Isaac Sim 仿真环境使用简介
0. 介绍
参考:
Isaac Sim 是 NVIDIA 开发的,基于 NVIDIA Omniverse 平台构建的,一个物理精确的虚拟环境,用于开发、测试和管理基于 AI 的机器人,它为构建虚拟机器人实验提供了基本功能,包括导入机器人模型以及仿真 RGB-D、激光雷达、接触、超声波和 IMU 等传感器。
Isaac Sim 使用 USD 交换文件格式来表示场景。通用场景描述(USD)是一种易于扩展的开源三维场景描述和文件格式。当然也支持从 URDF、Mujoco XML 文件导入。
*.usd/*.usdc: 一般的USD文件,以二进制存储与压缩,因此读取速率会快一些*.usda: 纯文本形式的USD文件,更方便阅读*.usdz: 以zip压缩文件形式存储的USD文件,可以将多个USD文件打包成一个*.drc: 其它自定义的文件格式
Isaac 是一个“专为机器人和AI打造的加速平台”。
在硬件层面它支持各种类型的硬件,比如RTX的GPU等等。在系统软件层面,依赖于RTX、CUDA、PhysX等框架。在平台层面,依赖于NVIDIA AI和NVIDIA Omniverse,最终就可以实现各类应用,比如机器人数据采集、环境仿真等等。甚至还有专门针对ROS提供的一些硬件加速的函数包,叫Isaac ROS。
1. Isaac Sim 的安装 - WorkStation 版
WorkStation 版相当于安装了一个独立的应用程序,适合便捷打开 GUI 界面调试,适合通过 GUI 和扩展的方式进行程序开发。如果想通过这种方式运行代码,需要使用安装目录的 isaac-sim.sh,限制了 python 环境的可能性,例如运行 test.py 文件需要:
1 | ~/isaacsim/isaac-sim.sh ~/path/test.py |
本文使用有显示器的服务器安装 Isaac Sim Workstation 演示,流程参考:https://docs.isaacsim.omniverse.nvidia.com/latest/installation/install_workstation.html
如果你使用无显示器的服务器,可以通过 Docker 安装,参考:https://docs.isaacsim.omniverse.nvidia.com/latest/installation/install_container.html
参考 Isaac Sim Requirements 查看系统是否满足要求。
- 系统:Ubuntu 20.04/22.04、Windows 10/11
- GPU:必须有 RT Cores,如 RTX 30 系、RTX 40 系
- NVIDIA 驱动:535.129.03 以上(2024 年 10 月要求,参考官网更新内容)
(1)下载 IsaacSim
打开 Isaac Sim Latest Release 网页:https://docs.isaacsim.omniverse.nvidia.com/latest/installation/download.html#isaac-sim-latest-release
下载第一行最新版的 Isaac Sim 4.5.0 压缩包。
1 | mkdir ~/isaacsim |
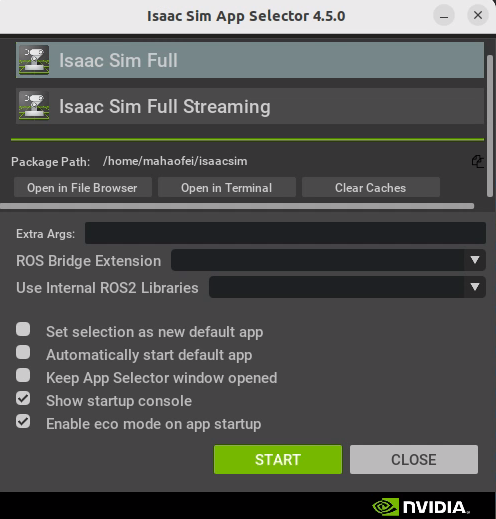
点击 Start 即可运行 Isaac Sim 主程序。
第一次运行会 warm up shader cache 可能会比较慢比较卡。
后续可以运行~/isaacsim/isaac-sim.sh启动
1. Isaac Sim 的安装 -Python 版
Python 版在创建的虚拟环境中直接安装 Isaac Sim,更容易和其他代码程序的依赖组合,个人认为更便于机器人开发。
本节参考:Isaac Sim Documents - Python Environment Installation
(1)创建虚拟环境
1 | conda create -n env_isaacsim python=3.10 |
(2)安装 Isaac Sim 包
首先更新 pip
1 | pip install --upgrade pip |
安装 Isaac Sim 完整版包
1 | pip install isaacsim[all]==4.5.0 --extra-index-url https://pypi.nvidia.com |
安装 Isaac Sim 缓存扩展
1 | pip install isaacsim[extscache]==4.5.0 --extra-index-url https://pypi.nvidia.com |
(3)示例
创建 python 程序如下:
1 | import isaacsim |
运行后效果为打开 Isaac Sim 窗口。
第一次运行会 warm up shader cache 可能会比较慢比较卡。
2. Isaac Sim GUI 基本使用
2.1 UI 界面
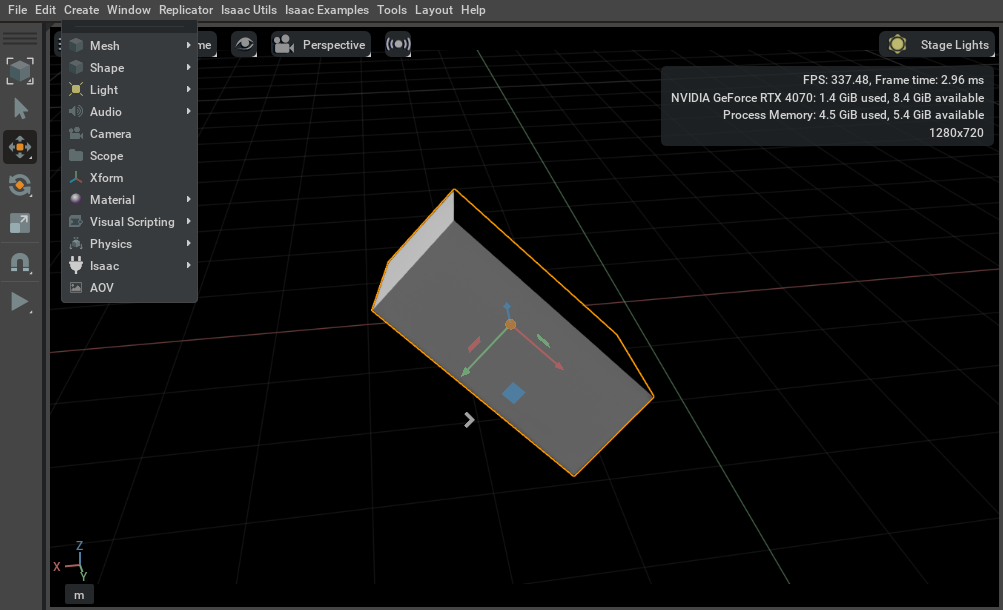
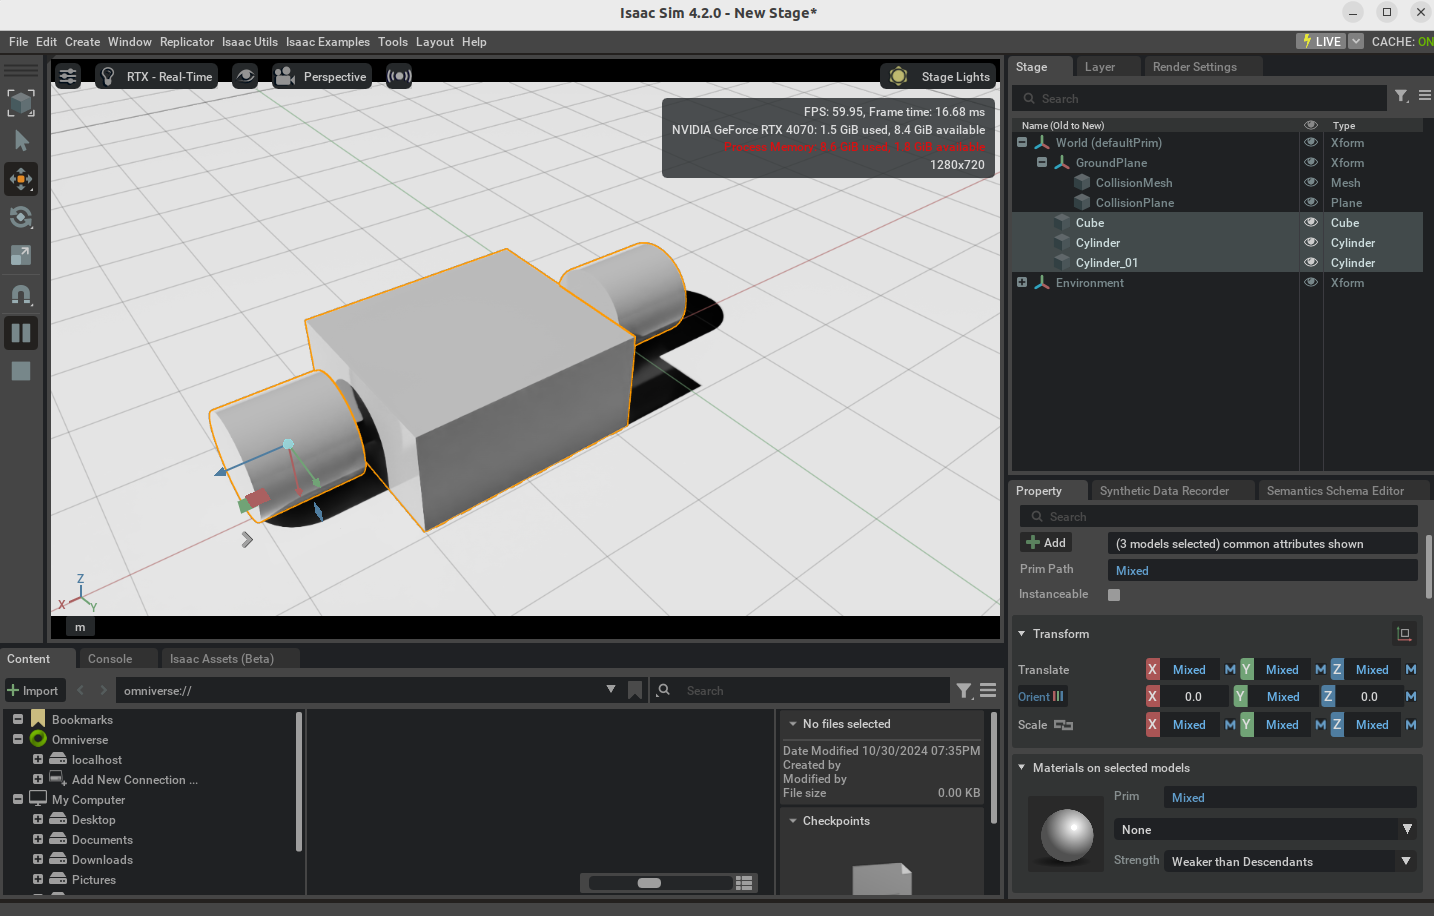
(1)添加并操作一个立方体
点击 Create->Shape->Cube 添加一个立方体:
- 选中立方体,拖动坐标轴移动立方体
- 按
E切换到旋转控制,调整立方体姿态,再按E切换到局部坐标系旋转控制 - 按
R切换到比例控制,调整立方体形状 - 按
W切换回位置控制,调整立方体位置,再按W切换到局部坐标系位置控制 - 按
Esc取消选中立方体
所有的操作都会在右下角的属性面板显示属性变化,也可以直接在右下角输入数值设置立方体参数。
(2)视角控制
F:相机居中并缩放到合适位置Alt+鼠标左键拖动:绕当前视角的中心旋转滚轮或Alt+鼠标右键拖动:缩放鼠标中间拖动:平移视角鼠标右键拖动:旋转视角
(3)Stage
在窗口右侧有一个 Stage 面板。
此时如果点击 Create->Xform 可以创建一个空坐标系。
可以将方块移动到坐标系内,此时移动坐标系,方块也会跟着移动,因为此时方块是 Xform 的子级,两者之间的变换关系不会因为移动 Xform 而变化。
(4)Property
窗口右下角是属性面板(Property),不同的单元(Xform, Shape, Light)都有着不同的属性数据格式,这是因为它们在 Issac Sim 中都是不同的数据类型。
2.2 环境设置
(1)重力
点击 Create->Physics->Physics Scene 添加 Physics Scene 到右侧的 Stage Tree 中。可以通过它的属性设置重力方向为 -Z 方向,大小为 9.8(默认为国际标准单位)
(2)地面
点击 Create->Physics->Ground Plane 添加地面。
(3)照明
每个创建的 Stage 都会有默认的光源。可以通过点击 Create->Light->Sphere Light 添加一个额外的光源。
- 在属性面板中,将其 Z 轴设为 7,回复 X,Y 的默认旋转为 0
- 在
Main中点击右侧的白色方块调整颜色 - 在
Main中点击Intensity修改光照强度为 1e6 - 在
Shaping中点击cone:angle将光照范围限制为 45 度,点击cone:angle设置边缘柔滑为 0.05。 - 为了使新的聚光灯更容易看到,打开默认光源的属性,设置其强度
Main->Intensity为 300。
效果如下:

2.3 添加物体
(1)向场景中添加形状
- 点击
Create->Shapes->Cube创建立方体 - 选中立方体并将其提到地面以上
- 点击左侧的
Scale按钮,或按R键,激活缩放小部件,调整立方体形状 - 在右下角属性中的
Transform->translate中设置物体的位置
同样,我们可以将其中加入其它形状。
(2)添加物理属性
- 选中所有的物体,在属性选项卡中,点击
+ Add,选择Physics->Rigid Body with Colliders Preset,设置三个形状的物理属性都是带有碰撞的刚体 - 点击
Play三个物体都会掉落到地面上 - 查看右下角属性,往下滚能看到
Rigid Body和Collider,可以点击这两个 APIs 的右上角x删除属性
(3)添加接触和摩擦
- 点击
Create->Physics->Physics Material,选择Rigid Body Materials创建新的物理材质,可以在右侧的 Stage 栏中看到 - 选中该材质,在下方的属性选项卡中可以调整摩擦系数、密度等等。
- 选中任意物体,在属性选项卡中找到
Physics materials on selected models,设置零件的材质。
(4)添加外观
刚才添加的是物理材质,但是实际上物体没有颜色反光属性(可以通过关闭光源查看),需要为物体创建外观
- 点击
Create->Materials->OmniPBR - 选中任意物体,在属性选项卡中找到
Materials on selected models,设置零件的外观。 - 可以修改外观的属性中的
Material and Shader->Shader->Albedo修改基础颜色,或修改反射率、粗糙度等查看变化
2.4 保存和加载场景,引用机器人
Isaac 使用 USD 格式作为所有的场景格式。
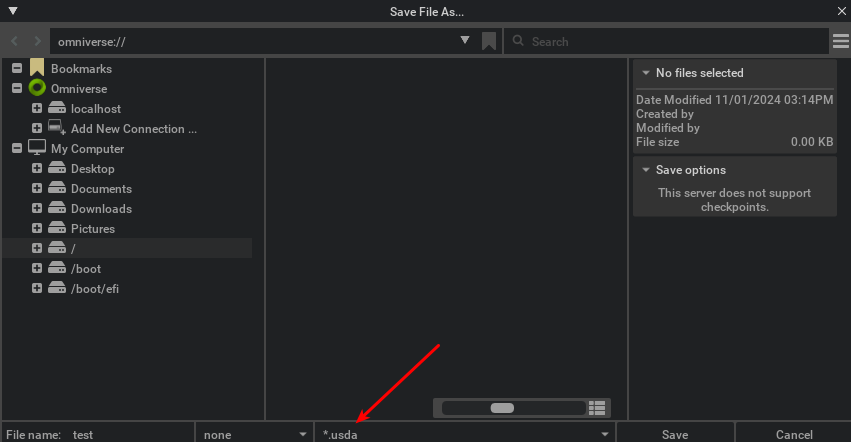
(1)保存场景
点击 File->Save As... 将当前场景保存为新 USD 文件。(如果点击 Save Flattened As 则是将所有组件保存到同一个 mesh 中)
可以选择 .usd 格式(二进制),.usda(人类可阅读格式)。
(2)加载场景
- 点击
Files->Open打开 USD 文件直接编辑。 - 点击
Files->Add Reference将 USD 文件作为引用添加,无法直接编辑。(直接将文件拖入到文件窗口也是以引用方式添加)
(3)引用文件添加的注意事项
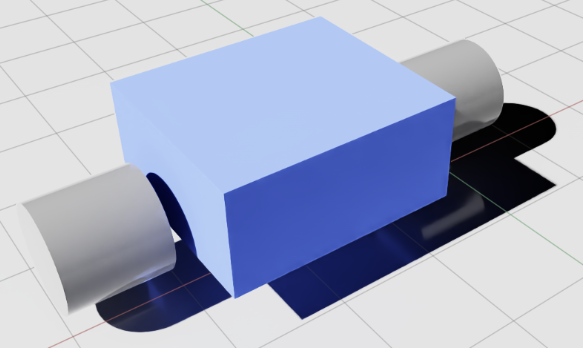
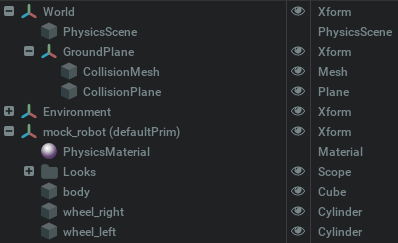
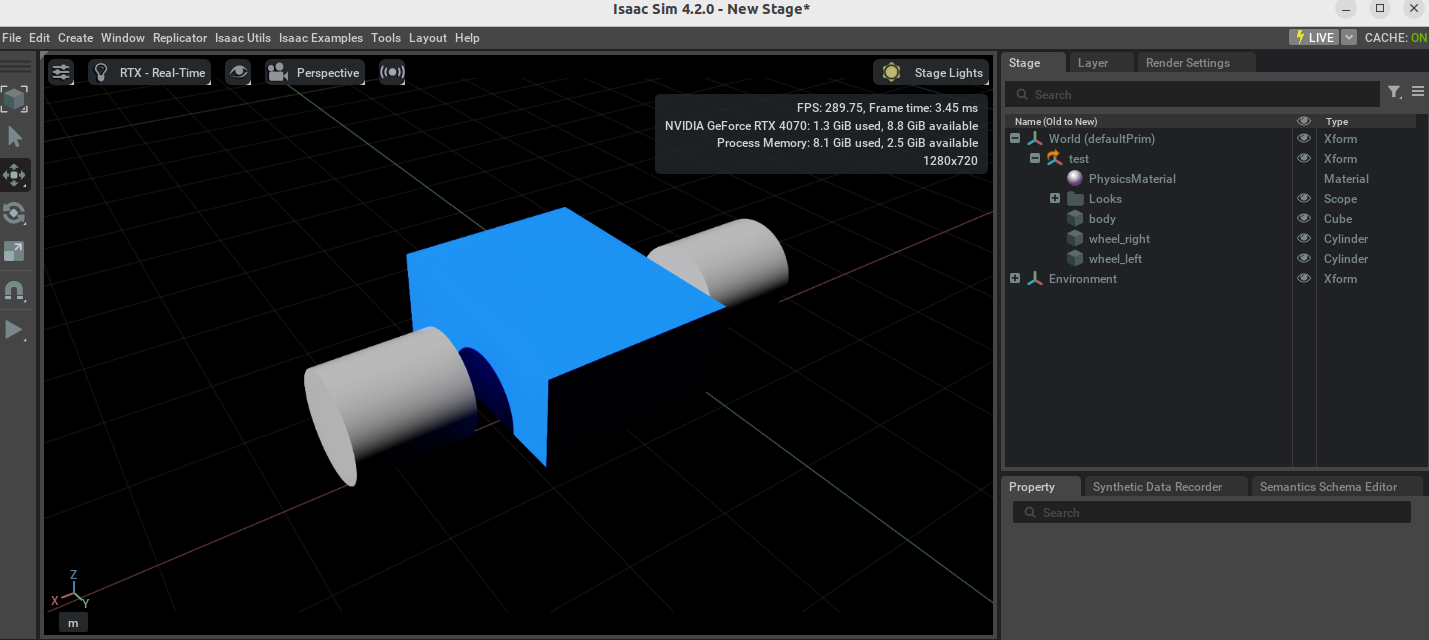
引用的文件最好将所有刚体排列成有意义的分层结构,以前面场景中的物体为例,将其视为两轮小车:
File->Open打开刚才保存的 USD 文件- 在 Stage 中右键创建一个
Xform,双击将其重命名为mock_robot,并将其拖动到空白位置,使其和World以及Environment同级,右键设置为默认坐标系Set as Default Prim - 重命名
Cube为body,两个Cylinder分别为wheel_left, wheel_right,将刚刚创建的刚体(cube, Cylinder),以及 Physics Material 和 Looks 都拖到mock_robot坐标系下 - 保存文件
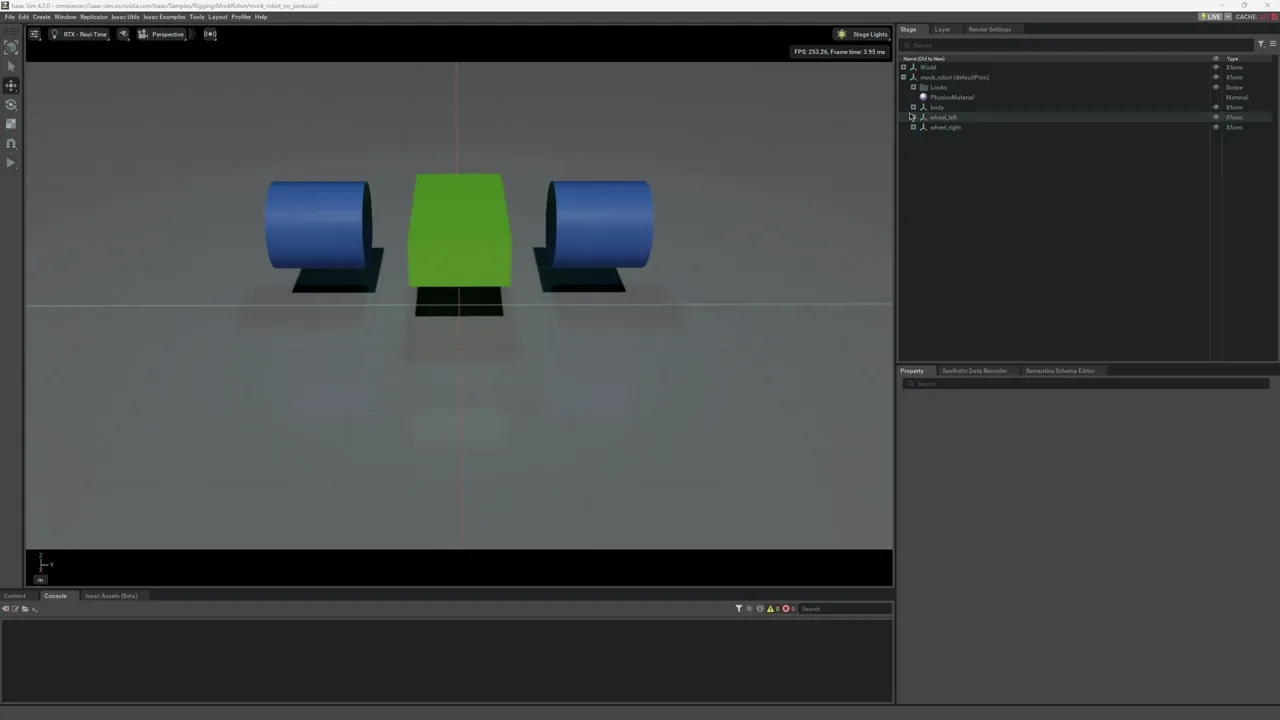
新建一个文件,点击 File->Add Reference,可以看到只有机器人被添加进来
2.5 关节配置
使用 File->Open 打开刚才的文件(最好和图中的一样,后面要添加关节)
(1)添加关节
- 点击
Create->Scope创建一个Scope来存储关节,重命名为joints。 - 创建关节时:先点击父实体,再点击子实体,然后点击
Create->Physics->Joint->Revolute Joint创建一个旋转关节。 - 检查关节的属性面板中,
body0是父实体(如 body),body1是子实体(如 wheel_right)。 - 在属性面板的
Revolute Joint中将旋转轴更改为Y/Z,根据模型的情况。 - 将创建的 joint 重命名为
joint_wheel_right并拖动到joints的 scope 中 - 重复 2-5 步添加另一个关节
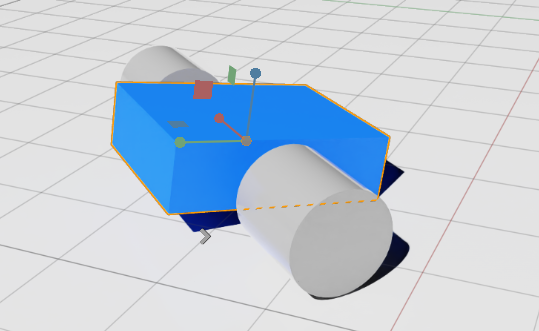
点击运行,可以观察到机器人落到了地面,按住 shift 拖动方块,可以发现两个圆柱旋转带动机器人在地面上滚动。
(2)添加关节驱动器
为了能够更好地控制关节,必须添加关节驱动器(位置控制或速度控制)实现驱动。
添加方法:选中关节,点击属性选项卡的 +Add 按钮,选择 Physics->Angular Drive 向关节添加驱动,可以在属性面板下滑找到 Drive 以设置属性。
- 位置控制:设置高刚度和零阻尼
- 速度控制:设置高阻尼和零刚度
对于该轮子来说,可以设置高阻尼如 Damping=1e4,目标速度可以设为 Target Velocity=200,点击播放可以看到机器人运动。
(3)添加 Articulation 关节
Articulation 是 Issac 中的另一种关节,与 joint 不同之处在于,它是由一系列 joint 组成的关节组。
添加方法:选择机器人的基坐标系 mock_robot,在属性选项卡中点击 +Add,添加 Physics->Articulation Root
这样就添加完成了。
(4)添加控制器
这部分主要是用来测试。
点击 Issac Utils->Common Omnigraphs->Articulation Velocity Control 添加一个速度控制图表。
Robot Prim 选择机器人基坐标系 mock_robot
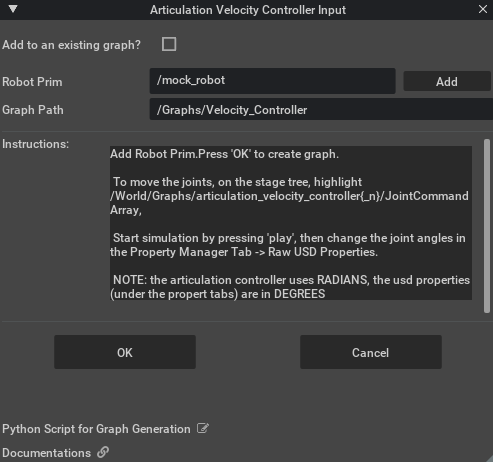
点击 Stage 中的 Graphs->Velocity_Controller->JointCommandArray,修改 Input0 和 Input1,例如设置成相反数让机器人差速原地转,点击播放看效果。
2.5 添加相机和传感器
(1)创建相机
点击 Create->Camera,会在 Stage 栏中创建一个 camera,同时界面中会出现一个灰色框,代表相机视图。
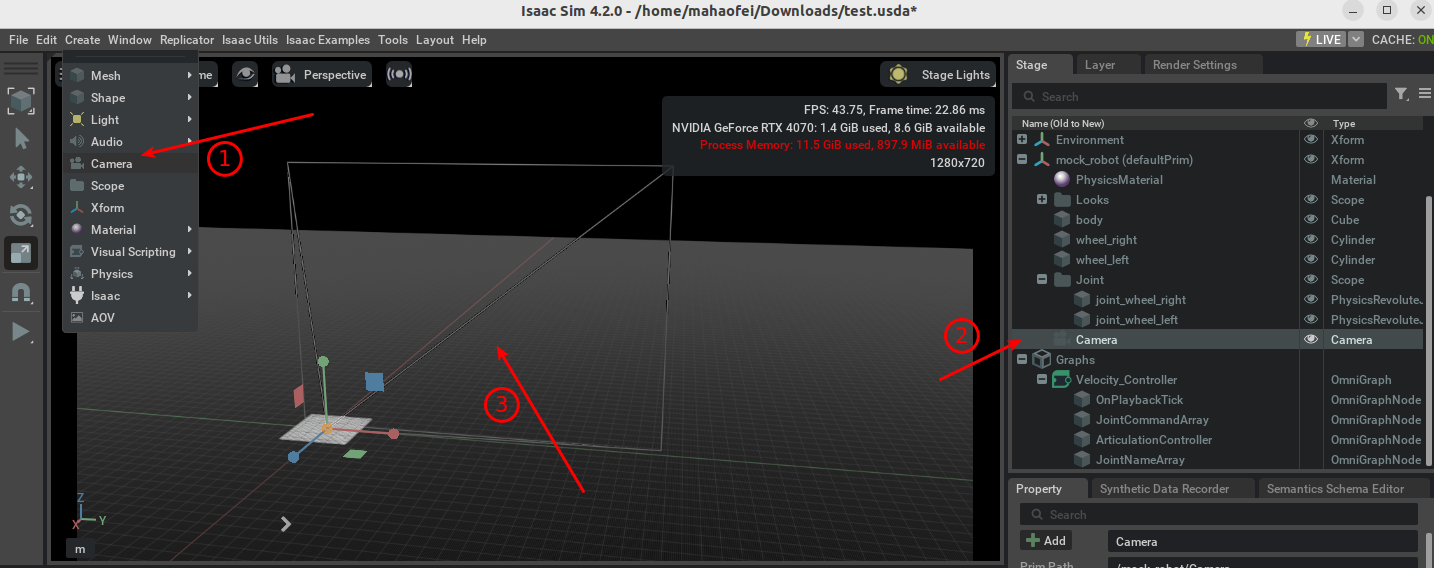
可以像正常的刚体一样调整相机的位置。
(2)相机扩展
相机扩展可以实现根据相机创建不同可视化视角,查看摄像头覆盖范围,获取和设计相机姿态。
可以点击 Issac Utils->Workflows->Camera Inspector 打开相机扩展
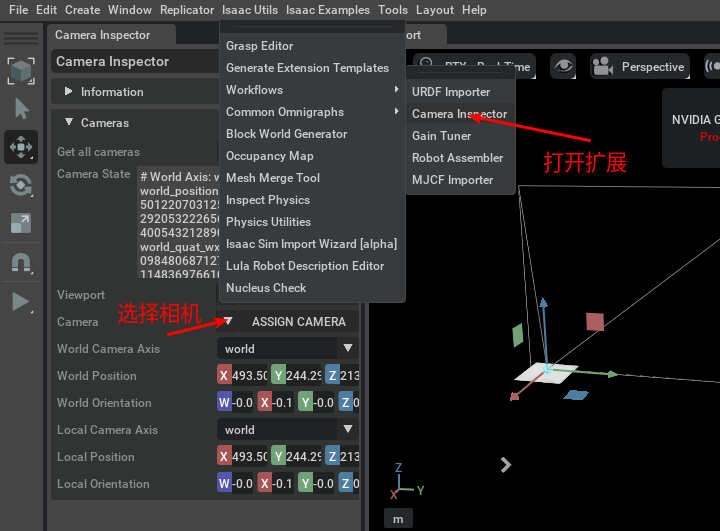
可以看到面板中有 Camera State 一栏,显示了相机的位置姿态,便于编写代码时查看。
(3)创建相机视角
点击面板中的 Create Viewport,可以创建相机视角的窗口,如下图所示:
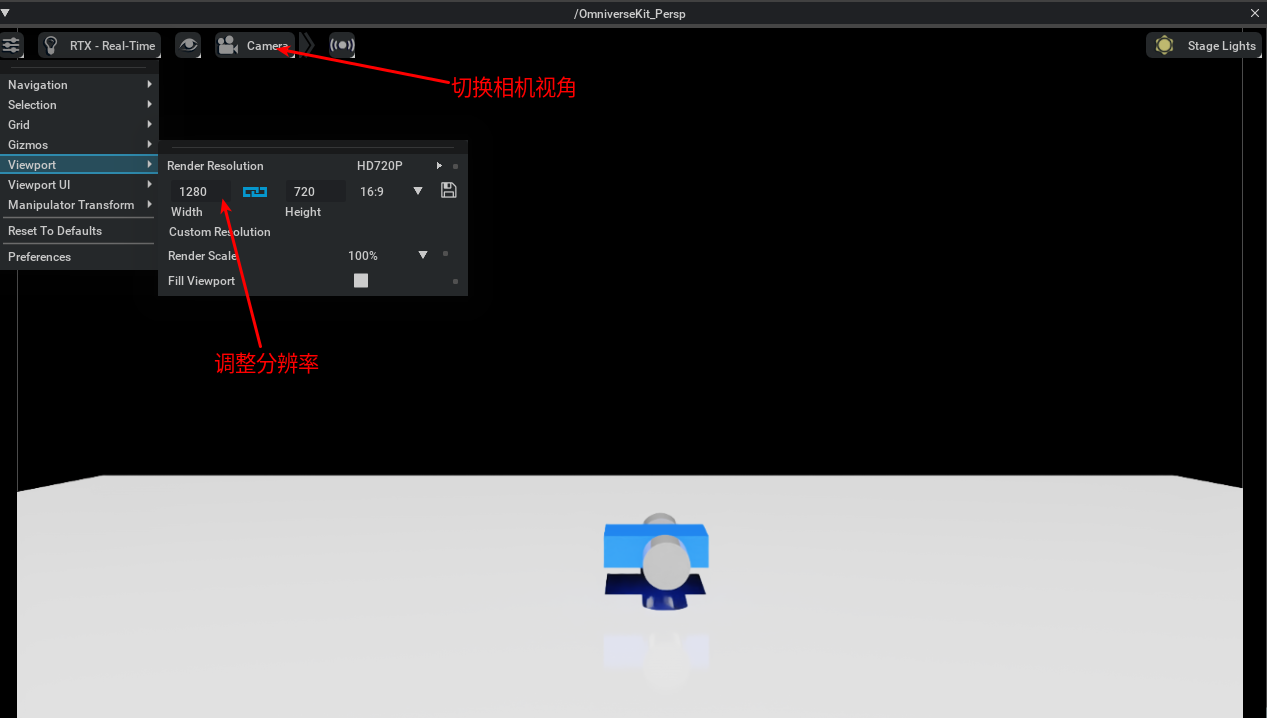
在该窗口中,点击左上角的菜单中的 Viewport 选项可以调整相机分辨率。
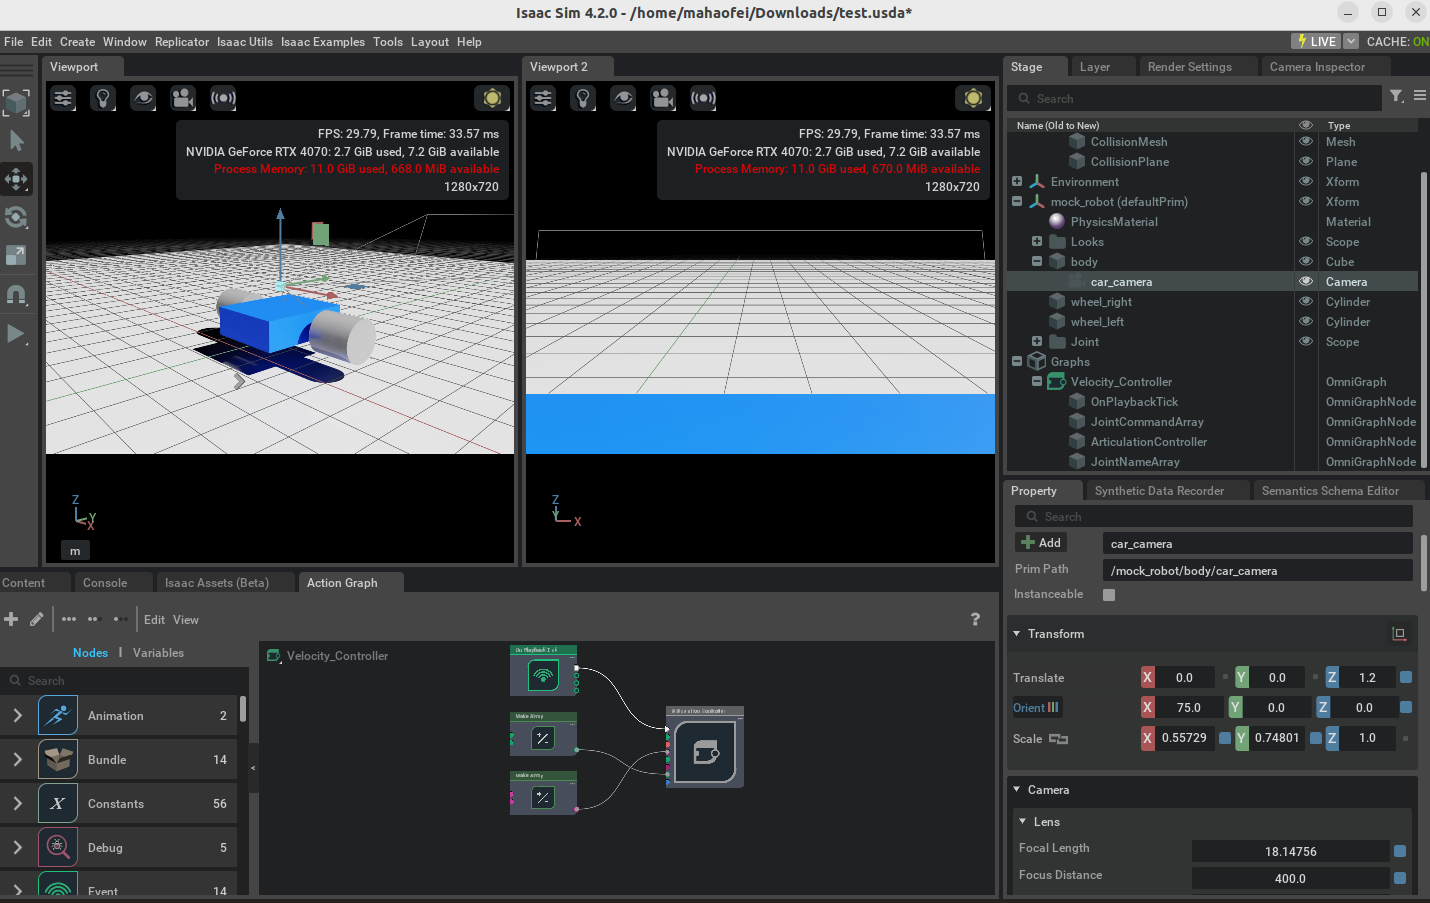
如果在仿真环境中移动相机位置,相机的状态属性等都会自动更新。
(4)将相机连接到机器人
例如现在需要添加一个车载摄像头,将其固定在 body 上,使其能够跟随 body 运动:
- 将新添加的摄像头重命名为
car_camera - 为了便于我们观察相机,可以点击
Window->Viewport启动Viewport2视窗,并点击上方的电影机按钮将其切换为car_camera的视角(注意选中 mock_robot,在视窗内按 f 可以帮助切换到中心画面) - 在右侧 stage 中将
car_camera拖动到body下方,将相机与机器人连接在一起 - 调整相机属性中的位置和方向,使其看向机器人前方地面,点击 Play 观察相机是否跟随机器人运动
4. Python 程序
4.1 独立 Python 程序的基本框架
Isaac Sim 仿真程序大概可以分成 Initialization 和 Simulation 两步骤,即首先初始化环境,创建世界和添加各种物体,然后是仿真的 Step 执行,示例代码如下:
1 | ################################################## |
4.2 独立 Python 程序控制移动机器人
1 | from isaacsim import SimulationApp |
4.x 常用 Python 程序及解释
(1)常规代码逻辑
simulation_app 的创建必须在所有 isaac sim 引用之前完成,启动 isaacsim 的仿真窗口。
1 | # 启动 Simulation APP |
Coming Soon …
 微信支付
微信支付 支付宝
支付宝