〇、基础知识
1.1 URDF
URDF是ROS中机器人模型的描述格式,包括机器人的外观、物理属性、关节类型等方面。
<robot>:最顶层标签<link>:描述刚提的外观形状、碰撞几何、颜色、惯性矩阵等<joint>:描述两个link之间的关系,有6种类型,最常用的是revolute类型,有关节位置限制的旋转关节
xacro模型可以将部分URDF打包成一个"类",在其他模型中调用。
功能包中一般包括以下四个部分
cfg:配置文件launch:加载urdf模型,并在rviz中展示meshes:urdf用到的外观模型urdf:urdf模型定义
1.2 Moveit控制
(1)Moveit!大致功能
最重要的节点是move_group,输入可以是RVIZ中的数据或点云和深度图。路径规划一般使用的OMPL库,碰撞检测使用FCL库。最后发送个机械臂让机械臂执行轨迹。
一、实验环境搭建
1.0 安装 ROS
参考Ubuntu20.04安装ROS Noetic 文章
![[01-Ubuntu20.04安装ROS Noetic#二、安装ROS]]
1.1 机器人Solidworks模型转URDF
本仿真实验使用大族E05机器人 和Robotiq 2f-85夹爪
该部分参考以下视频
首先下载机器人模型,并转换为URDF。
(1)安装sw_urdf_exporter插件
下载sw_urdf_exporter插件:http://wiki.ros.org/sw_urdf_exporter ,注意下载最新的就行,最新的也支持以前版本的Solidworks。
关闭 Solidworks。
运行 sw2urdfSetup.exe ,自行安装即可。
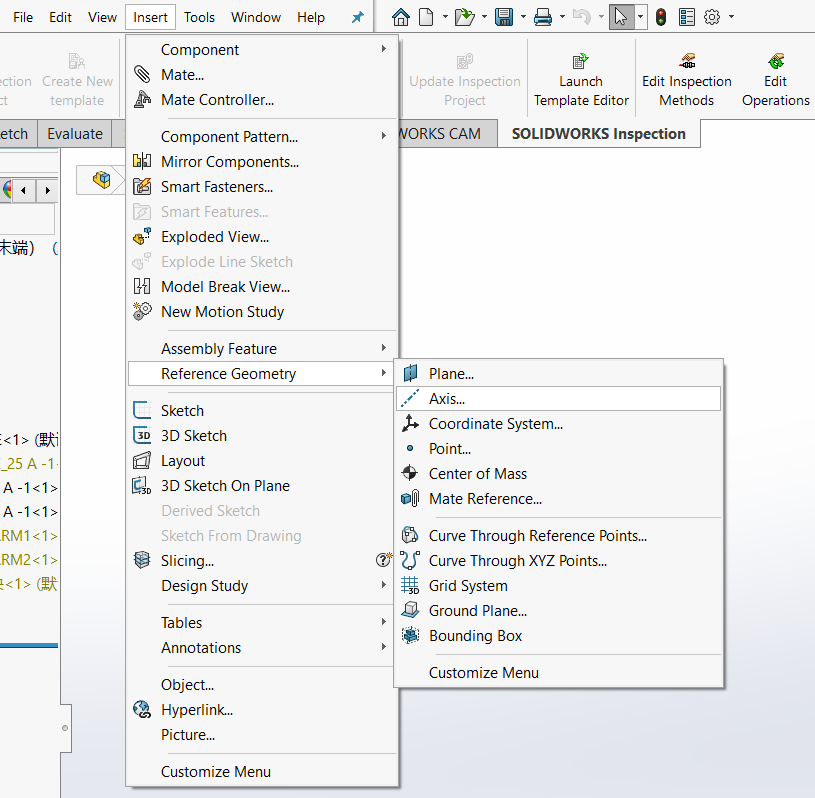
(2)为机器人添加基准轴(旋转轴)
以此选择六个圆柱面,确定六个旋转轴方向。
(3)导出URDF
查看是否有【工具-最下面File-Export as URDF】,如果有的话,直接点击打开,如果没有,则打开【工具-插件】,在最下面打开Sw2URDF插件的两个√。
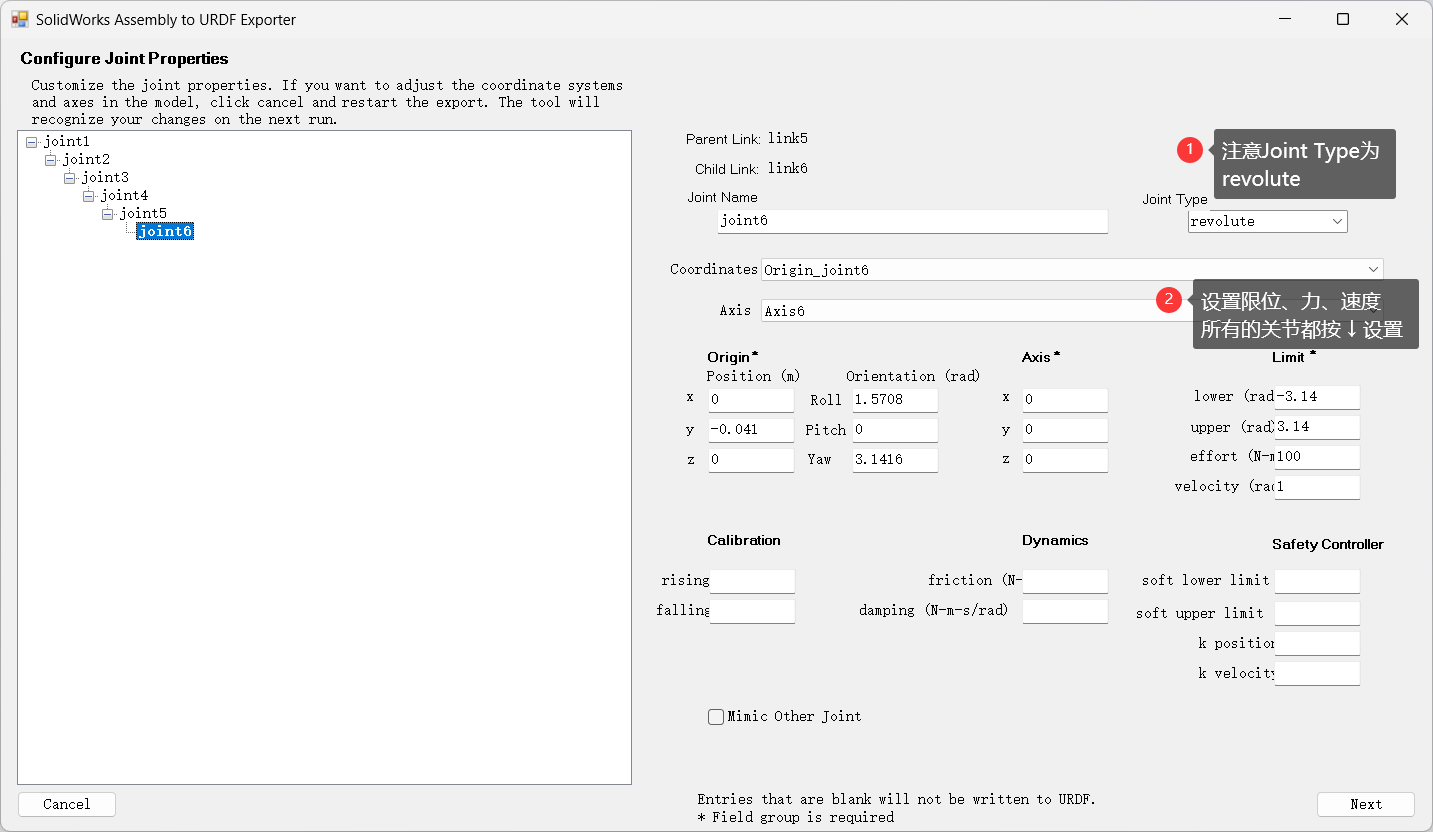
按照以下过程,创建base_link和link1-6
然后点击Preview and Export
然后点击Next和Export URDF and Mesh,它会将我们的URDF模型以功能包的形式保存到设置的位置。
注意创建完成后,一定要检查最后一个坐标系是否是在机器人末端连接法兰的中心,因为后续添加夹爪需要这个坐标系,如果不是,需要自己手动调整坐标系的位置,重新生成URDF
1.2 ROS中查看模型
创建一个工作空间
1
2
3
mkdir -p catkin_robot/src cd catkin_robot/src catkin_init_workspace
将功能包复制到src目录下
编译工作空间
运行测试程序
1 2 source devel/setup.bash roslaunch e05 display.launch
1.3 添加 Robotiq 2f-85 夹爪
(1)准备夹爪环境
进入工作空间的src目录
1 2 cd src git clone https://github.com/ros-industrial/robotiq.git
在自己的机械臂的功能包的urdf文件夹中,新建一个common.gazebo.xacro文件
1
2
cd src/e05/urdf gedit common.gazebo.xacro
添加以下内容
1 2 3 4 5 6 7 8 9 10 <?xml version="1.0" ?> <robot xmlns:xacro ="http://wiki.ros.org/xacro" > <gazebo > <plugin name ="ros_control" filename ="libgazebo_ros_control.so" > </plugin > </gazebo > </robot >
为了方便表示,我在e05.urdf最后添加了一个ee_link
1 2 3 4 5 6 7 8 9 10 11 12 13 14 15 16 17 <link name ="ee_link" > <visual > <origin xyz ="0 0 0" rpy ="0 0 0" /> <geometry > <sphere radius ="0.01" /> </geometry > <material name ="" > <color rgba ="1 0 0 1" /> </material > </visual > </link > <joint name ="ee_joint" type ="fixed" > <origin xyz ="0 0 0" rpy ="0 0 0" /> <parent link ="link6" /> <child link ="ee_link" /> </joint >
再新建一个xacro文件,(例如我的机械臂功能包名字为e05)
添加如下内容,注意修改Gazebo支持和E05机械臂部分自己的机械臂功能包名称,以及夹爪与机械臂连接部分的第一行的parent,我这里连接在了link6也就是末端上。
1 2 3 4 5 6 7 8 9 10 11 12 13 14 15 16 17 18 19 20 21 22 23 24 25 26 27 28 29 30 31 32 33 34 35 36 37 38 39 40 41 42 43 44 45 46 47 48 49 50 51 52 53 54 55 56 57 58 59 60 61 62 63 64 65 66 67 68 69 70 71 72 73 74 75 76 77 78 79 80 81 82 83 84 85 86 <?xml version="1.0" ?> <robot xmlns:xacro ="http://www.ros.org/wiki/xacro" name ="e05" > <xacro:arg name ="transmission_hw_interface" default ="hardware_interface/PositionJointInterface" /> <xacro:include filename ="$(find e05)/urdf/e05.urdf" /> <xacro:include filename ="$(find e05)/urdf/common.gazebo.xacro" /> <xacro:macro name ="transmission_block" params ="joint_name" > <transmission name ="tran1" > <type > transmission_interface/SimpleTransmission</type > <joint name ="${joint_name}" > <hardwareInterface > hardware_interface/PositionJointInterface</hardwareInterface > </joint > <actuator name ="motor1" > <hardwareInterface > hardware_interface/PositionJointInterface</hardwareInterface > <mechanicalReduction > 1</mechanicalReduction > </actuator > </transmission > </xacro:macro > <xacro:transmission_block joint_name ="joint1" /> <xacro:transmission_block joint_name ="joint2" /> <xacro:transmission_block joint_name ="joint3" /> <xacro:transmission_block joint_name ="joint4" /> <xacro:transmission_block joint_name ="joint5" /> <xacro:transmission_block joint_name ="joint6" /> <link name ="world" /> <joint name ="world_joint" type ="fixed" > <parent link ="world" /> <child link = "base_link" /> <origin xyz ="0.0 0.0 0" rpy ="0.0 0.0 0.0" /> </joint > <xacro:include filename ="$(find robotiq_2f_85_gripper_visualization)/urdf/robotiq_arg2f_85_macro.xacro" /> <xacro:include filename ="$(find robotiq_85_description)/urdf/robotiq_85_gripper.urdf.xacro" /> <gazebo > <plugin name ="gazebo_grasp_fix" filename ="libgazebo_grasp_fix.so" > <arm > <arm_name > ur5_gripper</arm_name > <palm_link > link6</palm_link > <gripper_link > gripper_finger1_finger_tip_link</gripper_link > <gripper_link > gripper_finger2_finger_tip_link</gripper_link > <gripper_link > gripper_finger2_knuckle_link</gripper_link > <gripper_link > gripper_finger1_knuckle_link</gripper_link > <gripper_link > gripper_finger1_inner_knuckle_link</gripper_link > <gripper_link > gripper_finger2_inner_knuckle_link</gripper_link > </arm > <forces_angle_tolerance > 150</forces_angle_tolerance > <update_rate > 130</update_rate > <grip_count_threshold > 2</grip_count_threshold > <max_grip_count > 8</max_grip_count > <release_tolerance > 0.005</release_tolerance > <disable_collisions_on_attach > true</disable_collisions_on_attach > <contact_topic > __default_topic__</contact_topic > </plugin > </gazebo > <xacro:robotiq_85_gripper prefix ="" parent ="ee_link" > <origin xyz ="0 0 0" rpy ="0 ${-pi/2} 0" /> </xacro:robotiq_85_gripper > </robot >
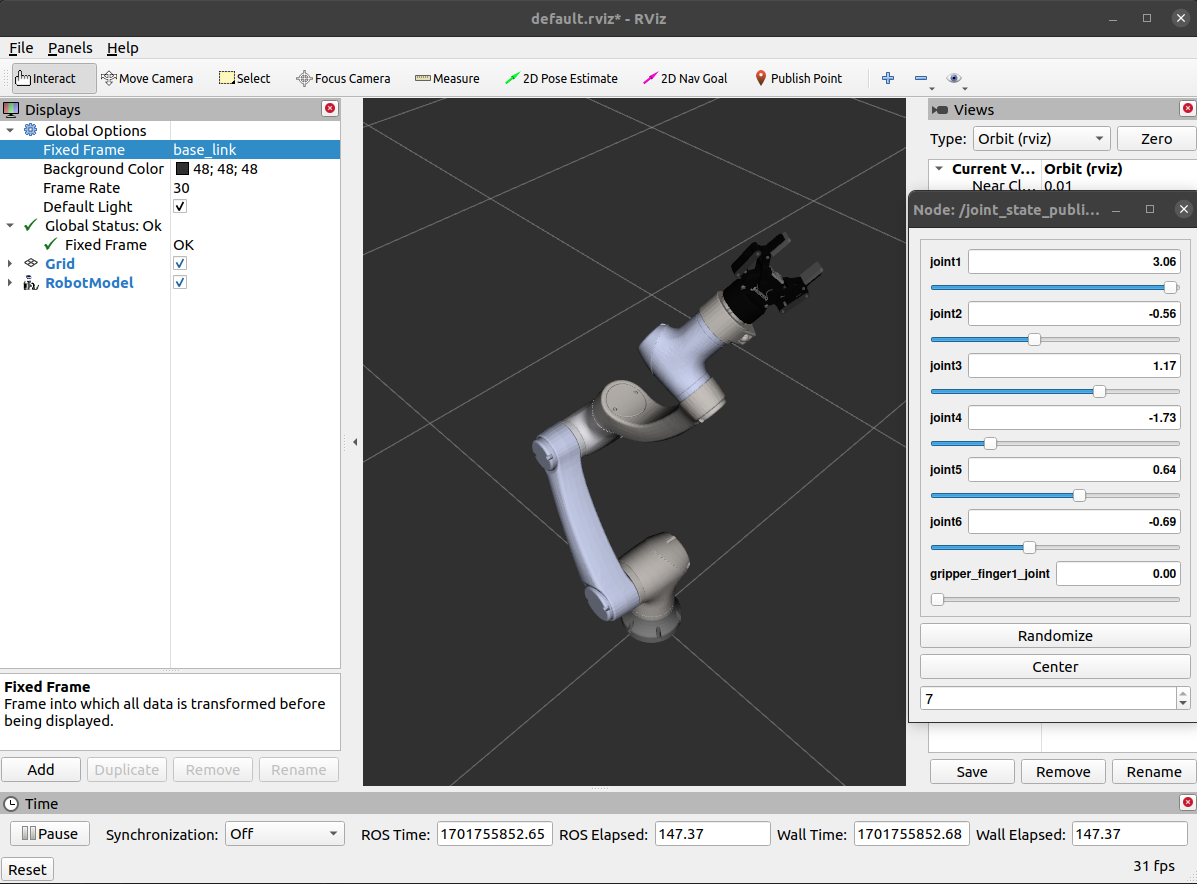
修改原来的launch文件,这里我为了后续方便,将原来的display.launch重命名了display_e05_with_gripper.launch,这里主要修改<param name="robot_description" command="$(find xacro)/xacro '$(find e05)/urdf/e05.xacro'" /> 这一行,添加刚刚创建的xacro文件。
1 2 3 4 5 6 7 8 <launch > <arg name ="model" /> <param name ="robot_description" command ="$(find xacro)/xacro '$(find e05)/urdf/e05.xacro'" /> <node name ="joint_state_publisher_gui" pkg ="joint_state_publisher_gui" type ="joint_state_publisher_gui" /> <node name ="robot_state_publisher" pkg ="robot_state_publisher" type ="robot_state_publisher" /> <node name ="rviz" pkg ="rviz" type ="rviz" args ="-d $(find e05)/urdf.rviz" /> </launch >
(2)Rviz中查看机器人
1
2
3
4
cd catkin_motion catkin_make source devel/setup.bash roslaunch e05 display_e05_with_gripper.launch
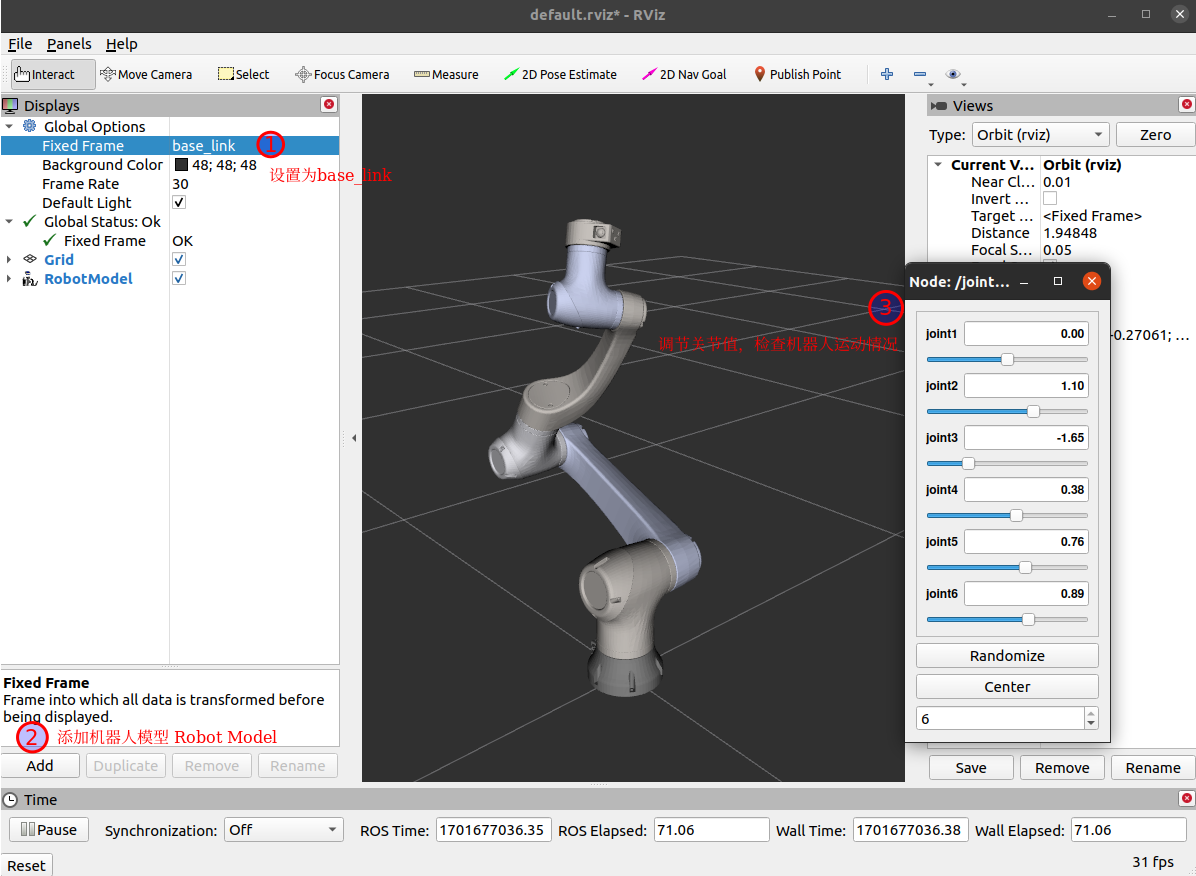
左下角Add,添加机器人模型RobotModel。
左侧Fixed Frame选择base_link,即可看到机器人了。
(3)Gazebo中查看机器人
创建一个gazebo_e05_with_gripper.launch文件,内容参考如下:
1 2 3 4 5 6 7 8 9 10 11 12 13 14 15 16 17 18 19 20 21 22 23 24 <launch > <arg name ="gui" default ="true" doc ="Starts gazebo gui" /> <arg name ="paused" default ="false" doc ="Starts gazebo in paused mode" /> <include file ="$(find gazebo_ros)/launch/empty_world.launch" > <arg name ="world_name" default ="$(find gazebo_ros)/launch/empty_world.world" /> <arg name ="paused" value ="$(arg paused)" /> <arg name ="gui" value ="$(arg gui)" /> </include > <node name ="tf_footprint_base" pkg ="tf" type ="static_transform_publisher" args ="0 0 0 0 0 0 base_link base_footprint 40" /> <include file ="$(find e05)/launch/display_e05_with_gripper.launch" /> <node name ="spawn_gazebo_model" pkg ="gazebo_ros" type ="spawn_model" args ="-urdf -param robot_description -model robot -z 0" respawn ="false" output ="screen" /> <node name ="fake_joint_calibration" pkg ="rostopic" type ="rostopic" args ="pub /calibrated std_msgs/Bool true" /> </launch >
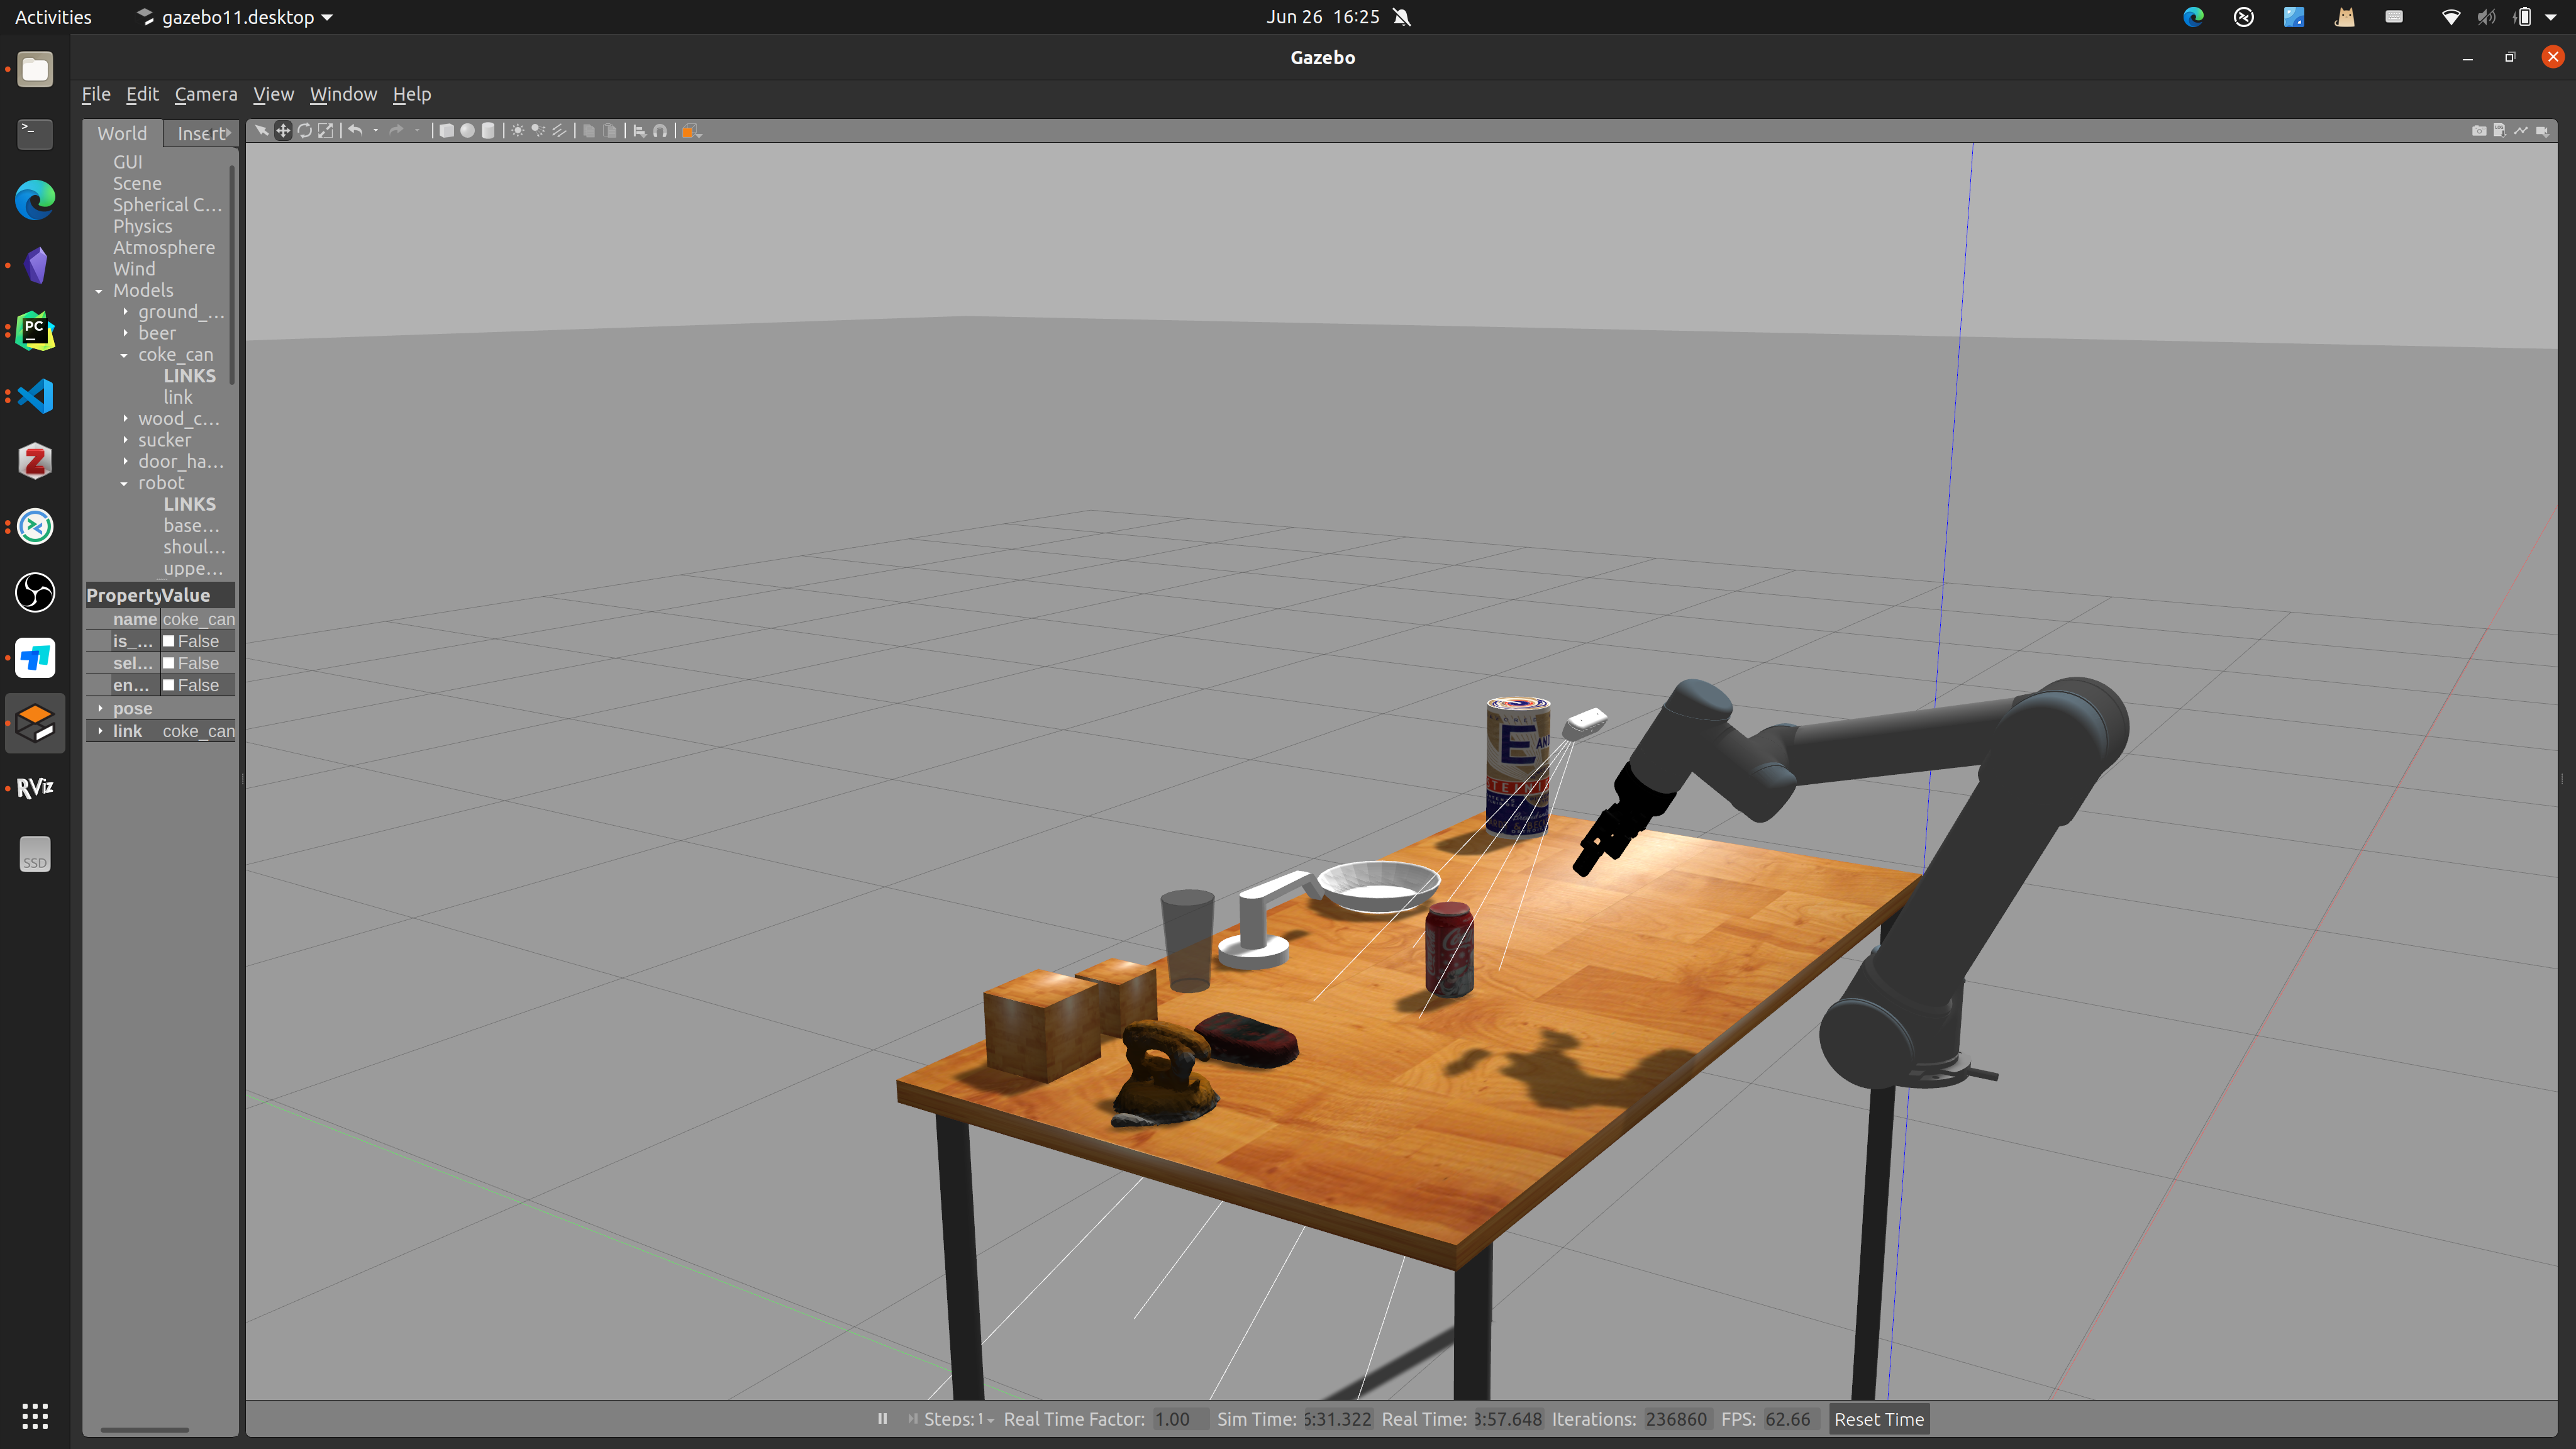
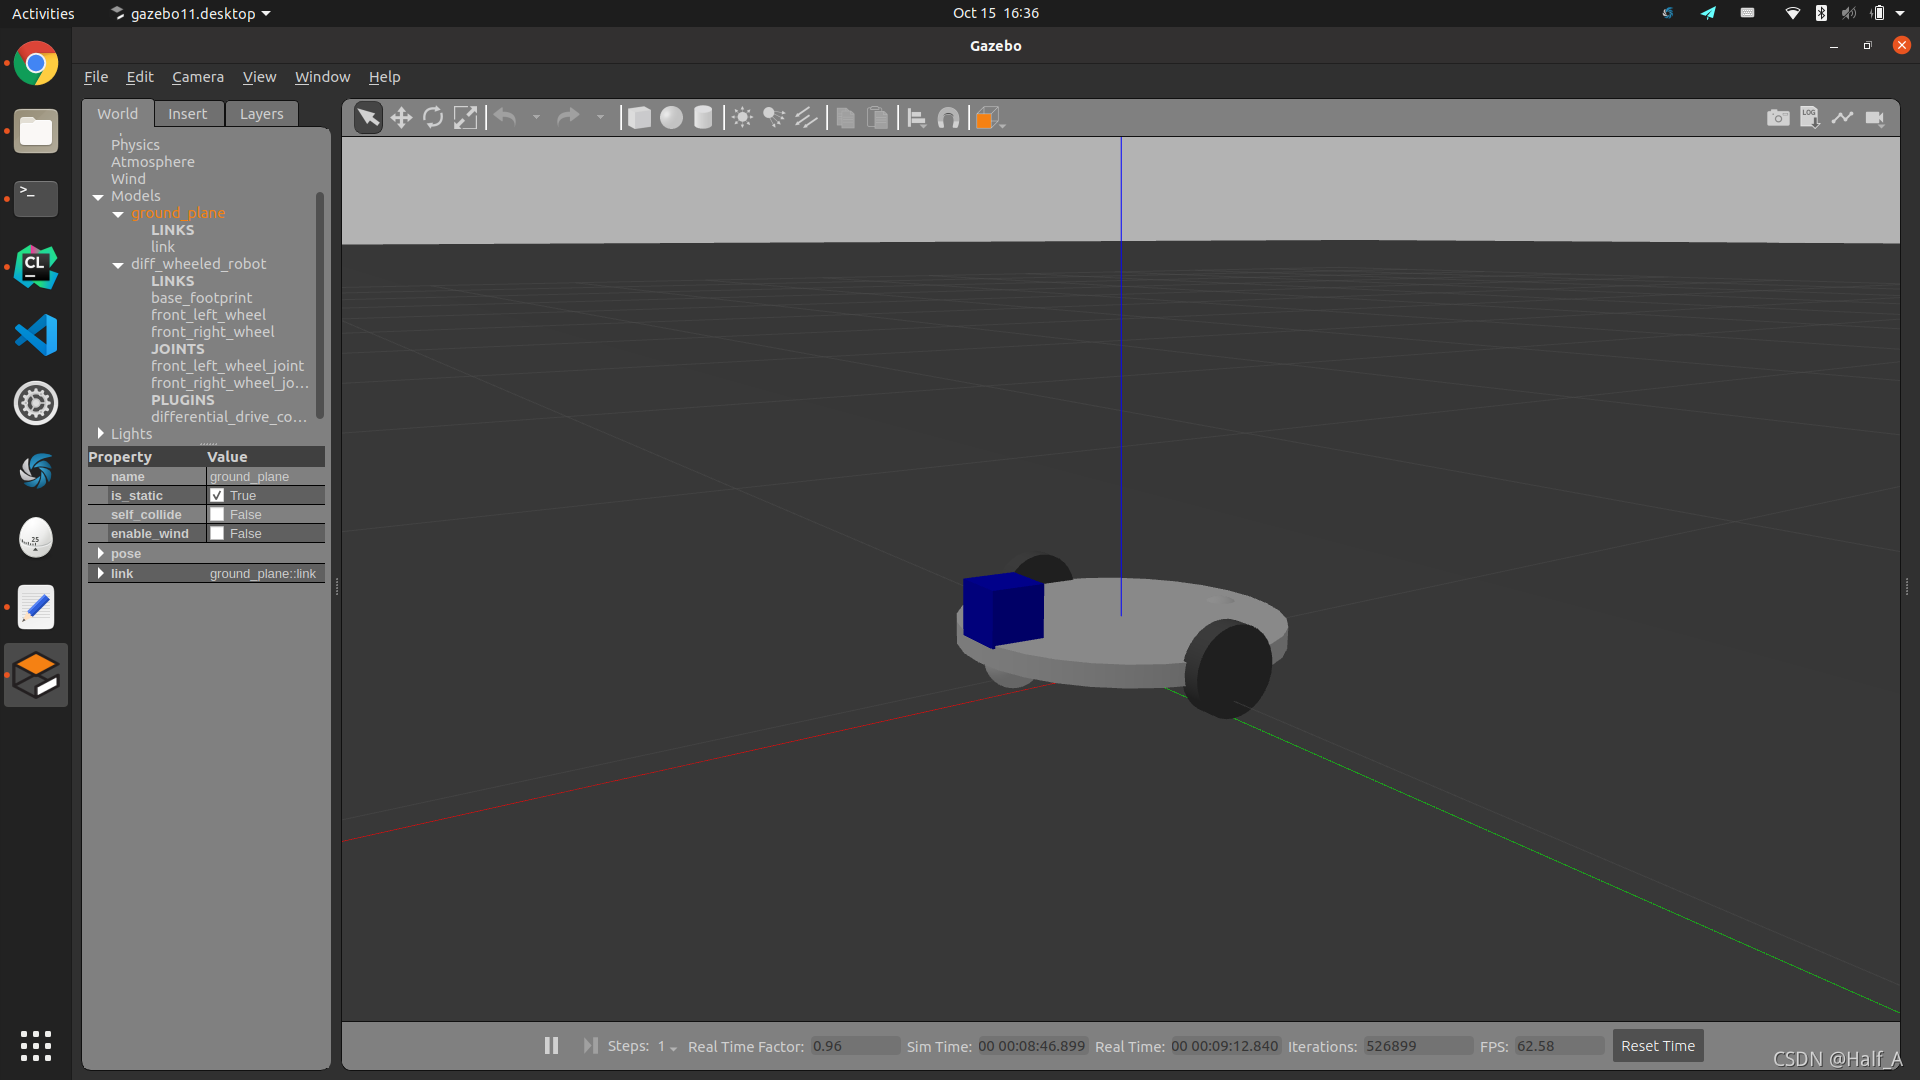
此时启动launch文件,可以看到gazebo环境中机器人。
1.4 创建MoveIt驱动
此部分参考该文章 。
安装moveit
1
2
3
sudo apt install ros-noetic-moveit sudo apt install ros-noetic-object-recognition-msgs ros-noetic-soem* ros-noetic-socketcan-* sudo apt install ros-noetic-moveit*
启动moveit设置助手
1 rosrun moveit_setup_assistant moveit_setup_assistant
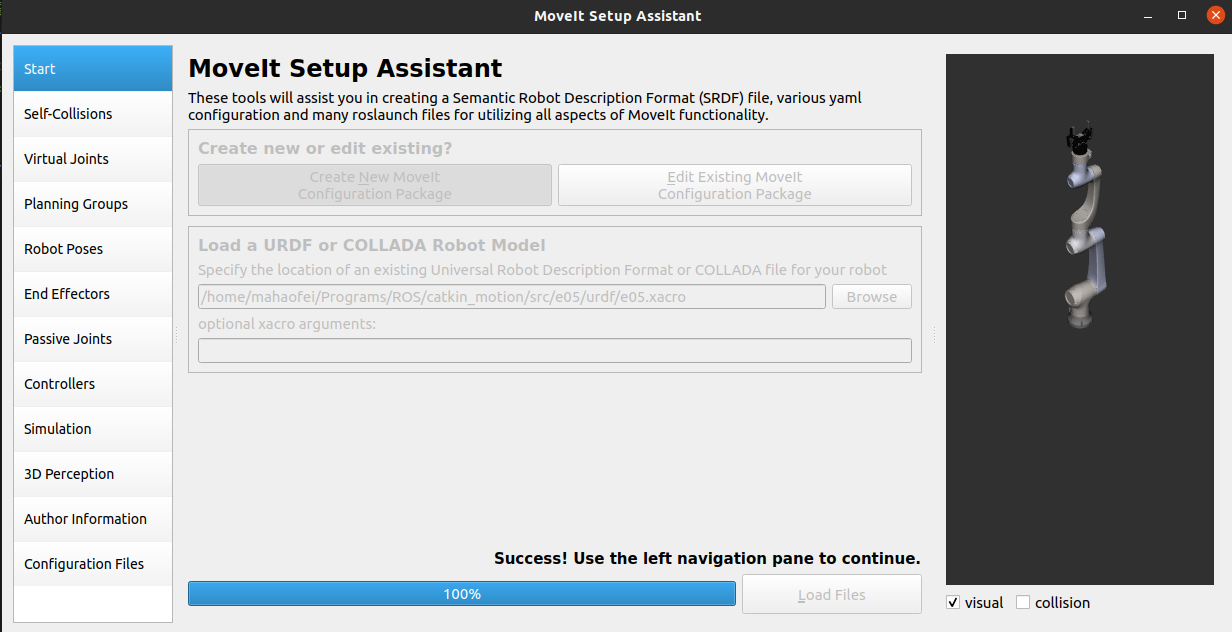
选择Create New Moveit Configuration Package,选择自己的e05.xacro文件,点击Load Files
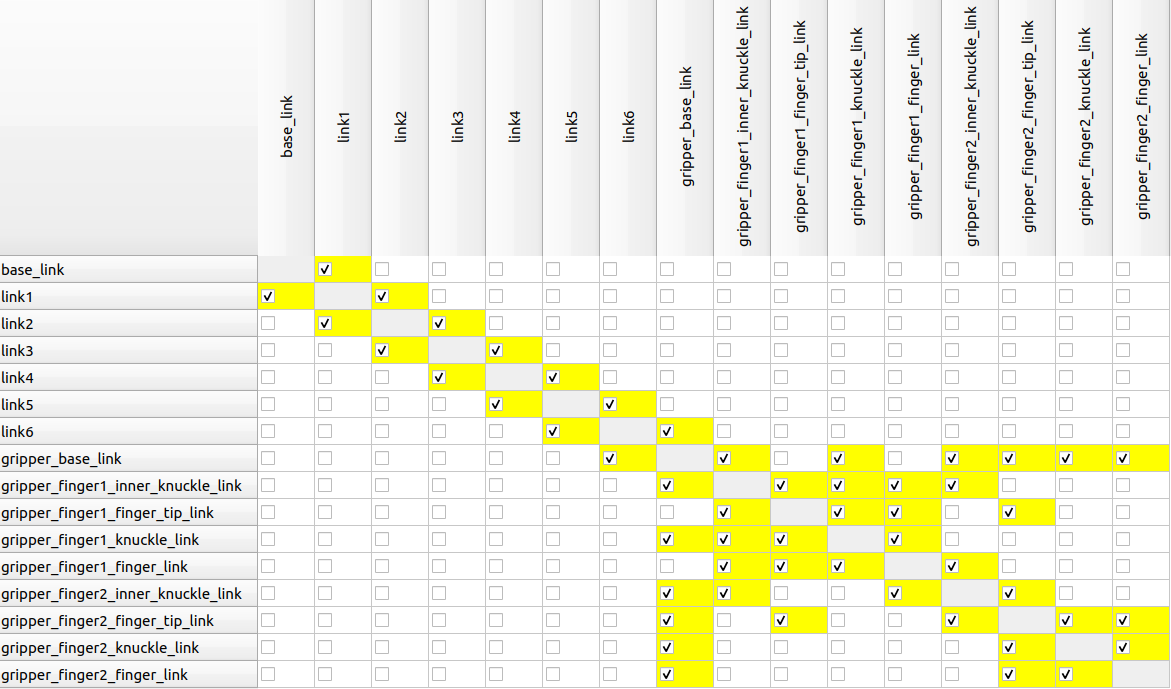
左侧第二个的Self-Collisions是检查碰撞,一定将所有有可能发生碰撞的都勾选上,不然后续会出错。
第三个Virtual Joints一般也不需要。
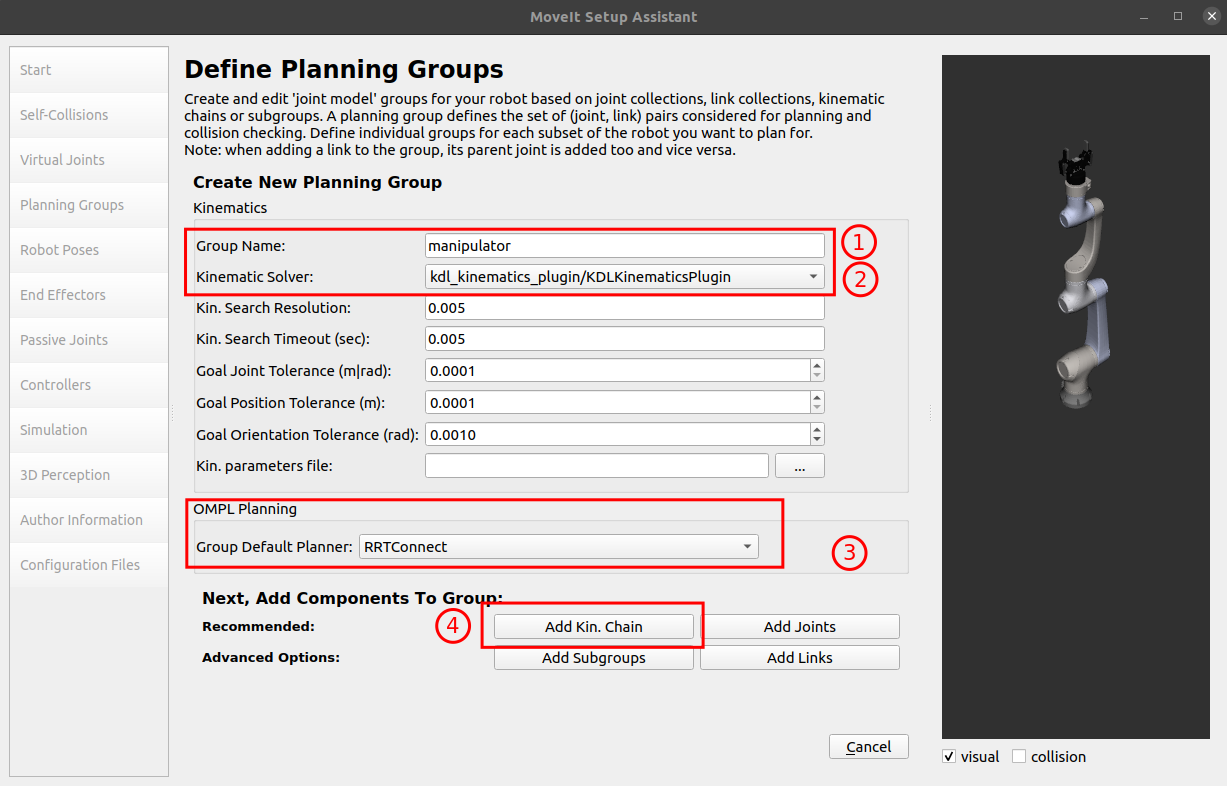
第四个Planning Groups是最重要的,我们需要设置,点击Add Group,分别配置机器人和末端夹爪。
机械臂:
Group Name一般填manipulator就行
运动学求解器,选择kdl
路径规划算法,默认选择RRT Star就行
点击Add Kin. Chain,Baselink选择 base_link,Tiplink选择ee_link
末端夹爪的Group Name填上gripper,其它的都不用选。
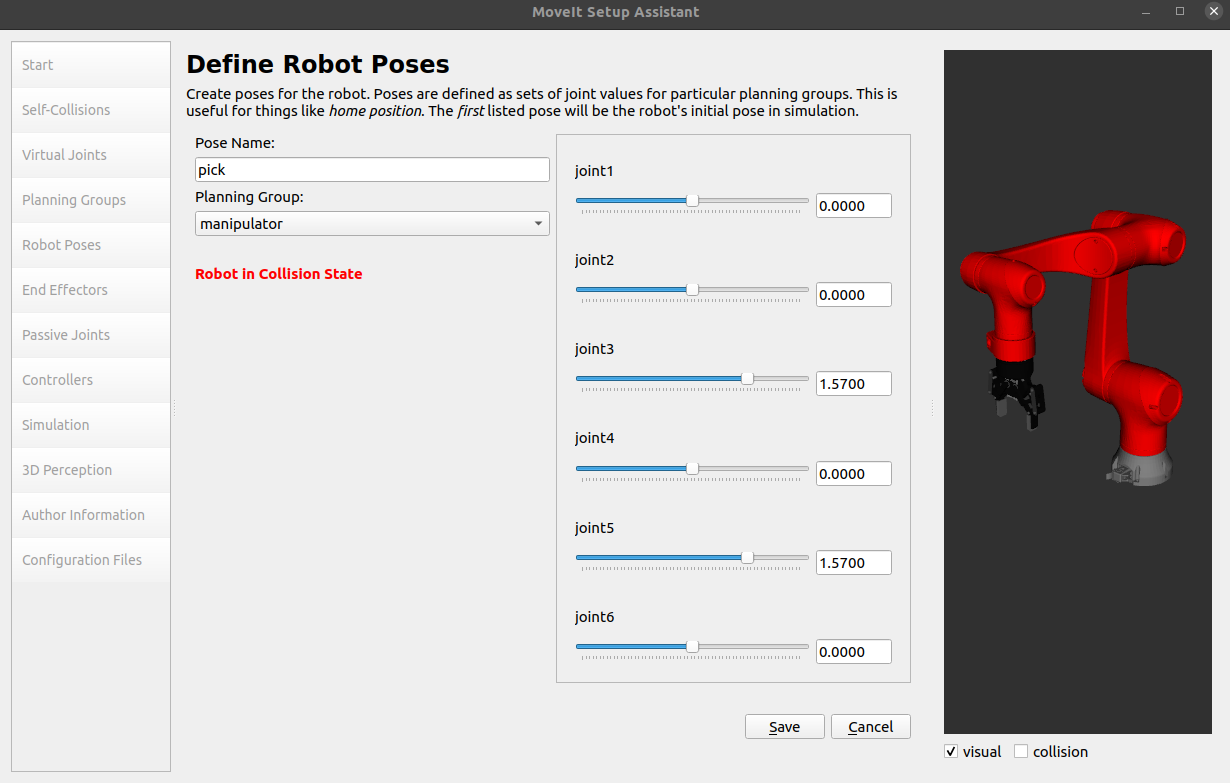
第五个Robot Poses可以添加一些常用位置,便于我们快速使机器人运动到这些位置,例如
up:机器人初始的竖直向上
pick:机器人准备夹取
open:夹爪打开
close:夹爪关闭
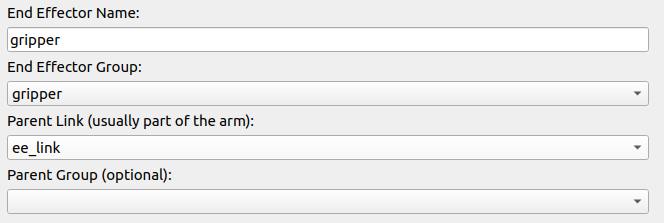
第六个End Effectors,按下图设置就行
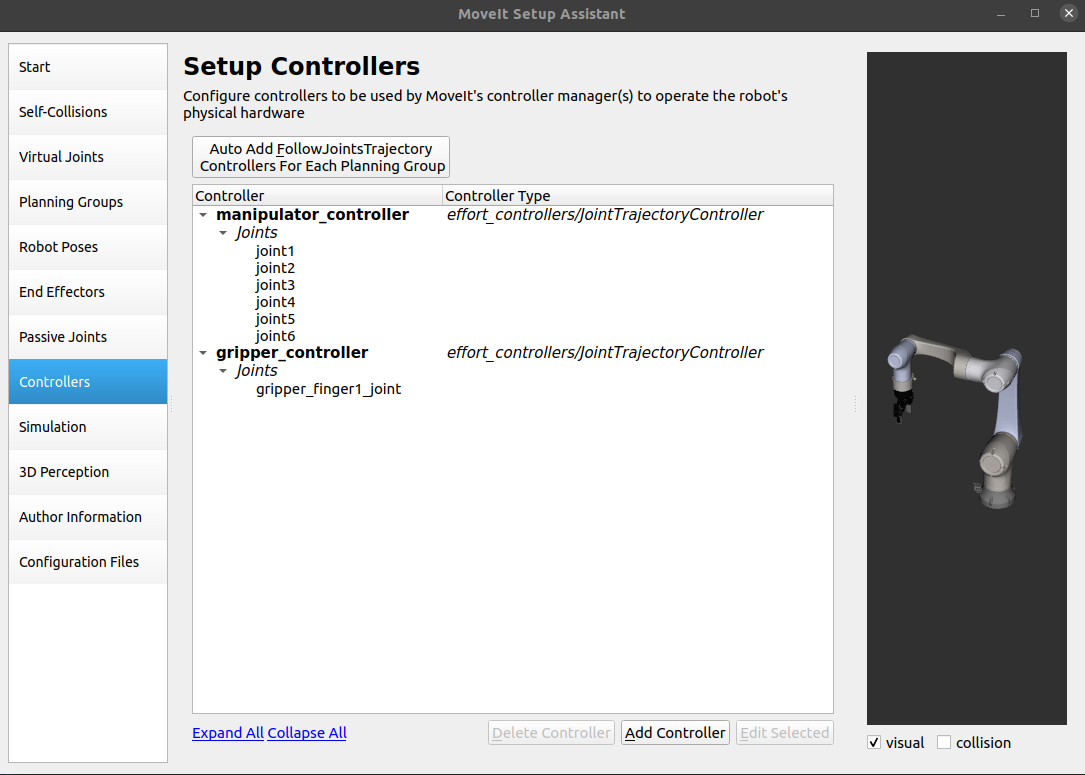
点击Controllers,点击左上角自动生成
点击倒数第二个Author Information,填写名字和邮箱,不一定是真实的,但是不填无法生成功能包
最后Generate Package就可以了(在src目录下新建一个e05_moveit文件夹,选择此文件夹生成)
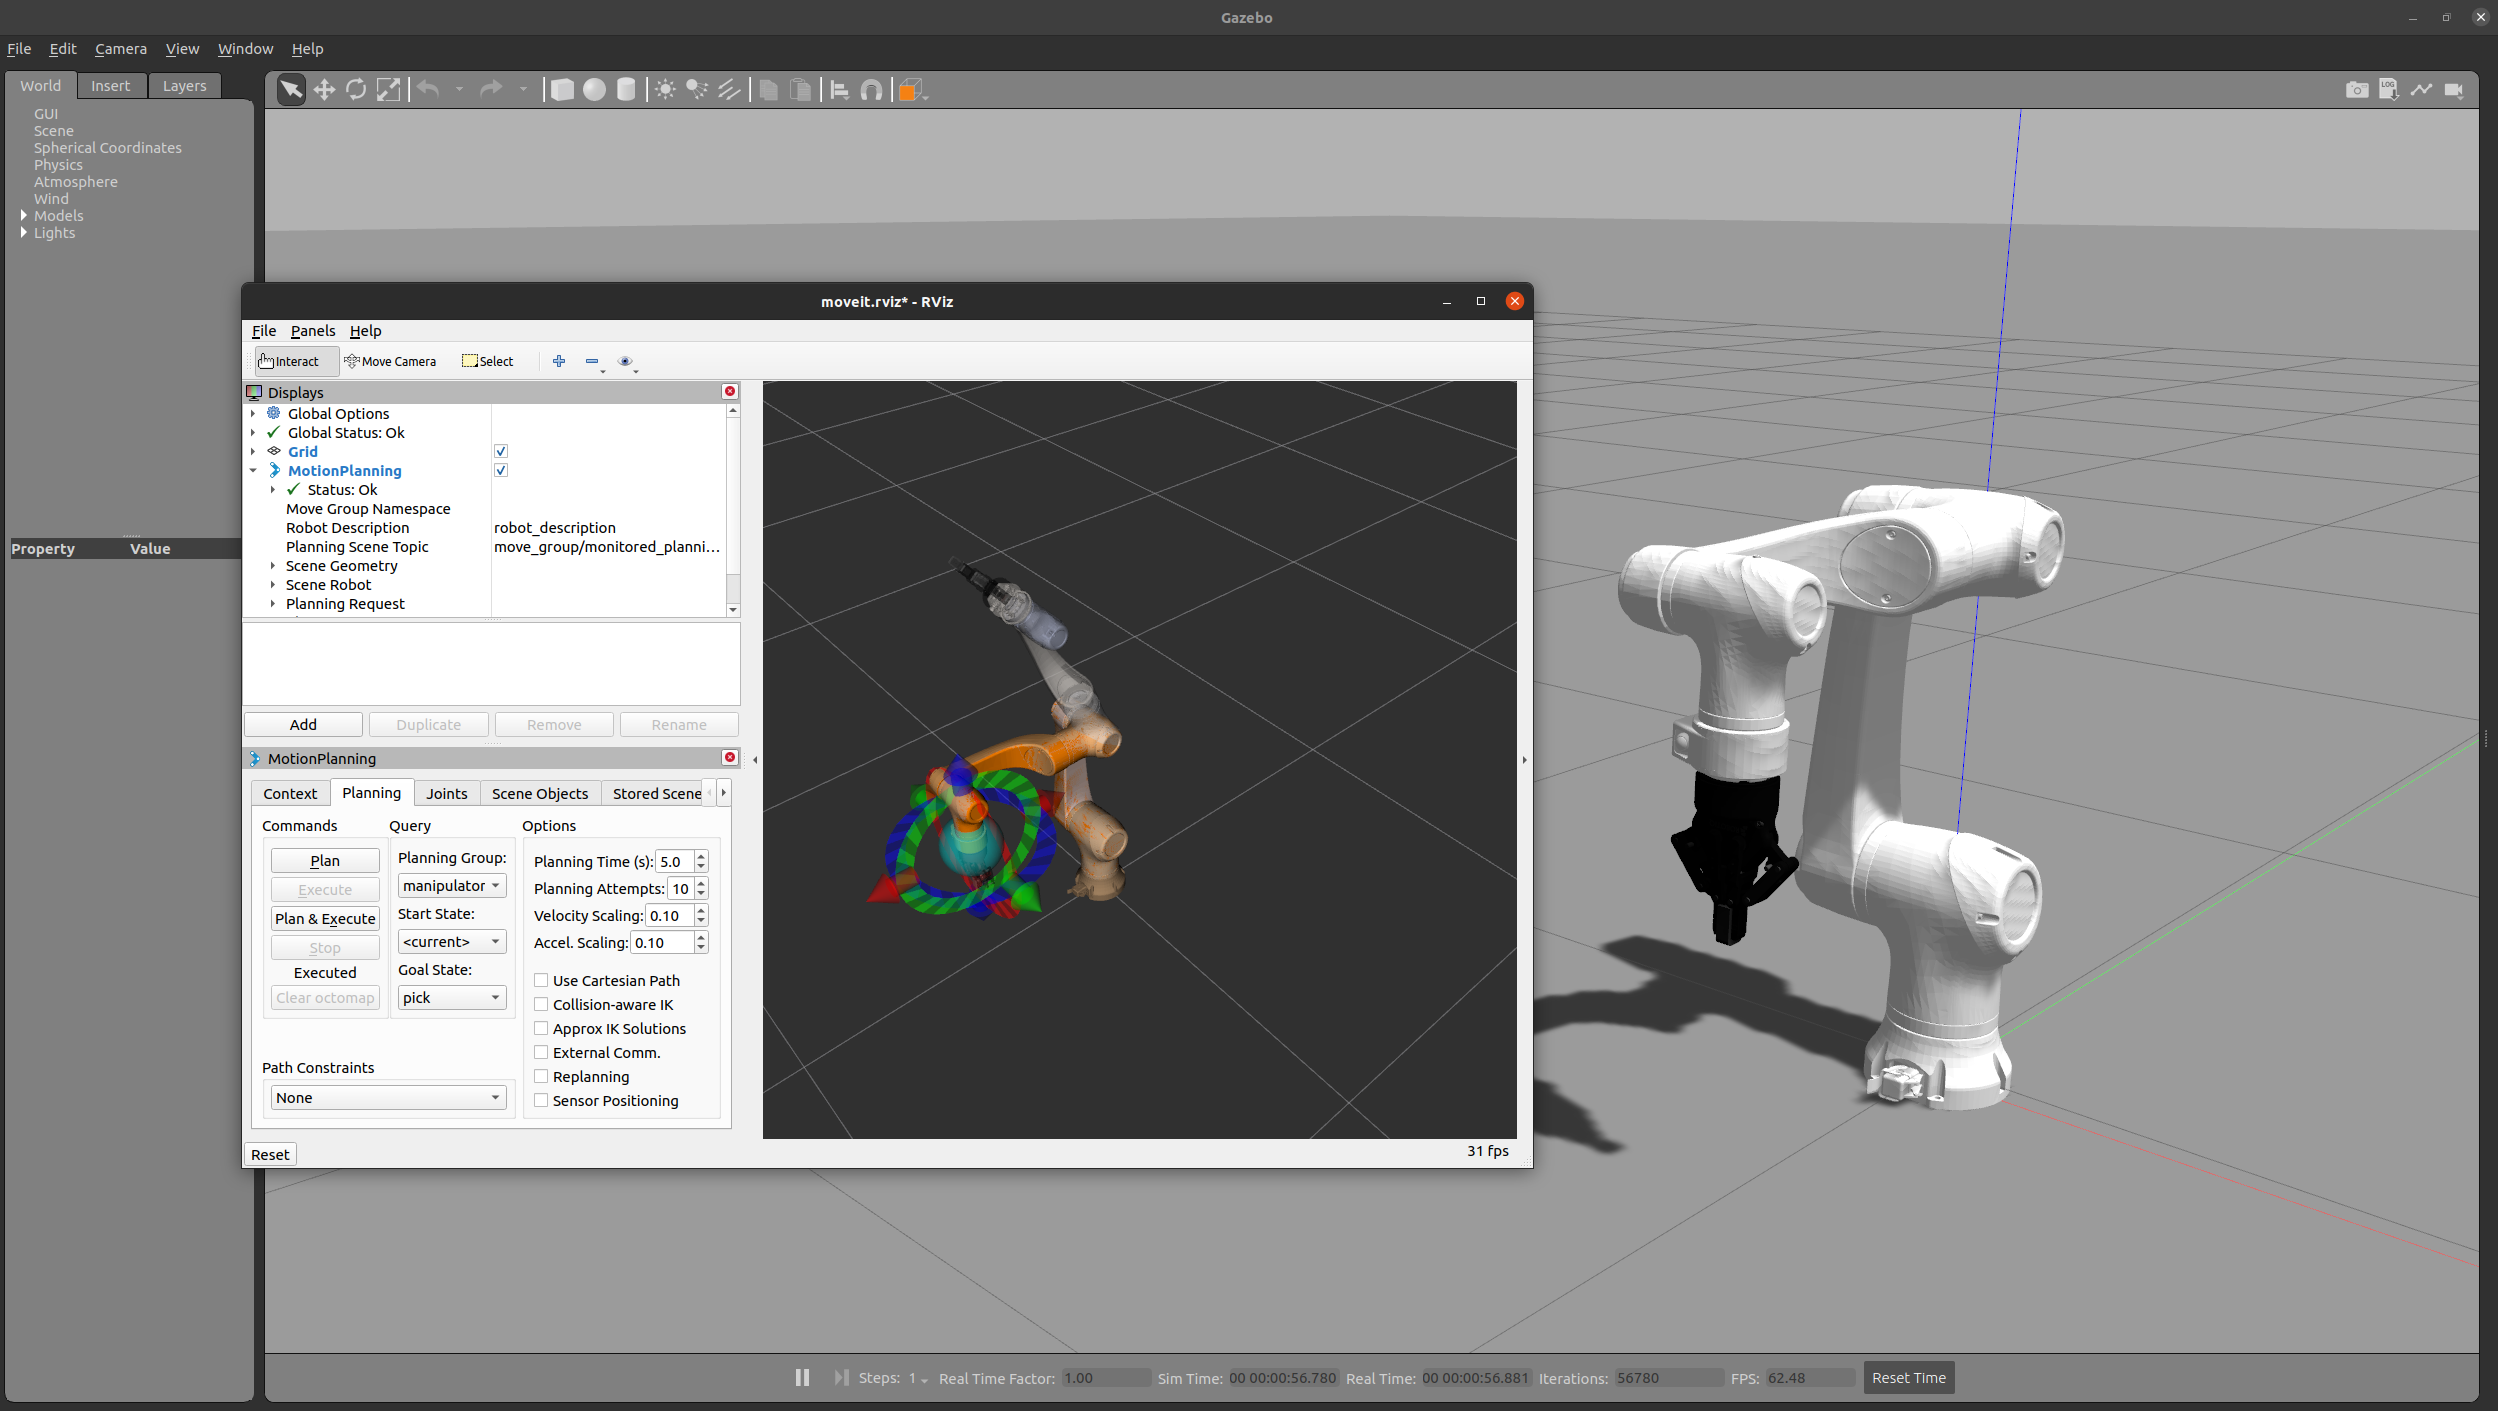
测试rviz是否能控制机器人
1
2
3
catkin_make source devel/setup.bash roslaunch e05_moveit demo.launch
测试gazebo是否能联动
1 roslaunch e05_moveit demo_gazebo.launch
测试时遇到了Rviz中的机械臂可以正常做规划和执行,但是Gazebo中机械臂没有反应 的问题,解决方法参考此文章
二、实验环境搭建
以下为之前使用的 UR5 + Robotiq 2f-85 测试
2.1 安装UR机器人及驱动
复制代码后,修改下面的内容,使其能在noetic版本的ros上运行。
1 gedit ~/catkin_ws/src/universal_robot/ur_msgs/srv/SetPayload.srv
1
2
3
4
float32 payload geometry_msgs/Vector3 center_of_gravity ----------------------- bool success
1 gedit ~/catkin_ws/src/universal_robot/ur_msgs/CMakeLists.txt
1
2
3
4
5
6
7
8
9
10
11
12
13
14
15
16
17
18
19
20
21
22
23
24
25
26
27
28
29
30
31
32
33
34
35
36
37
38
39
40
41
42
43
44
45
46
47
48
49
50
51
52
53
54
55
56
57
58
cmake_minimum_required(VERSION 2.8.3) project(ur_msgs) # # # find_package(catkin REQUIRED COMPONENTS message_generation std_msgs geometry_msgs) # add_message_files( FILES Analog.msg Digital.msg IOStates.msg RobotStateRTMsg.msg MasterboardDataMsg.msg RobotModeDataMsg.msg ToolDataMsg.msg ) # add_service_files( FILES SetPayload.srv SetSpeedSliderFraction.srv SetIO.srv ) # generate_messages( DEPENDENCIES std_msgs geometry_msgs ) # # # catkin_package( # INCLUDE_DIRS include # LIBRARIES ur_msgs CATKIN_DEPENDS message_runtime std_msgs geometry_msgs # DEPENDS system_lib ) # # # # # # # # #
1 gedit ~/catkin_ws/src/universal_robot/ur_msgs/package.xml
1
2
3
4
5
6
7
8
9
10
11
12
13
14
15
16
17
18
19
20
21
22
23
<?xml version="1.0"?> <package format="2"> <name>ur_msgs</name> <version>1.2.5</version> <description>The ur_msgs package</description> <author>Andrew Glusiec</author> <author>Felix Messmer</author> <maintainer email="[email protected] ">G.A. vd. Hoorn</maintainer> <maintainer email="[email protected] ">Miguel Prada Sarasola</maintainer> <maintainer email="[email protected] ">Nadia Hammoudeh Garcia</maintainer> <license>BSD</license> <buildtool_depend>catkin</buildtool_depend> <build_depend>message_generation</build_depend> <depend>std_msgs</depend> <depend>geometry_msgs</depend> <exec_depend>message_runtime</exec_depend> <export> </export> </package>
完成之后,就可以编译了。source之后使用roslaunch ur5_moveit_config demo.launch
2.2 简单测试
(1)Rviz打开UR5模型
机械臂夹爪模型路径为universal_robot/urdf/ur5_gripper_joint_limited_robot.urdf.xacro。
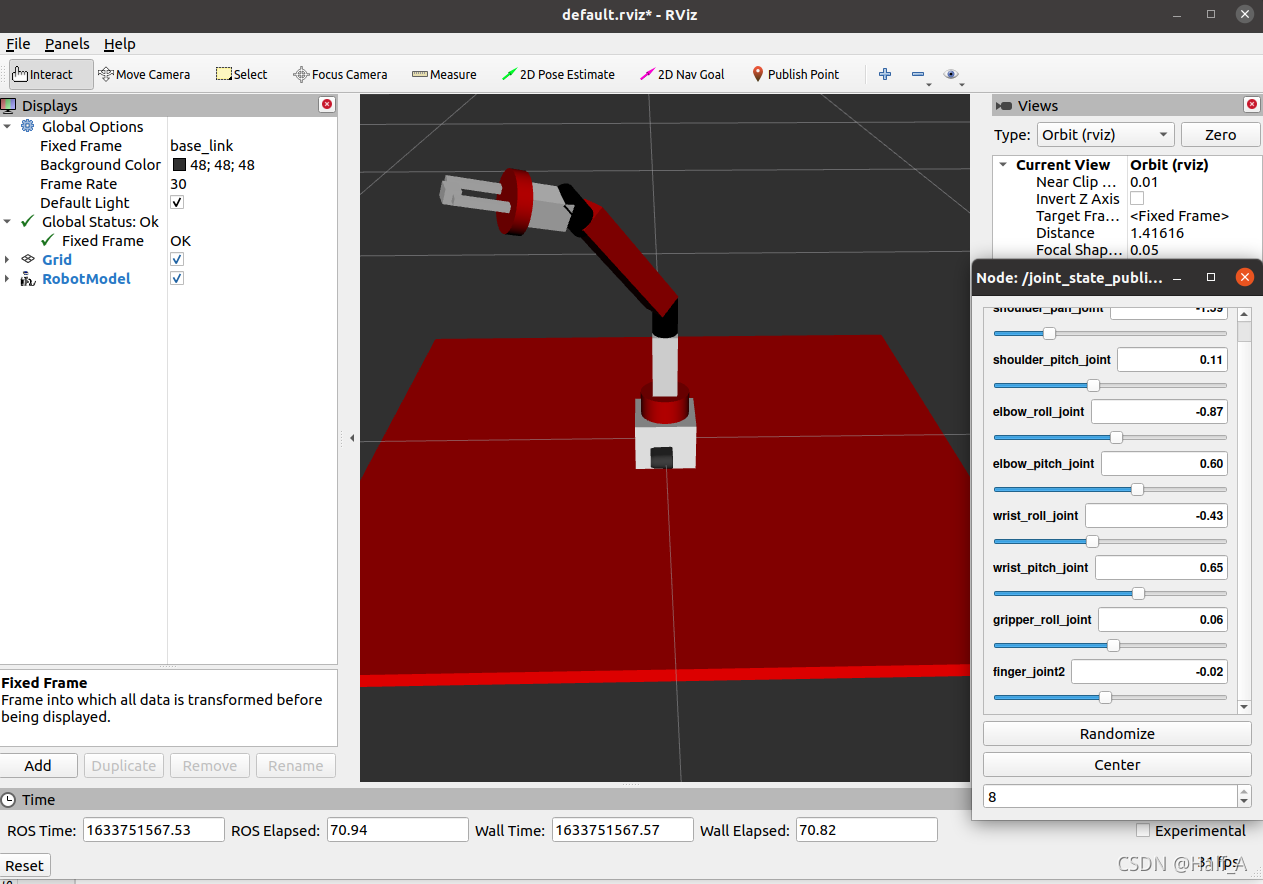
可以通过universal_robot/ur_description/launch/view_ur5_with_gripper.launch启动,从Rviz中查看模型情况,并使用joint_state_publisher_gui对机械臂模型拖动控制。
1
2
3
4
# 无夹爪 roslaunch ur_description view_ur5.launch # 有夹爪 roslaunch ur_description view_ur5_with_gripper.launch
(2)Rviz中Moveit测试
使用下面的程序可以在 Rviz 中进行 Moveit 轨迹规划测试。
1
2
3
4
# 无夹爪 roslaunch ur5_moveit_config demo.launch # 有夹爪 roslaunch ur5_gripper_moveit_config demo.launch
(3)Gazebo中Moveit测试
1
2
3
4
# 无夹爪 roslaunch ur_gazebo ur5.launch roslaunch ur5_moveit_config ur5_moveit_planning_execution.launch sim:=true roslaunch ur5_moveit_config moveit_rviz.launch config:=true
ur5.launch:用于启动 gazebo 仿真环境。具体包括以下几个部分,启动空环境、定义 robot_description 参数服务器、发送到gazebo中生成机器人、启动并加载控制器。
ur5_moveit_planning_execution.launch:用于启动 MoveIt 相关组件。具体包括以下几个部分:设置 sim参数, 根据 sim 参数重映射 follow_joint_trajectory 话题,启动MoveIt。
moveit_rviz.launch:用于启动 Rviz 相关组件。具体包括以下几个部分:加载配置参数,启动Rviz。
1
2
3
4
# 有夹爪 roslaunch ur_gazebo ur5_with_gripper.launch roslaunch ur5_single_arm_moveit_config ur5_moveit_planning_execution.launch roslaunch ur5_gripper_moveit_config moveit_rviz.launch config:=true
2.3 导入自定义物体
(1)网络方法
使用 MeshLab 加载自己的物体模型。
点击【Filters -> Normals … -> Compute normals for points sets】,按照默认设置确定即可。
点击【Filters -> Remeshing -> Surface Reconstruction: Screened Poisson】,按照默认设置确定即可。
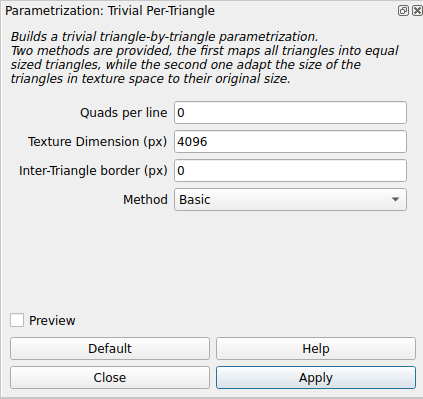
点击【Filters -> Texture -> Parametrization: Trivial Per-Triangle】,按照如下设置,重要的是Method。
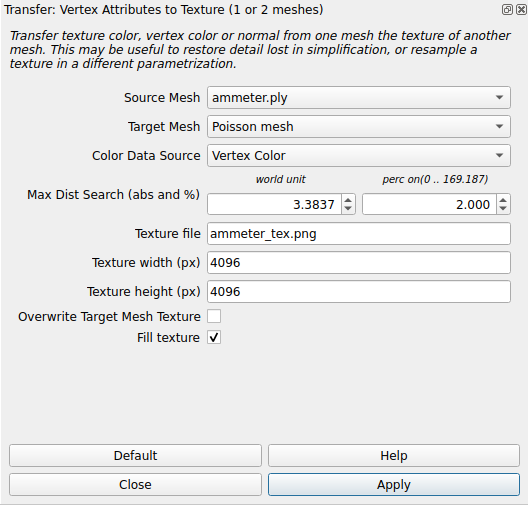
点击【Filters -> Texture -> Transfer Vertex Attributes to Textur(1 or 2 meshes)】,按照如下设置,重要的是Source Mesh和Target Mesh。
(2)摸索方法
点击【Filters -> Texture -> Parametrization: Flat Plane】
点击【Filters -> Texture -> Transfer Vertex Attributes to Textur(1 or 2 meshes)】
