Contents
0. Introduction to Vision Pro Development
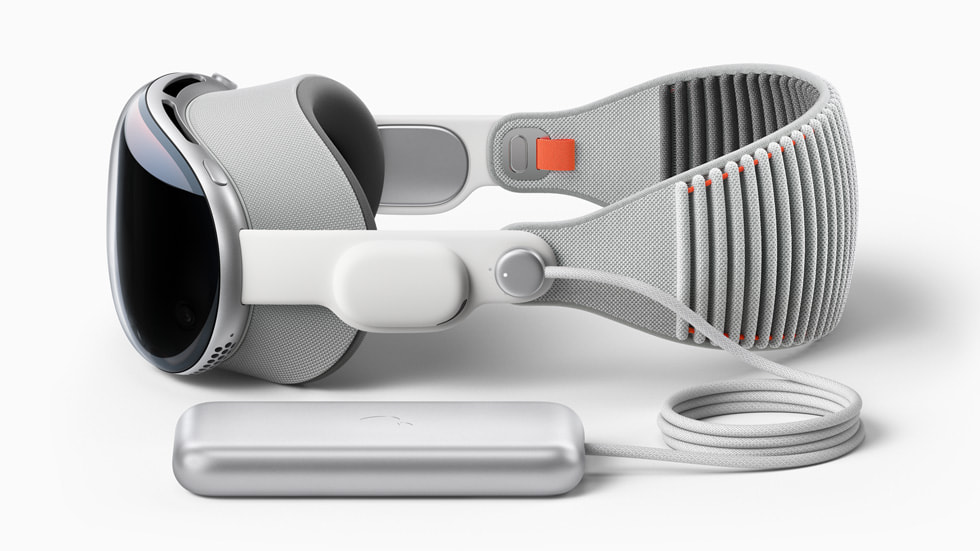
Vision Pro apps can be developed with Apple’s existing Swift tools or with Unity. Unity is the better fit for MR/VR games and 3D interaction.
Unity’s Apple Vision Pro toolkit is called PolySpatial.
(1) Hardware requirements
- A Mac with an M-series chip
- Apple Vision Pro
(2) Software requirements
- Xcode 15.2 or later, with the visionOS module installed
- the visionOS SDK (which can also be imported from Unity)
- Unity Pro 2022.3.18f1 or later (apply for a free Pro license through the Unity Student plan)
- An Apple Developer account, if you need to run the app on a physical Vision Pro
1. Vision Pro Developer Mode and Wireless Debugging
Connect Apple Vision Pro and the Mac to the same Wi-Fi network, then install and run the project on the headset over the local network.
(1) Pair Vision Pro with a Mac
Open Xcode and create a new project.
Select the visionOS template.
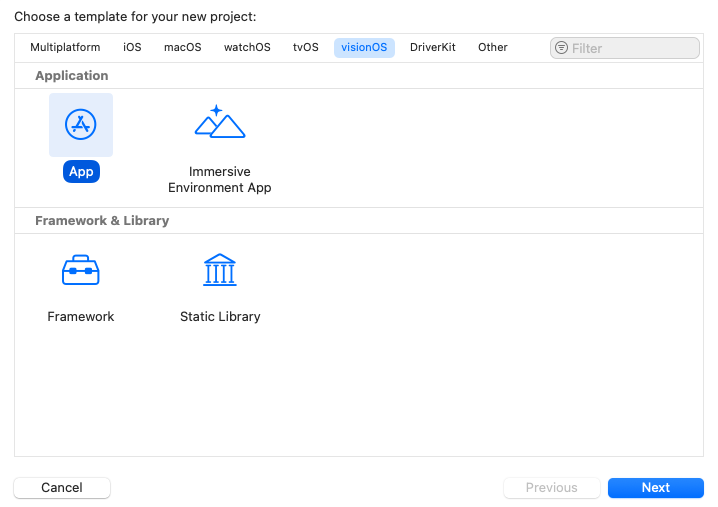
Enter a project name and choose a location.
This creates a new Xcode project.
On Vision Pro, open Settings > General > Remote Devices.
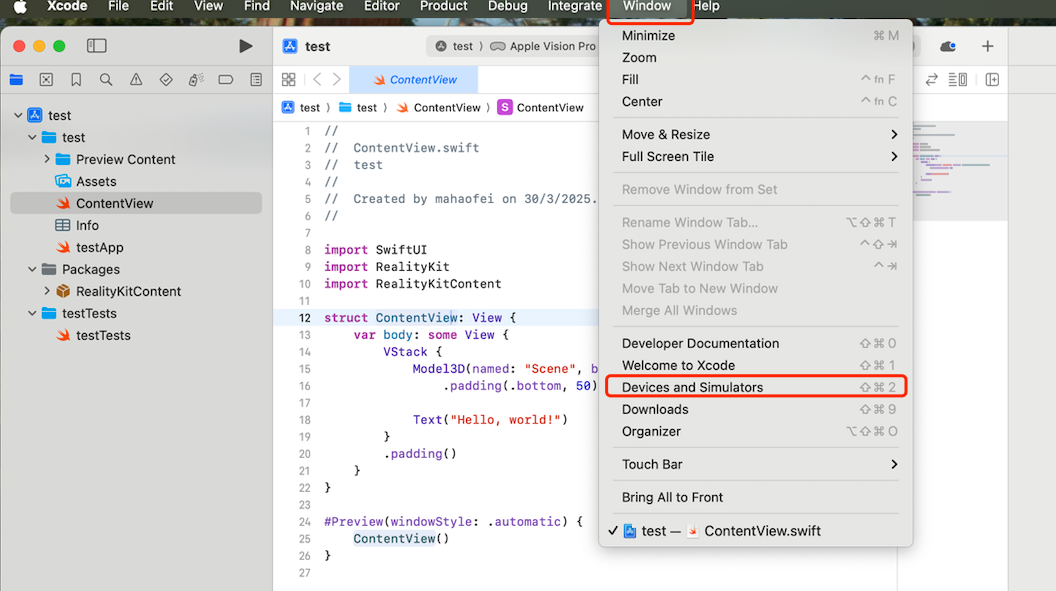
In Xcode, choose Window > Devices and Simulators. The pairing sheet should appear; click Pair. (Vision Pro and the Mac must be on the same local network. If the sheet never appears, try a phone hotspot.)
Vision Pro displays a pairing code. Enter it and click Connect.
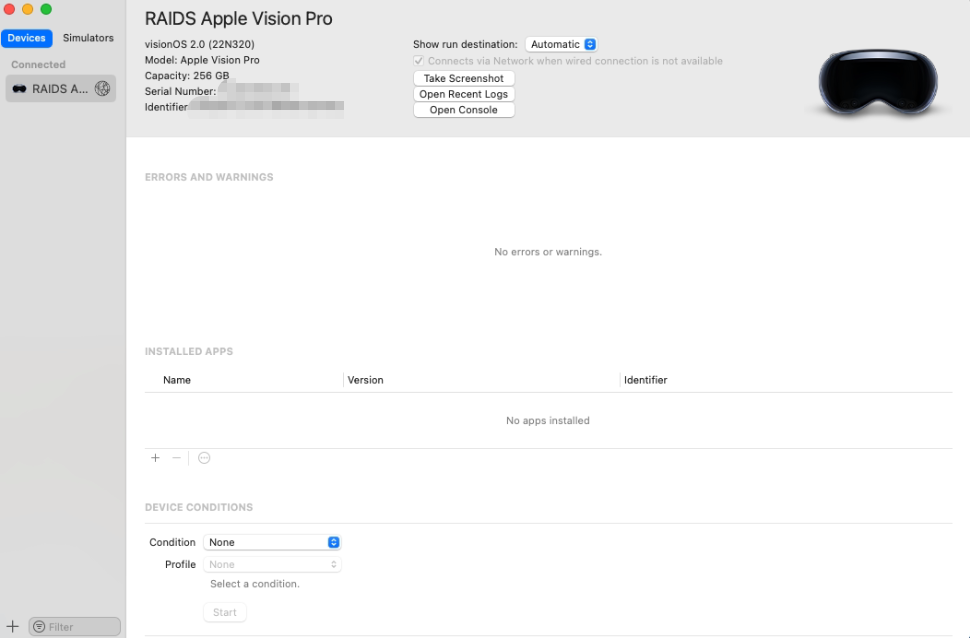
(2) Enable Vision Pro Developer Mode
Scroll to the bottom of the Vision Pro Settings app. Enable Developer Mode.
(3) Run an Xcode project on a physical Vision Pro
Xcode targets the simulator by default. To run on the headset, use the destination control at the top of the window and choose the paired Apple Vision Pro. The headset’s visionOS version must be at least as new as the project’s minimum visionOS deployment target.
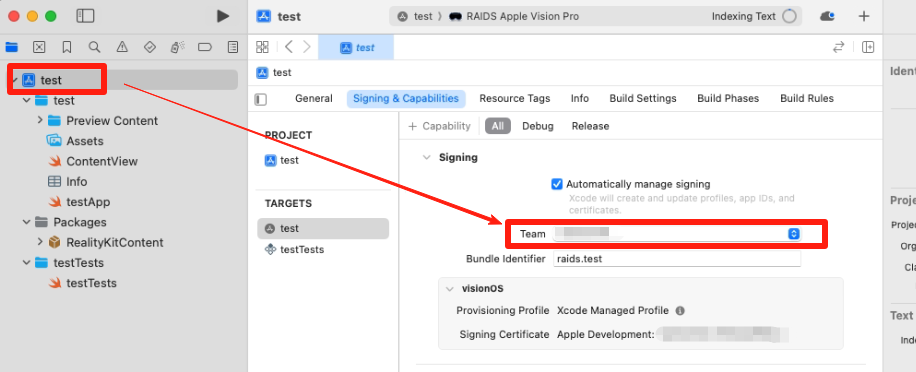
Select the project in the navigator, open Signing & Capabilities, choose Team, and pick your developer account. You need to do this for every new project.
Click Run to install the app on Vision Pro. It appears in the visionOS home view; open it and you should see Hello World.
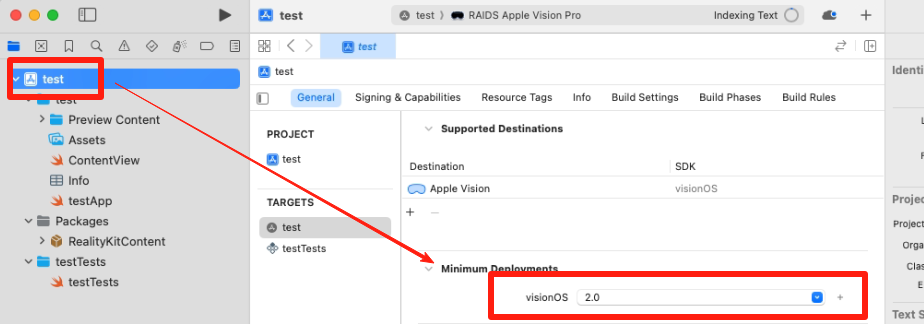
Possible error: Apple Vision Pro’s visionOS doesn’t match project. The headset OS version and the Xcode visionOS deployment target must match. Select the project in the navigator, then under General set Minimum Deployments for visionOS.
2. Installing Unity 2022.x and PolySpatial 1.0
(1) Install Unity
Download Unity Hub from the international Unity website, then use it to install Unity Pro 2022.3.18f1 or later. Students can get Pro at no cost through the Unity Student plan.
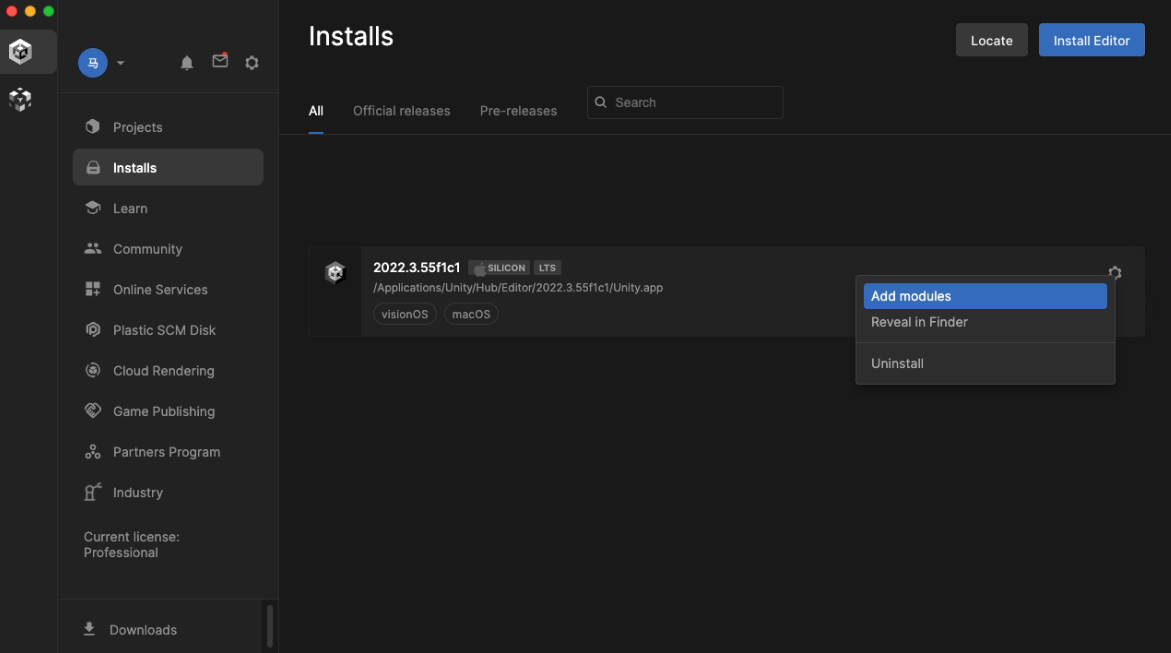
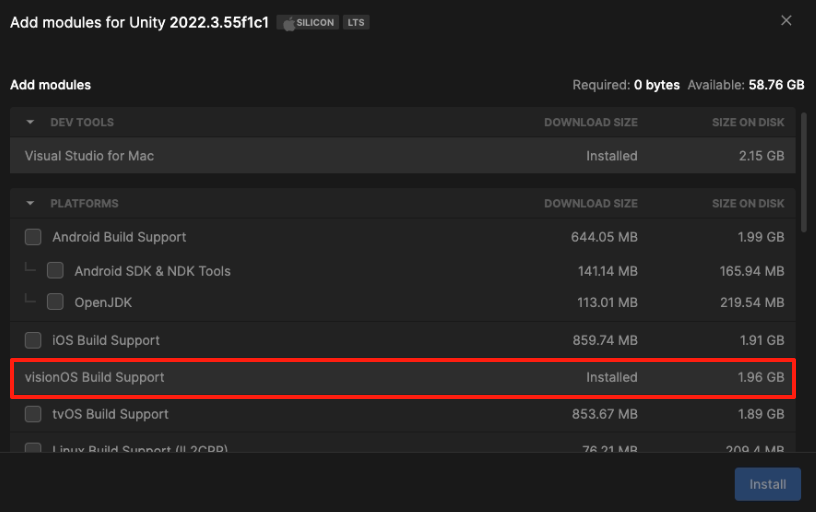
Click the gear icon next to the editor version, choose Add modules, and add visionOS Build Support.
(2) Create a project
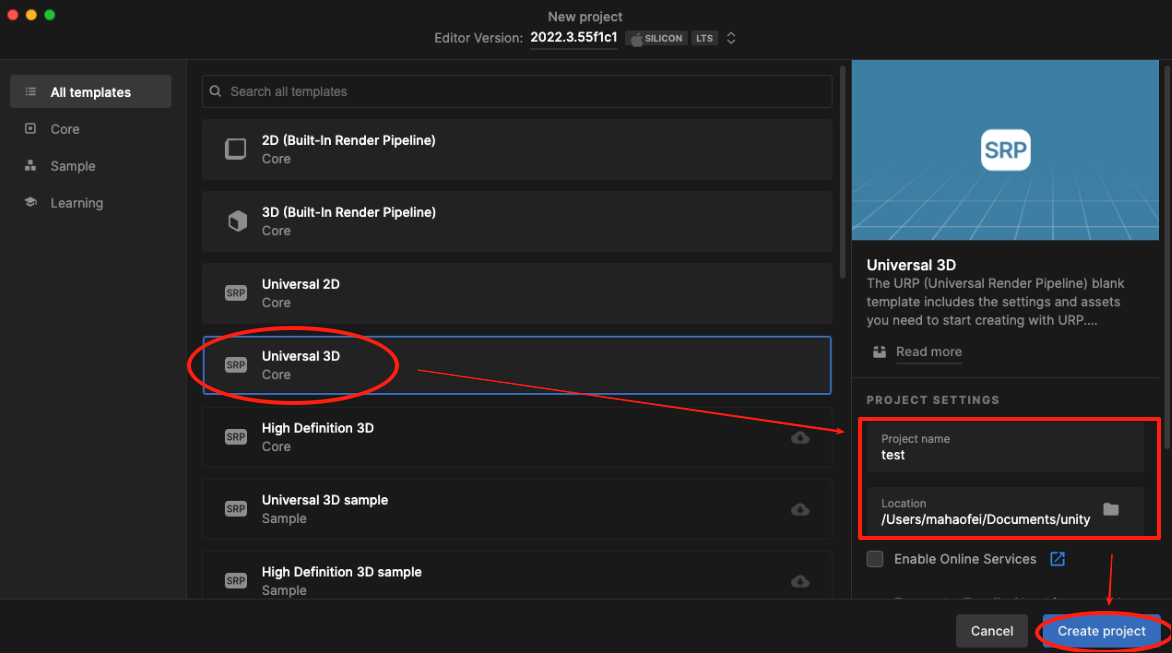
Create a project from the Universal 3D template. You can change the name and location on the right.
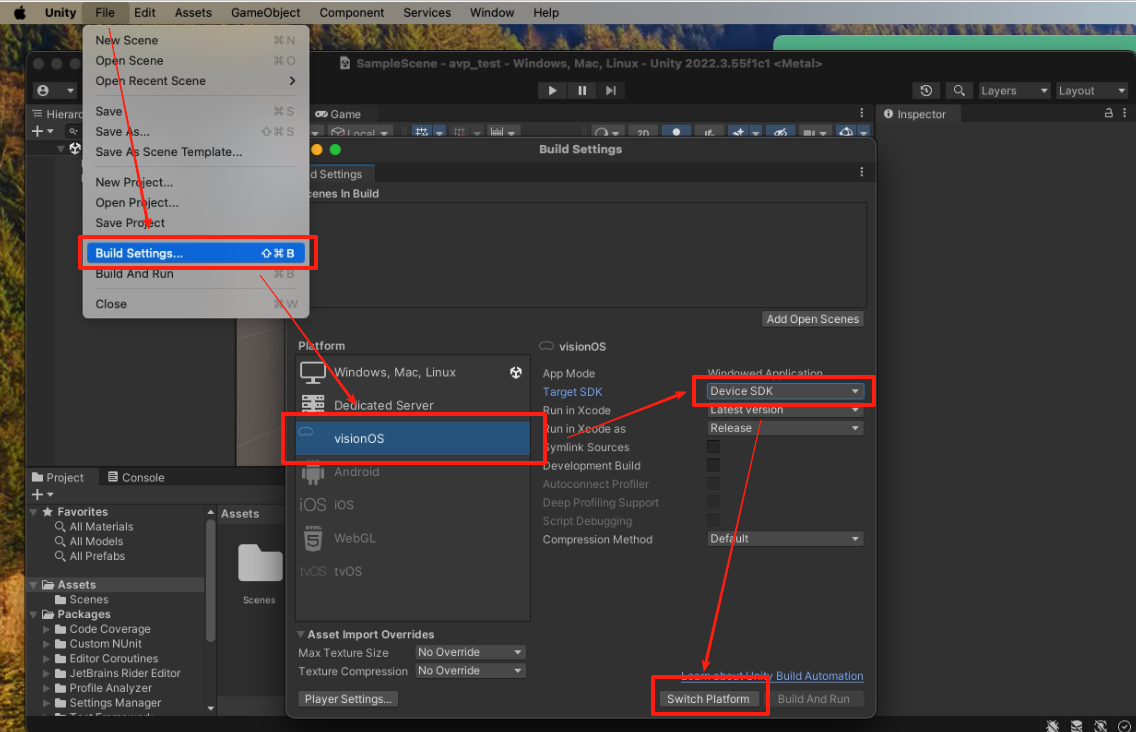
In the project, open File > Build Settings and switch the platform to visionOS. Choose device (not simulator) debugging:
(3) Install the plug-in
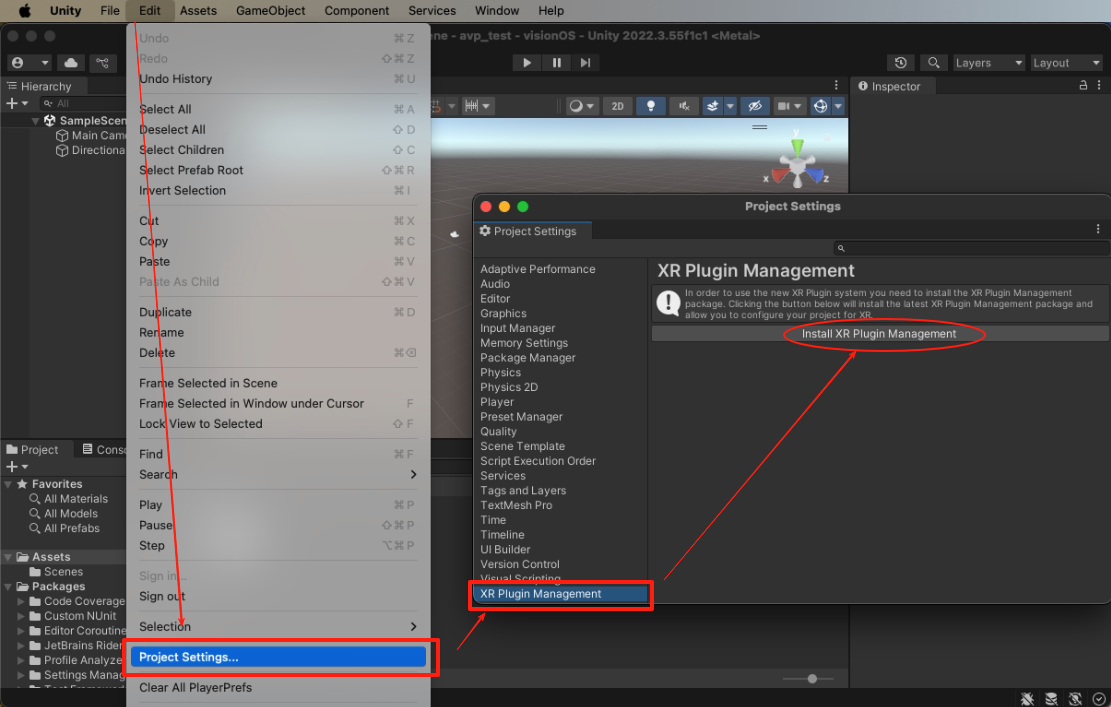
Open Edit > Project Settings, find XR Plug-in Management, and install it. You need this plug-in for AR/MR work; windowed apps can skip it.
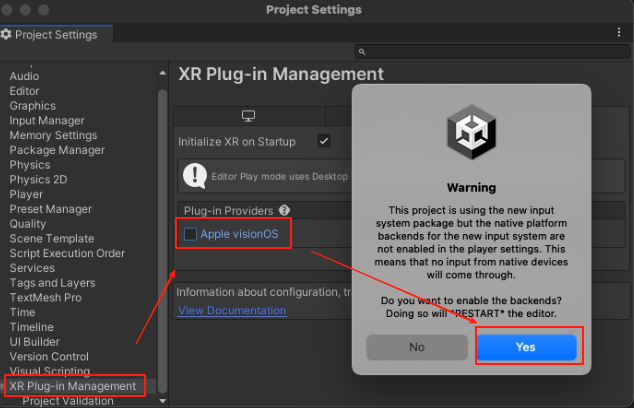
Open XR Plug-in Management again and enable Apple visionOS. That option is available only with a Pro license. If a warning appears, click Yes. Unity restarts and reimports packages; enable Apple visionOS again afterward.
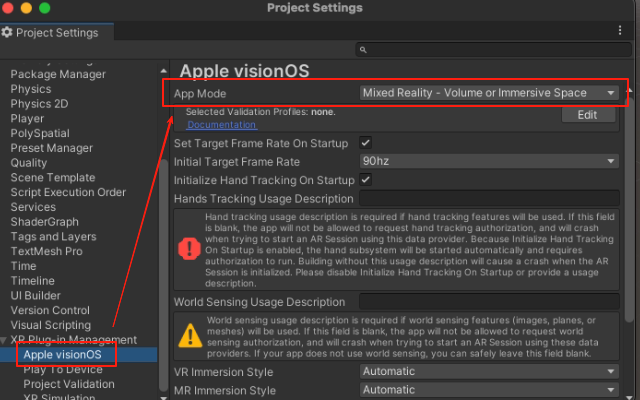
Still in this panel, open XR Plug-in Management > Apple visionOS. App Mode switches between VR and MR. Later projects in this series are MR, so set it to MR here. Unity then installs PolySpatial.
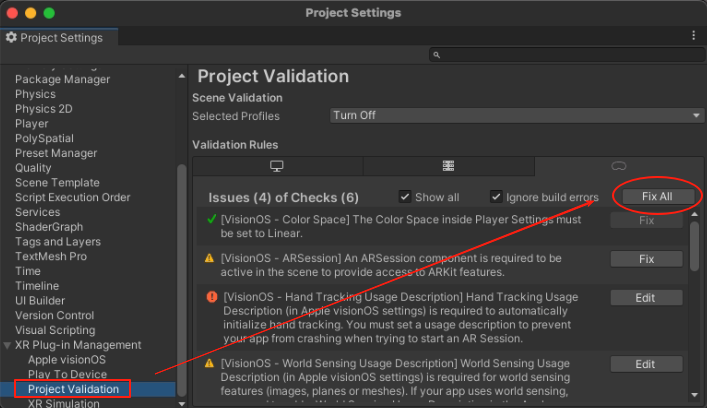
Open Project Validation, find Fix All under the Vision Pro icon, and click it. Unity repairs common environment issues.
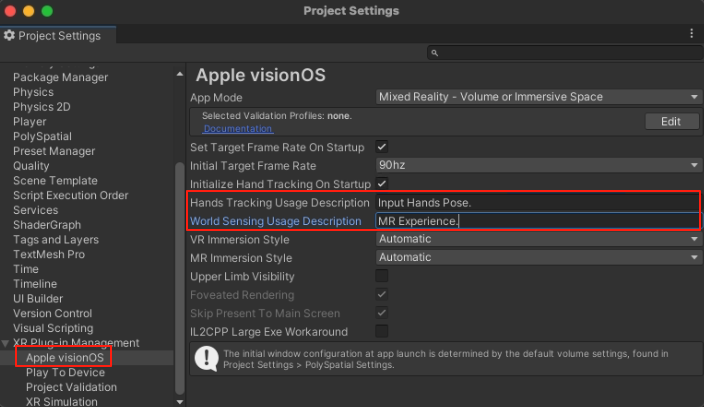
Open Apple visionOS and fill in Hands Tracking Usage Description and World Sensing Usage Description.
When the app asks for hand tracking or world sensing, Vision Pro shows a permission dialog. These strings are the explanation under the main heading.
(4) Import the PolySpatial sample scenes
Open Window > Package Manager, select the PolySpatial package, and import its Samples. That brings in template settings and sample scenes.
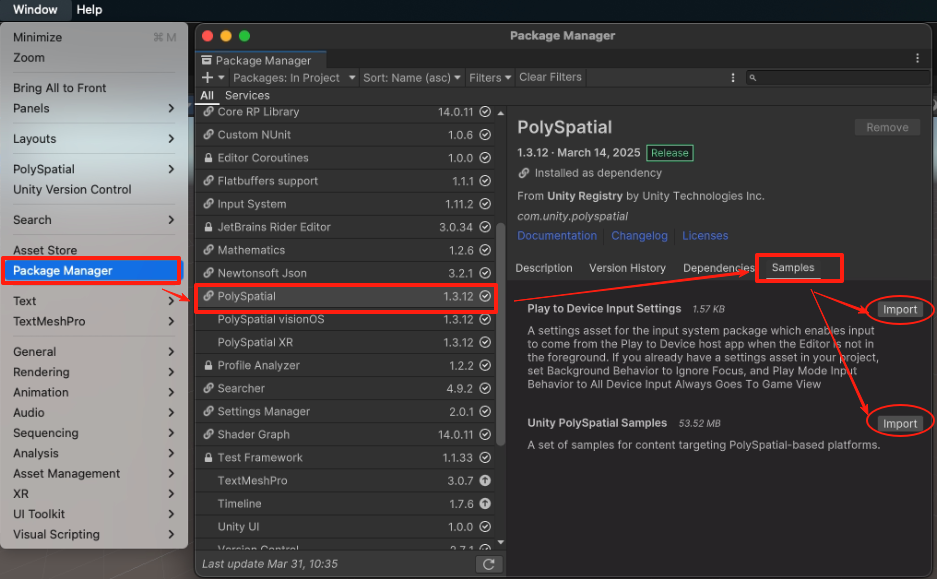
After import, the samples live under Assets > Samples > PolySpatial > Scenes.
Open ProjectLauncher and import TMP when prompted.
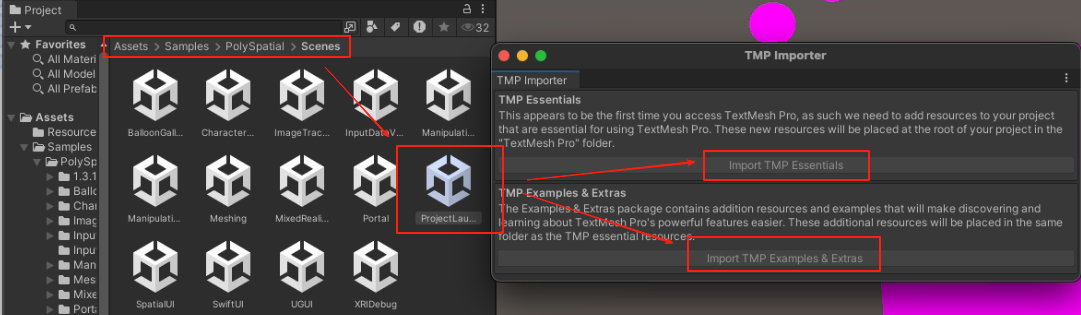
Then open File > Build Settings, drag every PolySpatial sample scene into Scenes in Build, and move ProjectLauncher to the top of the list (it is the launcher for the other scenes).
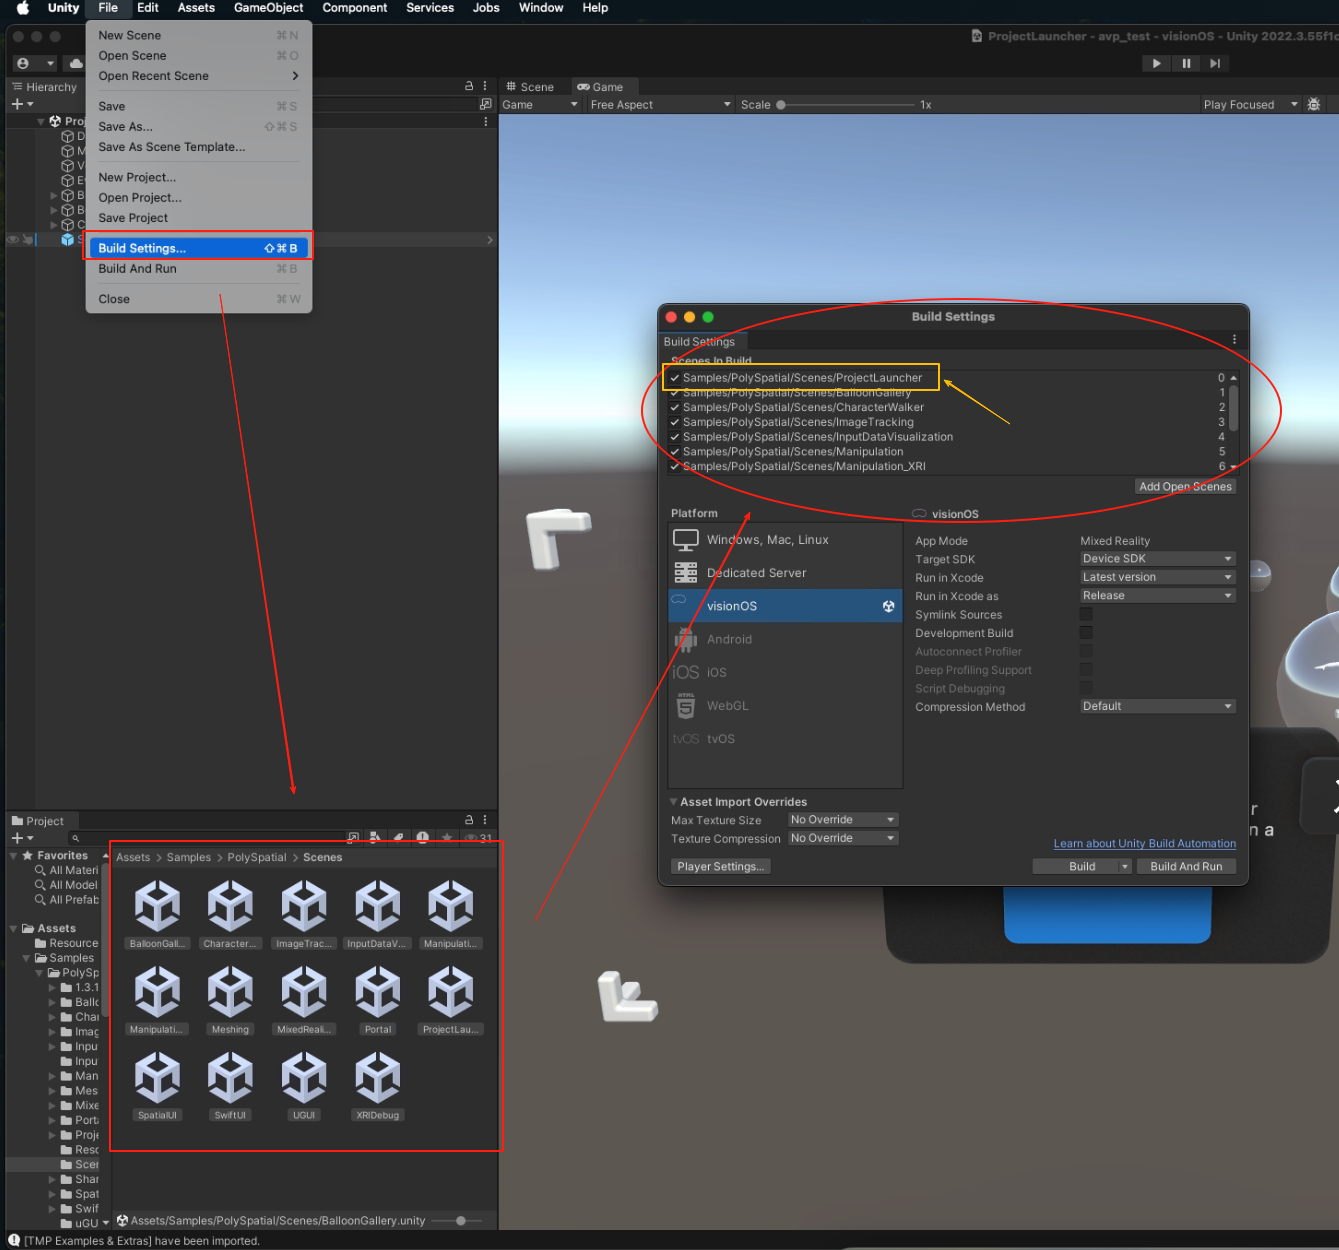
(5) Configure streaming for device debugging
Open PolySpatial’s Play to Device page. It includes a TestFlight link for installing TestFlight and Unity’s Play to Device software.
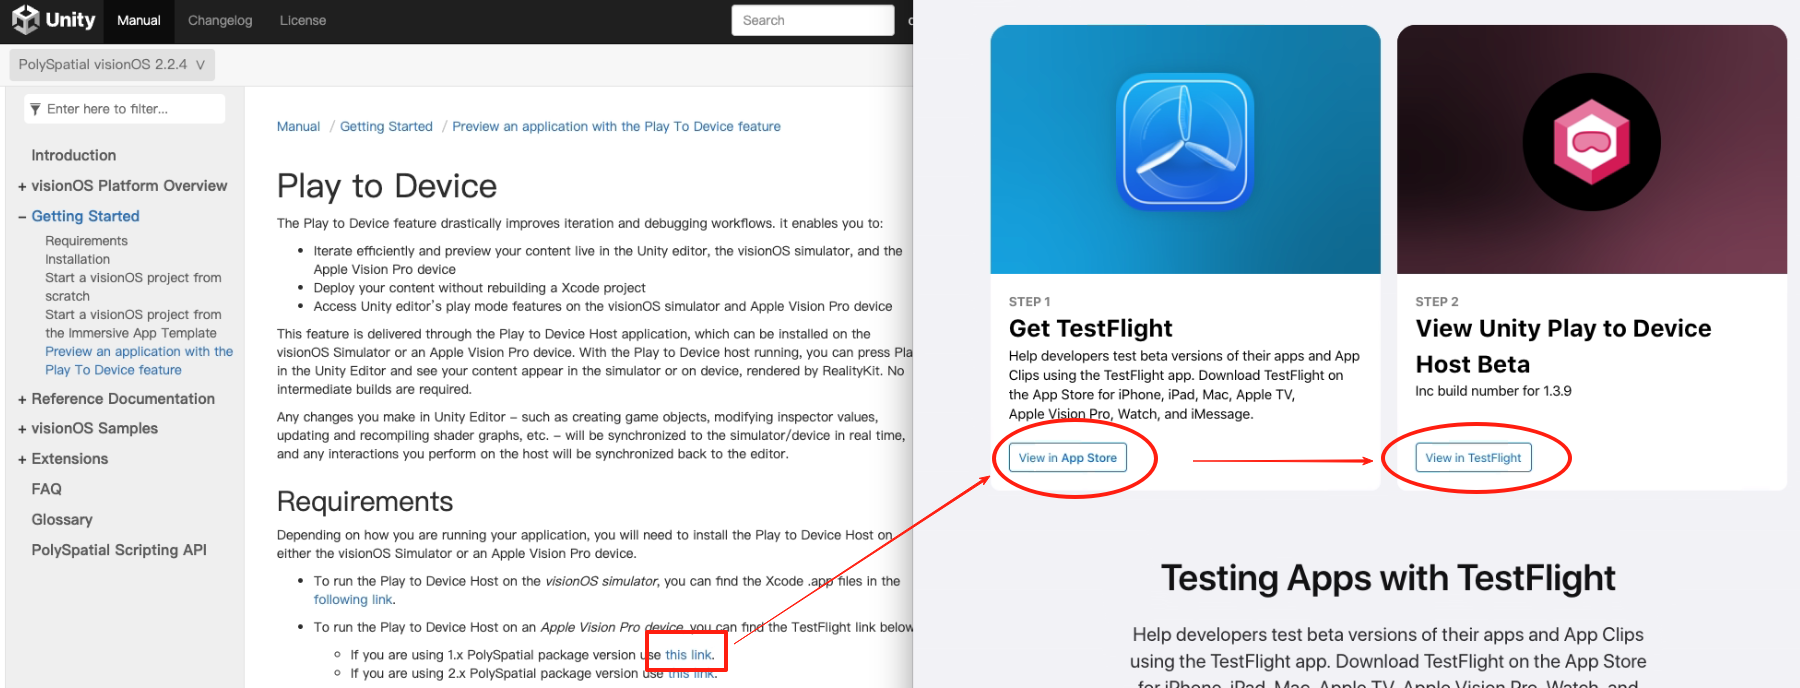
Install TestFlight on the headset and sign in with the same Apple Account as the Mac. The Unity Play to Device app appears there.
Open the Play to Device Host app. Note the IP address on that screen.
In Unity, open Window > Play to Device, enter the Vision Pro IP address, give the device any name, and click Add Device. Select Connect in the list, then set Connect on Play to Enable.
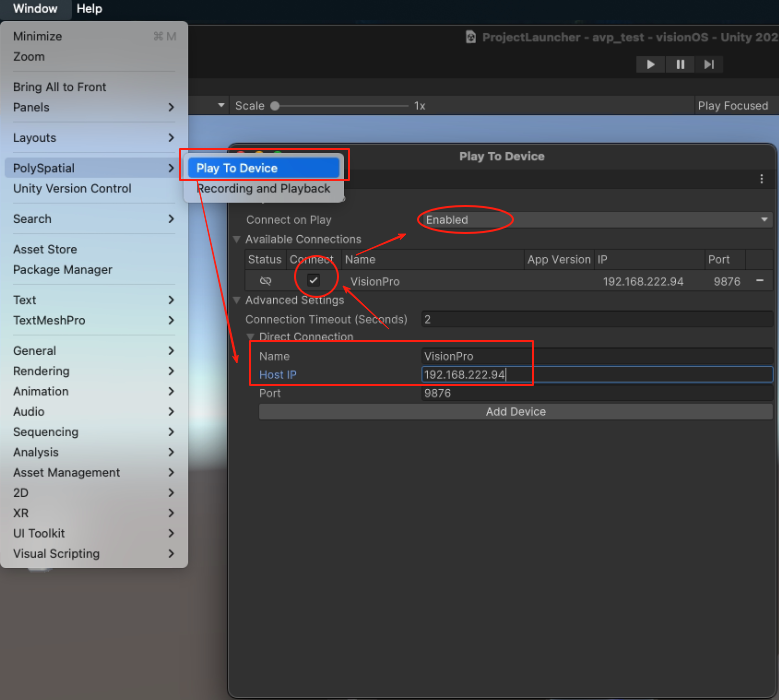
Return to Unity and click Play to stream the running scene to the headset.
When you finish, stop playback in the Unity Editor rather than closing the app on Vision Pro. If Play does not reach the headset, confirm the IP address. You can also press and hold both top buttons on Vision Pro, force-quit the Play to Device app, relaunch it, and click Play in Unity again.
Streaming still depends on the Unity Editor. The next section packages the project as a standalone app.
(6) Build an Xcode project
Open File > Build Settings and click Build. Choose a folder for the generated Xcode project, then click Choose.
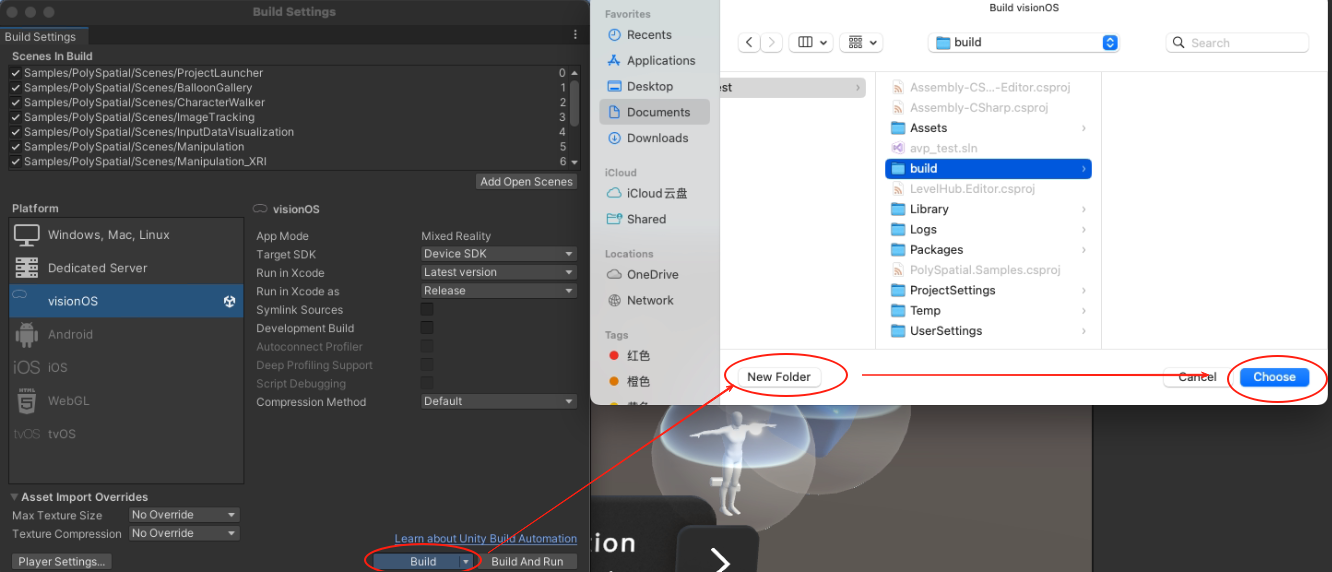
When the build finishes, open that Xcode project and run it the same way as in the previous section.
3. Installing Unity 6 and PolySpatial
(1) Install Unity
Download Unity Hub from the international Unity website — only that build can install Unity 6 — then install Unity 6.0 or later. Students can get Pro through the Unity Student plan.
Click the gear icon next to the editor version, choose Add modules, and add visionOS Build Support.
(2) Create a project
Check the Unity Editor version and choose Universal 3D.
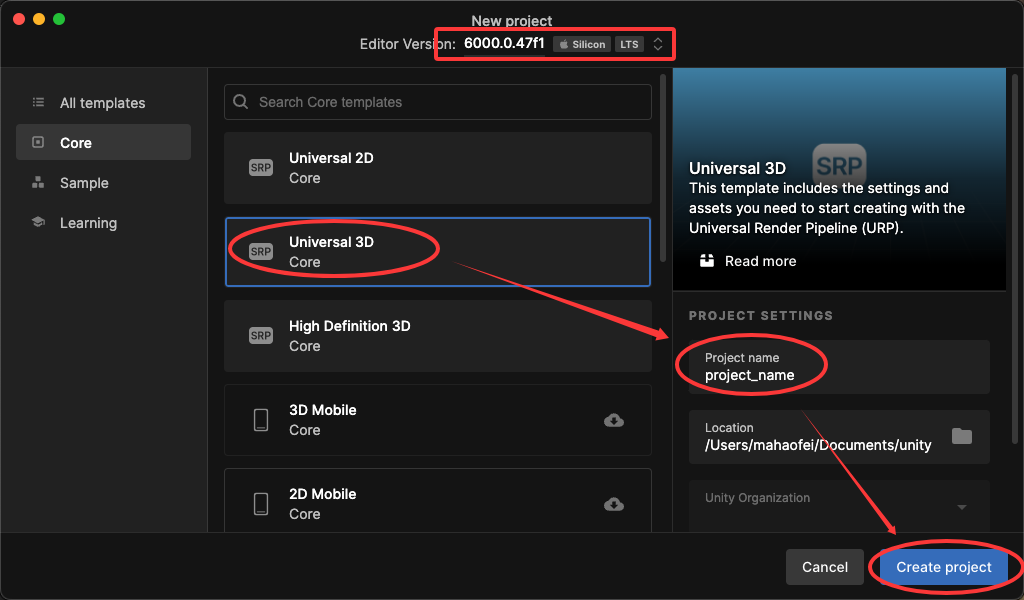
(3) Import PolySpatial 2.0
Open File > Build Profiles, switch the platform to visionOS, and set the target SDK to Device if you want to debug on the headset.
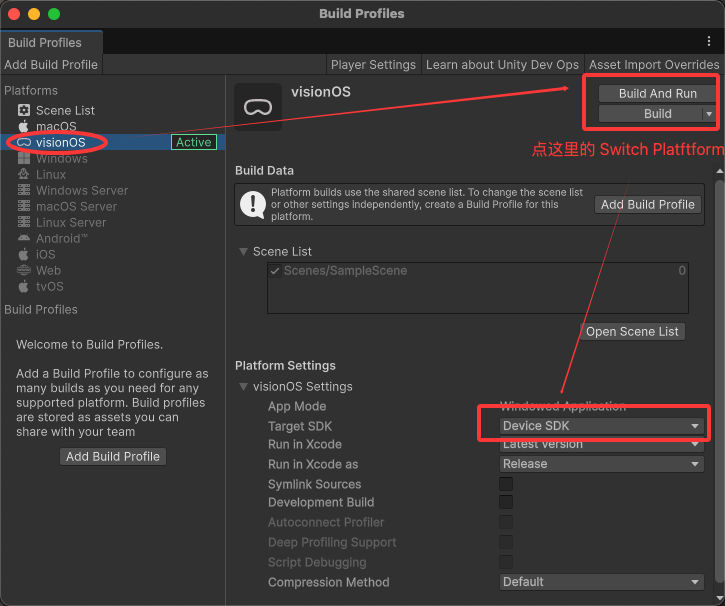
Open Edit > Project Settings, install XR Plug-in Management, enable Apple visionOS, and on the computer enable PolySpatial XR.
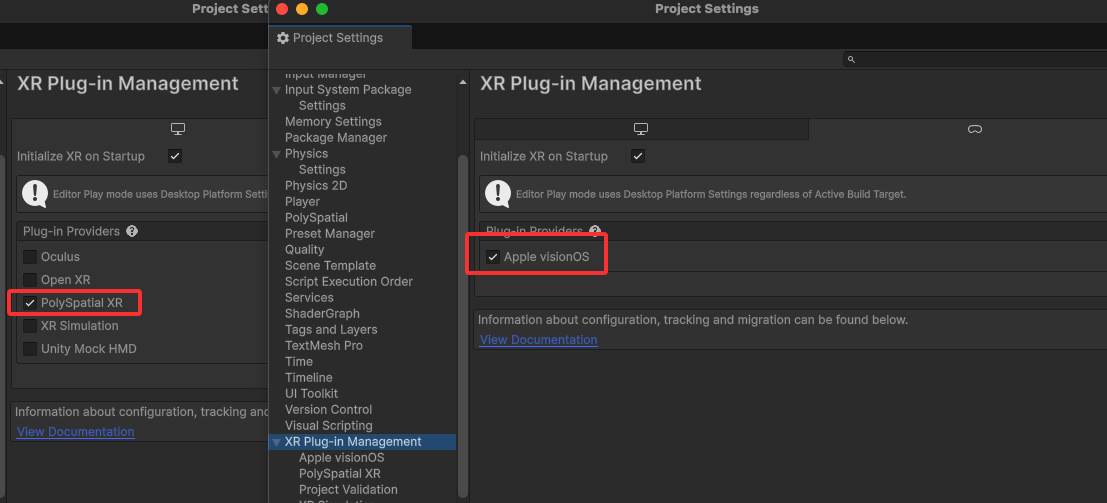
Then open the Apple visionOS settings and match the options below. The two description fields can be any short explanation.
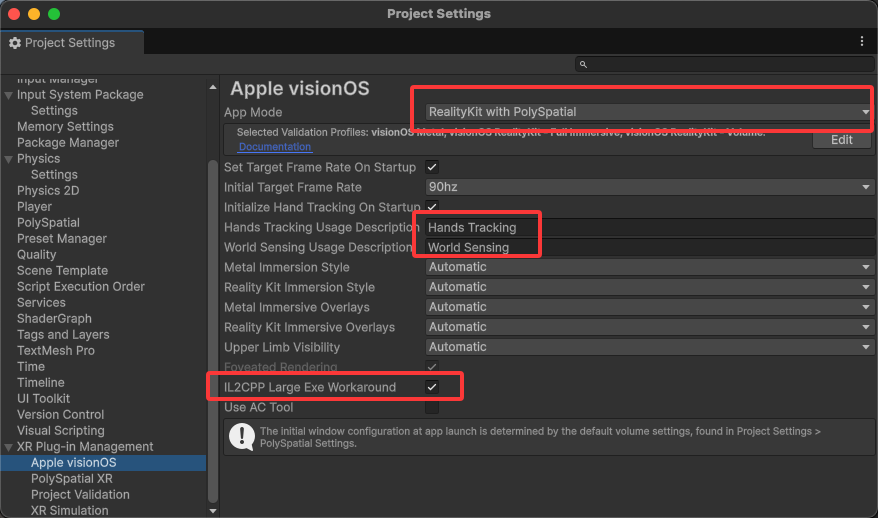
Sample import and Play to Device are the same as before, except you need Play to Device v2.
4. visionOS App Forms
(1) Space types
- Shared Space: 2D windows or 3D apps can run together in the same space
- Full Space / Immersive Space: one app occupies the entire space
Shared Space is like overlapping desktop windows; Full Space is like full screen.
ARKit features — hand tracking, scene mesh, head tracking, and object tracking — work only in Full Space, not in Shared Space.
(2) App forms
- Windowed mode: a 2D window, similar to an iOS or Mac app.
- VR mode: a fully virtual environment rendered by Unity.
- MR mode: virtual content in the real world. It can be shared or exclusive (Full Space), uses Apple’s CompositorServices, and renders with Metal.
5. Volume Camera
- In shared space, an app sits inside a cube with a bounding box.
- In exclusive space, the app has no boundary; the whole space is its container.
(1) Create a scene
In the Project panel, open Assets > Scenes, create a scene (for example, SharedSpace_VolumeCamera), and double-click it.
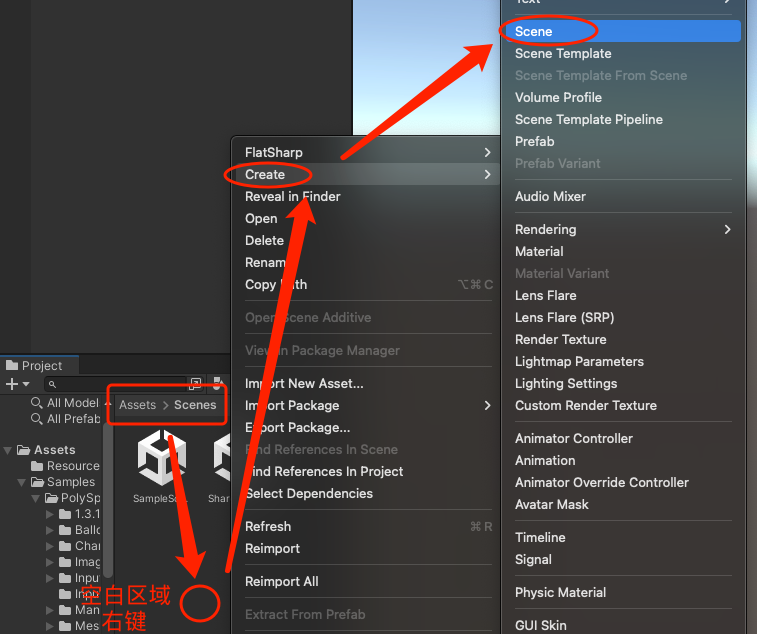
(2) Add a Volume Camera
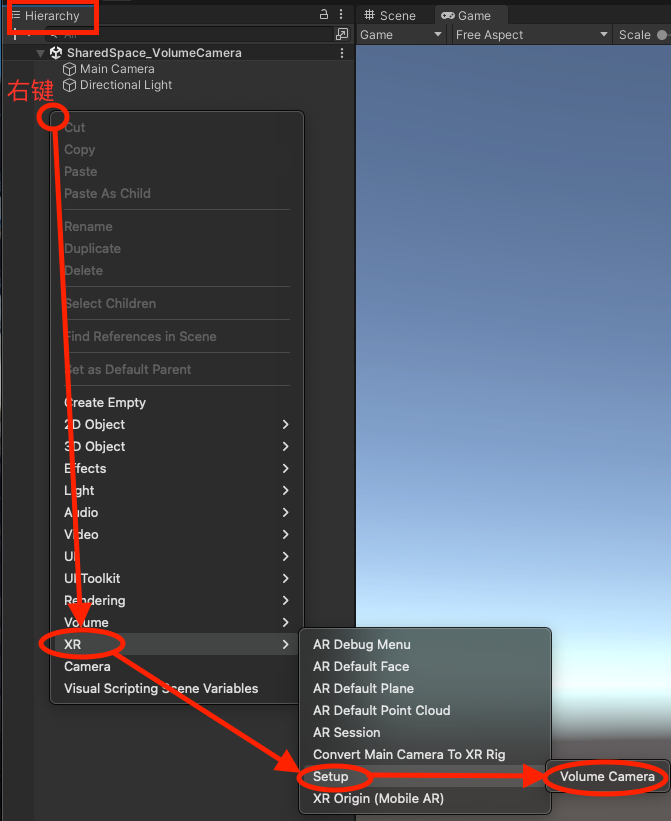
In the Hierarchy, right-click an empty area and choose XR > Setup > Volume Camera.
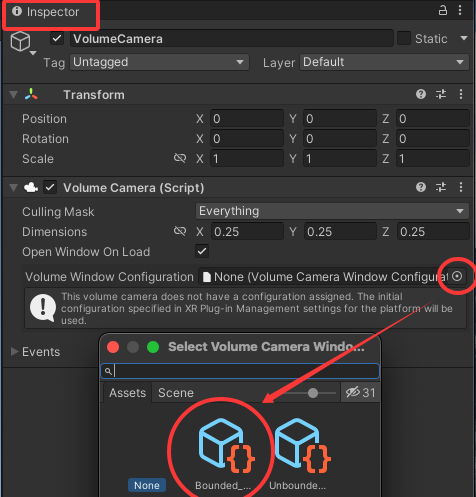
Select the Volume Camera and, in the Inspector, set Volume Window Configuration. Click the circle on the right. If the PolySpatial samples imported correctly, you should see Bounded… (with a boundary) and Unbounded… (without one).
To create your own configuration, go to Assets > Samples > PolySpatial > Resources and choose Create > PolySpatial > Volume Camera Window Configuration.
The asset must live in a
Resourcesfolder. That folder can be anywhere underAssets.
(3) App bounds versus Volume Camera bounds
- App bounding-box size: in
Bounded_VolumeCameraConfiguration, editOutput Dimensions. The unit is meters. - Volume Camera bounding-box size: in the Volume Camera Inspector. Size is Dimensions × Scale.
The app bounding box is how much space the app occupies when it launches on Vision Pro.
The Volume Camera bounding box is the volume Unity renders (only objects inside it are drawn).
If you keep the app bounds fixed and enlarge the Volume Camera bounds, objects appear smaller so everything still fits on screen.
Comments