Contents
Experiment environment: Ubuntu 20.04 omega.7
🛠️ Master Device Setup on Linux
1. Download the SDK
Download the matching SDK version from the official site (https://forcedimension.com/software/sdk), then extract it.
tar -zxvf sdk-3.17.0-linux-x86_64-gcc.tar.gz\bin: contains sample executables and the binaries required to run omega.x\examples: contains some demo programs\doc: all documentation and notes\lib,\include: libraries needed to build against the Force Dimension SDK
2. Install Drivers
sudo apt install libusb-1.03. Coordinate Frames
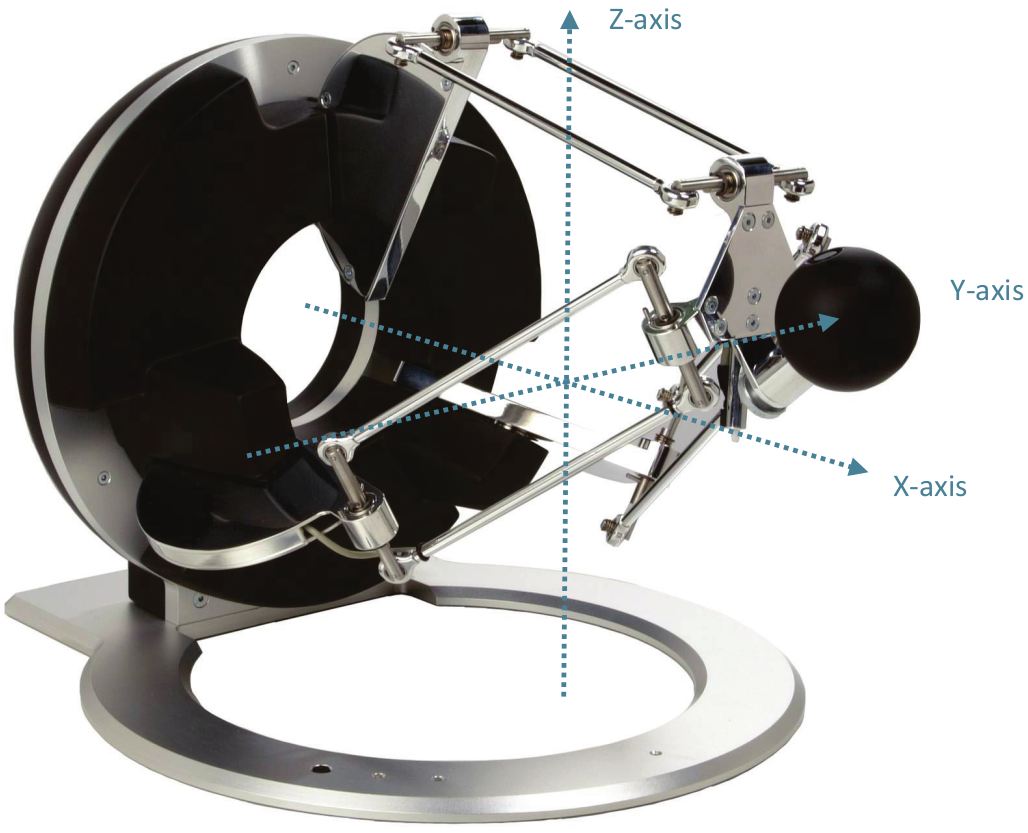
The translational frame is shown below. The actual origin is the center of the whole device—a virtual point.
Wrist rotation directions are shown below; rotation about all three axes is supported.
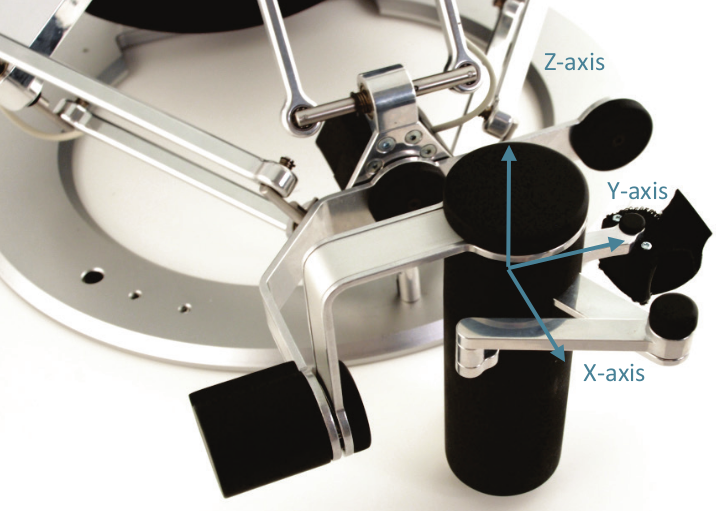
The finger section can return the gripper angle. For a right-handed omega.7 device as shown above, it returns a positive angle.
The three ports on the lower disc, from left to right, are:
- Force button
- Force LED
- Status LED (off means the system is powered down; on means the system is ready; fast blinking means the system needs calibration; slow blinking means the wrist needs manual calibration)
4. Calibration
The device must be calibrated every time it is powered on to ensure accurate and repeatable end-effector positioning.
Position calibration: during calibration, place the calibration rod in the calibration hole (the opening at the center of the disc). After the device detects that it has reached the calibration position, it calibrates automatically, and the status LED stops blinking.
Orientation calibration: to calibrate the wrist joints, move the three wrist rotation axes and the gripper control axis to their respective end stops. After the device detects this, it finishes calibration on its own.
Do not touch the device during automatic calibration. Move the device only after calibration is complete and the LED has stopped blinking.
5. HapticDesk Visualization Test
Power on the Omega.7 and finish calibration.
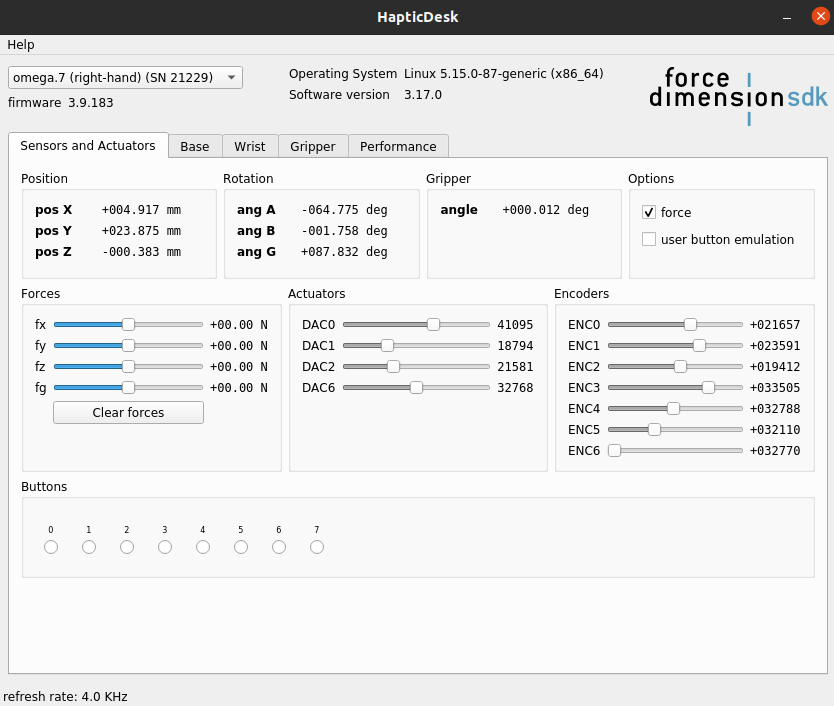
Enter the sdk-3.17.0\bin directory and start the visualization window with sudo ./HapticDesk. Move the Omega.7 master device, and you should see the position, rotation angles, and gripper angle at the top of the UI update accordingly.
💻 Related Programs
1. Configure the Environment
Create a conda environment
conda create -n omega python=3.8
conda activate omega
python3 -m pip install forcedimension-core numpy
Install libraries
Download the latest SDK, enter the sdk directory, and install manually (check that the version number is correct)
cd sdk-3.17.0

sudo cp include/* /usr/local/include
sudo cp lib/release/*/* /usr/local/lib
sudo chmod 755 /usr/local/lib/libdhd.so.3.17.0
sudo chmod 755 /usr/local/lib/libdrd.so.3.17.0
sudo chmod 755 /usr/local/lib/libdhd.a
sudo chmod 755 /usr/local/lib/libdrd.a
sudo ln -s /usr/local/lib/libdhd.so.3.17.0 /usr/local/lib/libdhd.so
sudo ln -s /usr/local/lib/libdrd.so.3.17.0 /usr/local/lib/libdrd.so
To uninstall, use a similar approach
sudo rm /usr/local/include/dhdc.h
sudo rm /usr/local/include/drdc.h
sudo rm /usr/local/lib/libdhd.a
sudo rm /usr/local/lib/libdhd.so.3.17.0
sudo rm /usr/local/lib/libdhd.so
sudo rm /usr/local/lib/libdrd.a
sudo rm /usr/local/lib/libdrd.so.3.17.0
sudo rm /usr/local/lib/libdrd.so
Configure permissions, mainly so that a normal user can access the USB device for ROS and Python control
Add a udev rule for the device under /etc/udev/rules.d/. Create a file named 40-haptic-device-udev.rules
sudo gedit /etc/udev/rules.d/40-haptic-device-udev.rulesThen paste the following template
TTR{idVendor}=="", ATTR{idProduct}=="", MODE="0666", SYMLINK+="haptic_device_%k", GROUP="plugdev"
SUBSYSTEM=="usb", ACTION=="add", ENV{DEVTYPE}=="usb_device", ATTR{idVendor}=="", ATTR{idProduct}=="", MODE="0664", GROUP="plugdev"
Use lsusb to inspect the vendor ID and product ID; the format is idVendor:idProduct
- In
SYMLINK+="haptic_device_%k", replacehaptic_devicewith the device name (without spaces) - Fill in your own vendor ID and product ID inside the double quotes for
ATTR{idVendor}andATTR{idProduct}
An example after editing looks like this:
ATTR{idVendor}=="1451", ATTR{idProduct}=="0301", MODE="0666", SYMLINK+="haptic_device_%k", GROUP="plugdev"
SUBSYSTEM=="usb", ACTION=="add", ENV{DEVTYPE}=="usb_device", ATTR{idVendor}=="1451", ATTR{idProduct}=="0301", MODE="0664", GROUP="plugdev"
Run the following commands to reload the udev rules
sudo udevadm control --reload-rules && sudo udevadm trigger2. Basic Program
Use the following program to print the master device position
import forcedimension_core.containers as containers
import forcedimension_core.dhd as dhd

dhd.open()
pos = containers.Vec3()

# Equivalent to: dhd.getPosition(out=pos)
dhd.direct.getPosition(out=pos)

print(pos)
3. Control a MuJoCo Robot with the Master Device
import gym
import numpy as np
from gym import error, spaces

import diffusion_policy.env.gym_envs
from diffusion_policy.env.gym_envs.utils import ctrl_set_action, mocap_set_action
import cv2
import mujoco_py
from diffusion_policy.env.gym_envs import rotations

from scipy.spatial.transform import Rotation as R

import forcedimension_core.containers as containers
import forcedimension_core.dhd as dhd
import forcedimension_core.drd as drd

import ctypes

#################### 初始化设备 ####################
# 打开设备
dhd.open()

# 全局变量,位置、旋转矩阵、夹爪角度、线速度、角速度
pos = np.zeros(3)
matrix = np.zeros((3, 3))
gripper_pointer = ctypes.pointer(ctypes.c_double(0.0))
linear_velocity = np.zeros(3)
angular_velocity = np.zeros(3)
euler = np.zeros(3)

# 力控配置
devicePosition = np.zeros(3)
deviceRotation = np.zeros((3, 3))
deviceLinearVelocity = np.zeros(3)
deviceAngularVelocity = np.zeros(3)

flagHoldPosition = True
flagHoldPositionReady = True
holdPosition = np.zeros(3)
holdRotation = np.zeros((3, 3))
last_display_time = dhd.os_independent.getTime()

# # 连续控制
# pos_continus = np.zeros(3)
# pos_result = np.zeros(3)
# flag_continus = False

# Drd 初始化
if drd.open() < 0:
    print("无法打开设备: " + drd.error())
    dhd.os_independent.sleep(2)
if not drd.isInitialized() and drd.autoInit() < 0:
    print("无法初始化设备: " + drd.error())
    dhd.os_independent.sleep(2)
if drd.start() < 0:
    print("无法启动设备: " + drd.error())
    dhd.os_independent.sleep(2)
if drd.moveToPos(pos, block=True) < 0:
    print("无法移动到位置: " + drd.error())
    dhd.os_independent.sleep(2)
if drd.moveToRot(euler, block=True) < 0:
    print("无法移动到旋转矩阵: " + drd.error())
    dhd.os_independent.sleep(2)
if drd.stop(True) < 0:
    print("无法停止设备: " + drd.error())
    dhd.os_independent.sleep(2)

# 记录相邻动作
last_action = np.array([1.17, 0.75, 0.70, -np.pi, 0., -np.pi/2, 0.])
action_list = []

#################### 常用函数 ####################

def quaternion2euler(quaternion):
    r = R.from_quat(quaternion)
    euler = r.as_euler('xyz', degrees=True)
    return euler


def euler2quaternion(euler):
    r = R.from_euler('xyz', euler, degrees=True)
    quaternion = r.as_quat()
    return quaternion


test_env = gym.make('PutInDrawer-v0')
test_env.reset()
# obs = test_env.reset()
# episode_acs = []
# episode_obs = []
# episode_info = []
# episode_obs.append(obs)    # 存储初始观察值
# idx = 0
# time_step = 0   # 记录总的时间步数
i=0
# viewer2 = mujoco_py.MjRenderContextOffscreen(test_env.sim, 0)
while True:
    ######################### 读取设备状态 #########################
    # 获取位置、旋转矩阵
    dhd.getPositionAndOrientationFrame(pos, matrix)
    # 获取夹爪角度
    dhd.getGripperAngleDeg(gripper_pointer)
    gripper = gripper_pointer.contents.value
    # 获取线速度
    dhd.getLinearVelocity(linear_velocity)
    # 获取角速度
    dhd.getAngularVelocityDeg(angular_velocity)

    ######################### 控制设备位置 #########################
    # 设置设备状态
    devicePosition = pos
    deviceRotation = matrix
    deviceLinearVelocity = linear_velocity
    deviceAngularVelocity = angular_velocity
    deviceForce = np.zeros(3)
    deviceTorque = np.zeros(3)
    deviceGripperForce = 0.0

    # 设置刚度和阻尼
    Kp = 2000.0
    Kv = 10.0
    Kr = 5.0
    Kw = 0.05

    # 保持设备位置
    if flagHoldPosition:
        if flagHoldPositionReady:
            # 计算反作用力
            force = -Kp * (devicePosition - holdPosition) - Kv * deviceLinearVelocity
            # 计算反作用力矩
            deltaRotation = np.transpose(deviceRotation) @ holdRotation
            axis, angle = np.zeros(3), 0.0
            # 计算旋转轴和角度
            angle = np.arccos((np.trace(deltaRotation) - 1) / 2)
            if angle > 1e-6:
                axis = np.array([deltaRotation[2, 1] - deltaRotation[1, 2],
                                 deltaRotation[0, 2] - deltaRotation[2, 0],
                                 deltaRotation[1, 0] - deltaRotation[0, 1]]) / (2 * np.sin(angle))
            torque = deviceRotation @ ((Kr * angle) * axis) - Kw * deviceAngularVelocity

            # 加上所有力
            deviceForce = deviceForce + force
            deviceTorque = deviceTorque + torque
        else:
            holdPosition = devicePosition
            holdRotation = deviceRotation
            flagHoldPositionReady = True

    # 设置设备力
    MaxTorque = 0.3
    if np.linalg.norm(deviceTorque) > MaxTorque:
        deviceTorque = MaxTorque * deviceTorque / np.linalg.norm(deviceTorque)
    # dhd.setForceAndTorqueAndGripperForce(deviceForce, deviceTorque, deviceGripperForce)

    if dhd.setForceAndTorqueAndGripperForce(np.zeros(3), np.zeros(3), 0.0) < 0:
        print("无法设置力和力矩: " + dhd.error())
        dhd.os_independent.sleep(2)
        break

    ######################### 键盘控制 #########################
    if dhd.os_independent.kbHit():
        keyboard = dhd.os_independent.kbGet()
        if keyboard == ' ':
            continue
        if keyboard == 'q':
            break

    # 周期打印设备状态,并刷新输出
    device_time = dhd.os_independent.getTime()
    if device_time - last_display_time > 0.1:
        last_display_time = device_time
        print("Pos (%.3f %.3f %.3f) m | Gripper %.3f deg | Rot (%.3f %.3f %.3f %.3f %.3f %.3f %.3f %.3f %.3f) | Force (%.3f %.3f %.3f) N | Freq %.2f kHz \r"
              % (pos[0], pos[1], pos[2], gripper, matrix[0, 0], matrix[0, 1], matrix[0, 2], matrix[1, 0], matrix[1, 1], matrix[1, 2], matrix[2, 0], matrix[2, 1], matrix[2, 2], deviceForce[0], deviceForce[1], deviceForce[2], dhd.getComFreq()), end="\r", flush=True)

    # action = np.array([0, 0., 0, 0., 0., 0., 0.])
    # print(action)
    action_pos = pos
    action_matrix = matrix
    action_gripper = gripper

	# 将主手的运动范围映射到mujoco机器人工作空间
    # x从[-0.05,0.05]映射到[0.8,1.5]
    action_pos[0] = pos[0]*7    # + 1.15
    # y从[-0.1,0.1]映射到[0,1.2]
    action_pos[1] = pos[1]*6    # + 0.6
    # z从[-0.05,0.1]映射到[0.4,1.0]
    action_pos[2] = pos[2]*4    # + 0.6

    # 将旋转矩阵转换为四元数
    action_matrix *= 0.05
    # 绕x轴旋转180度的旋转矩阵
    matrix_rotation_x_180 = np.array([[1, 0, 0], [0, -1, 0], [0, 0, -1]])
    # 绕z轴旋转-90度的旋转矩阵
    matrix_rotation_z_n90 = np.array([[0, 1, 0], [-1, 0, 0], [0, 0, 1]])
    # 旋转矩阵乘法
    action_matrix = np.dot(action_matrix, matrix_rotation_x_180)
    action_matrix = np.dot(action_matrix, matrix_rotation_z_n90)


    action_quat = rotations.mat2quat(action_matrix)

    # 将夹爪角度从[0,30](0为夹爪关闭),归一化到[0,1](0为夹爪打开)
    action_gripper = abs((action_gripper - 30.0) / 30.0)

    # test_env.sim.step()             # 执行一步仿真,模拟环境中物体的运动和交互
    action = np.concatenate([action_pos, action_quat, [action_gripper]])
    test_env.step(action)             # 执行一步仿真,模拟环境中物体的运动和交互

    # gym 渲染
    test_env.render(mode="human")

    # 获取action
    action_list.append(action)

# 将动作列表转换为numpy数组并保存为文件
action_list = np.array(action_list)
# np.save("data/put_in_drawer/habtic_actions.npy", action_list)

if drd.close() < 0:
    print("无法关闭设备: " + drd.error())
    dhd.os_independent.sleep(2)
print("\n设备已关闭")
Comments