Contents
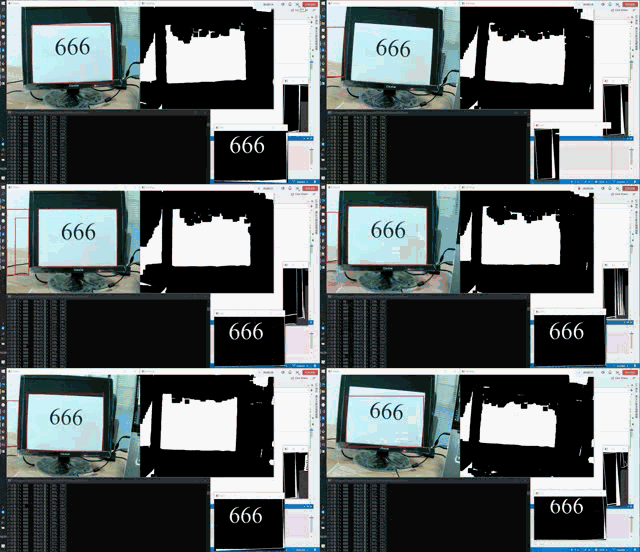
This article aims to recognize digits in camera images. Practical applications include license plate number recognition and recognizing printed digits on A4 paper in some competitions. The project results are shown below. Click here to download the complete project files:
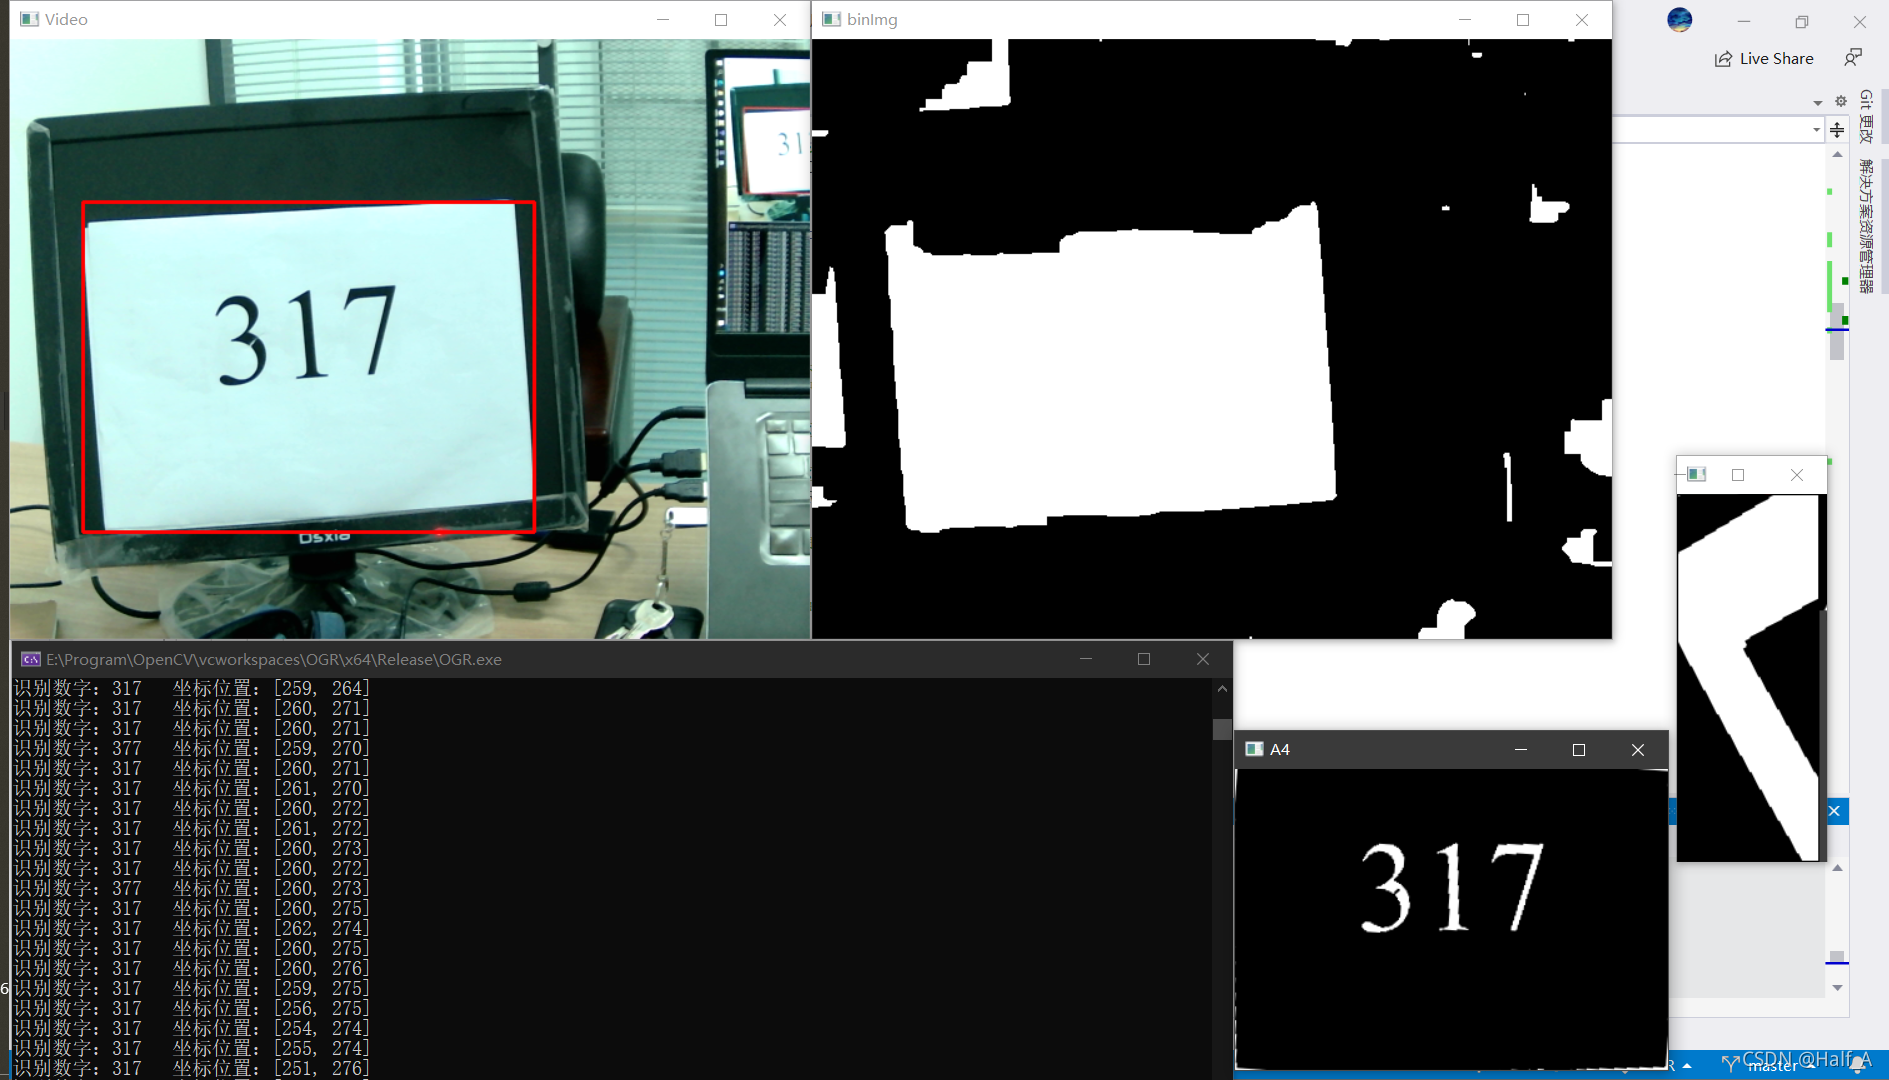
Camera-based digit recognition consists of two steps:
- Extract the ROI from the image, such as the rectangular license plate area or the A4 paper image.
- Recognize digits in the ROI.
Digit recognition is relatively straightforward, so I will first introduce its methods and principles.
I. Two Methods for Digit Recognition
1.1 Contour Extraction
The idea is to extract contours from the ROI and then match every detected contour against the templates one by one. A similarity above the specified threshold can be considered a successful recognition.
The function used to find contours is findContours(). It stores all detected contours in contours. A loop then draws the smallest rectangle enclosing each contour.
Use each small rectangle to extract its corresponding contour image, then subtract the template from it. A smaller difference means the pixels are closer and the images are more similar, enabling digit matching.
//轮廓提取主函数
int main()
{
	//读取一张图像,转换为灰度图并进行二值化处理
    Mat srcImage = imread("E://Program//OpenCV//vcworkspaces//ogr_test//images//txt.jpg");  //读取图片
    Mat dstImage, grayImage, binImage;
    srcImage.copyTo(dstImage);  //将读取到的图片,深拷贝为dstImage
    cvtColor(srcImage, grayImage, COLOR_BGR2GRAY);                  //转换灰度图
    threshold(grayImage, binImage, 100, 255, cv::THRESH_BINARY_INV);     //转换二值图,设置阈值,高于100认为255

	//寻找轮廓
    vector<vector<Point>> contours;  //定义轮廓和层次结构
    vector<Vec4i> hierarchy;
    findContours(binImage, contours, hierarchy, cv::RETR_EXTERNAL, cv::CHAIN_APPROX_NONE); //寻找轮廓
    int i = 0;
    vector<vector<Point>>::iterator It;
    Rect a4rect[15];	//假设最多不会超过15个轮廓
	for (It = contours_rec.begin(); It < contours_rec.end(); It++) {                        //画出包围数字的最小矩形
		a4rect[i].x = (float)boundingRect(*It).tl().x;
		a4rect[i].y = (float)boundingRect(*It).tl().y;
		a4rect[i].width = (float)boundingRect(*It).br().x - (float)boundingRect(*It).tl().x;
		a4rect[i].height = (float)boundingRect(*It).br().y - (float)boundingRect(*It).tl().y;
		if ((a4rect[i].height > 80) && (a4rect[i].width > 50) && (a4rect[i].height < 300) && (a4rect[i].width < 300)) {
			rectangle(dstImage, a4rect[i], Scalar(0, 0, 255), 2, 8, 0);	//在原图像中用红框画出识别到的各轮廓
			rectangle(binImage, a4rect[i], Scalar(0, 0, 0), 0, 8, 0);
			i++;
		}
	}
	imshow("dstImage", dstImage);

	//将图像轮廓逐一与模板匹配
	Mat num[15];
	int matchingNum = 0;	//匹配到的数字
	int matchingRate = 0;	//相似率
    for (int j = 0; j < i; j++) {
    	a4binImg(a4rect[j]).copyTo(num[j]);		//提取包围数字的矩形区域至num[j]
        imgMatch(num[j], matchingRate, matchingNum);	//数字匹配
        if (matchingRate < 400000) {
        	cout << "识别数字:" << matchingNum << "\t匹配率:" <<  matchingRate << endl;
			//imwrite(to_string(matchingNum) + ".jpg", num[j]);
		}
	}

    system("pause");
    return 0;
}
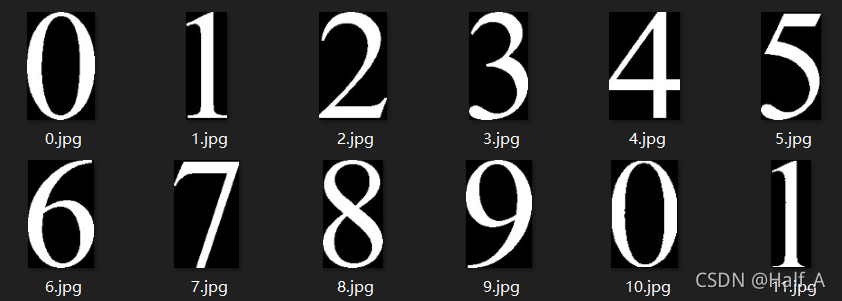
Before subtracting the two images, you need to create a set of templates. You can type the digits 0-9 in Notepad, take screenshots, and use the imwrite function above to save the templates. You can also download them from my GitHub repository, where 0.jpg-9.jpg are the template files.
//获取所有像素点和,用于求两图像相减后所得图像的所有像素之和
int getPixelSum(Mat& image){
	int a = 0;
	for (int row = 0; row < image.rows; row++) {
		uchar* current_pixel = image.ptr<uchar>(row);
		for (int col = 0; col < image.cols; col++) {
			a += *current_pixel++;	//指针遍历像素点反转颜色
		}
	}
	return a;
}

//模板匹配函数,两图像做差
int imgMatch(Mat& image, int& rate, int& num) {
	Mat imgSub;
	double min = 10e6;
	num = 0;
	rate = 0;

	for (int i = 0; i < 10; i++) {
		Mat templatimg = imread("E:/Program/OpenCV/vcworkspaces/OGR/images/" + std::to_string(i) + ".jpg", IMREAD_GRAYSCALE);
		resize(image, image, Size(32, 48), 0, 0, cv::INTER_LINEAR);	//将两图像大小调至相同
		resize(templatimg, templatimg, Size(32, 48), 0, 0, cv::INTER_LINEAR);
		absdiff(templatimg, image, imgSub);
		rate = getPixelSum(imgSub);
		if (rate < min) {
			min = rate;
			num = i;
		}
	}
	return num;
}
1.2 Row-and-Column Scanning
This method mainly follows the article Detailed OpenCV Digit Recognition Tutorial. My thanks to LTG01 for sharing it so generously.
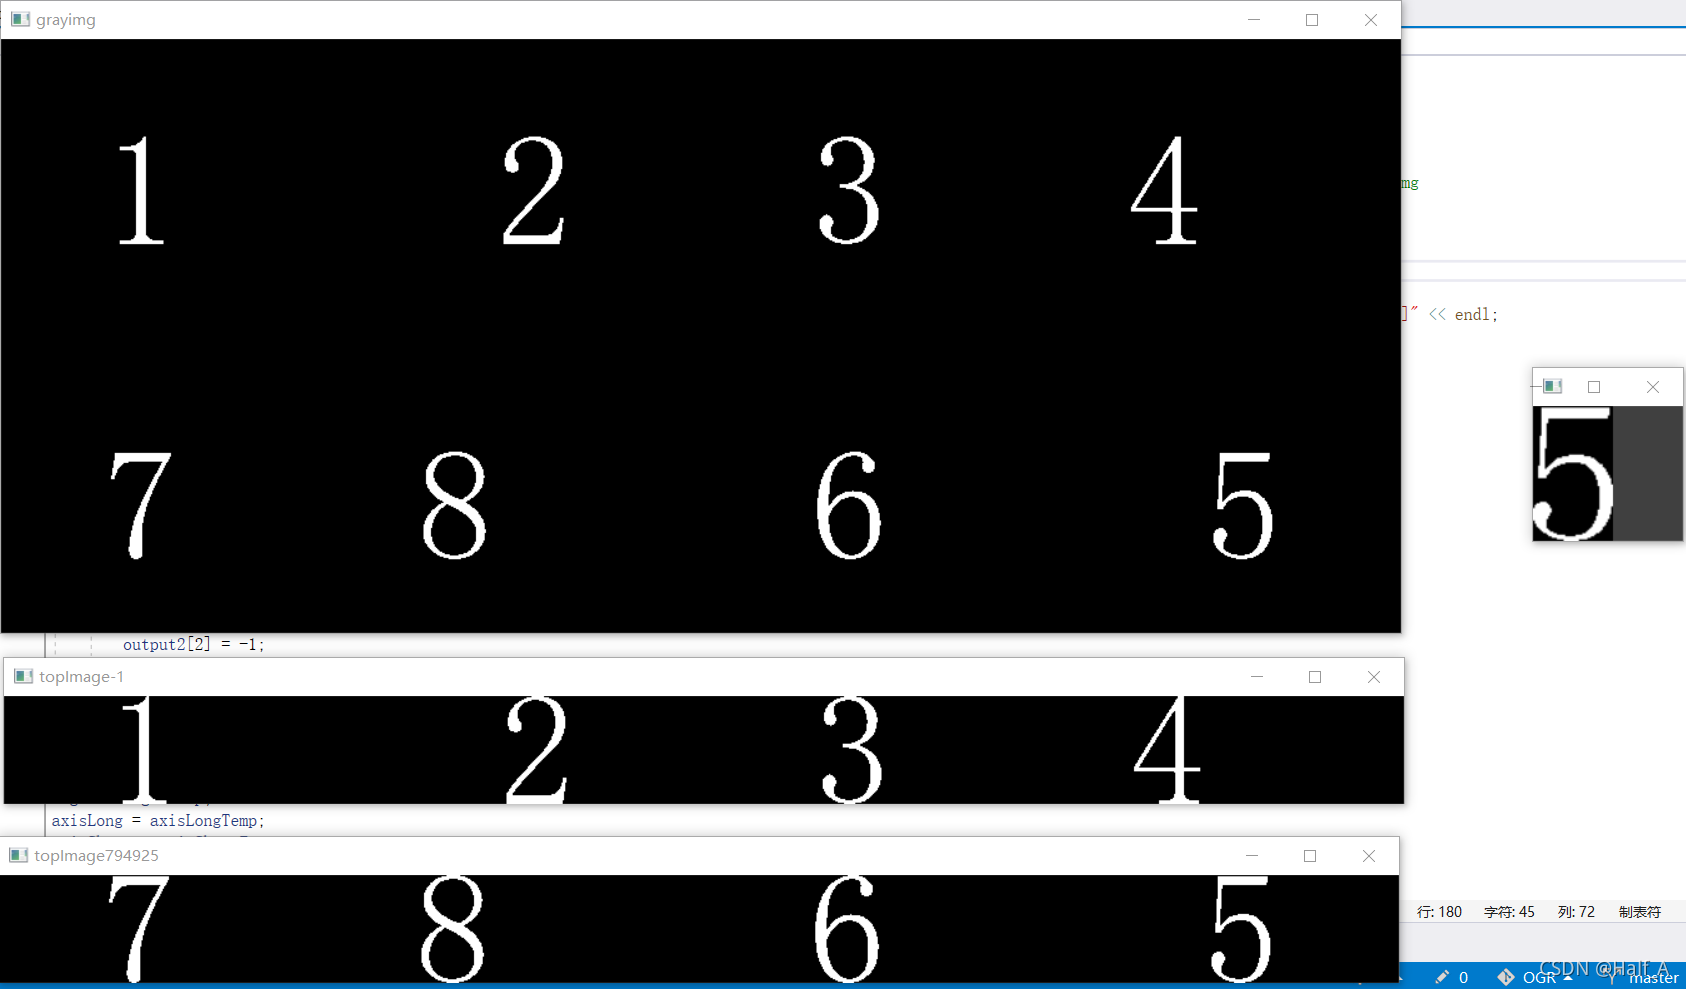
The basic process is as follows:
- Binarize the image so that the digits are white and everything else is black.
- First scan the image row by row and calculate each row’s sum. If the pixel sum of the first row is 0, continue scanning downward until reaching a row whose pixel sum is not 0. Record its row number as the top of the digit.
- Continue scanning downward through each row occupied by the digit. When the row’s pixel sum becomes 0 again, record that row number as the bottom of the digit, then crop the area between the top and bottom.
- Scan the cropped image column by column and calculate each column’s sum in the same way. Record the left and right column numbers, then use them to extract the smallest image containing the digit from the image cropped in the previous step.
- Match this smallest image against the templates.
int main()
{
	//读取图像并进行二值化处理
	Mat src = imread("E:/Program/OpenCV/vcworkspaces/ogr_test/images/txt.jpg",IMREAD_GRAYSCALE);
    Mat grayImage;					//定义Mat对象用于存储每一帧数据
    threshold(src, grayImage, 100, 255, THRESH_BINARY_INV);     //转换二值图,设置阈值,高于50认为255
	imshow("grayimg", grayImage);

	//进行行列扫描
    Mat leftImg, rightImg, topImg, bottomImg;
    int topRes = cutTop(grayImage, topImg, bottomImg);	//对二值图像逐行扫描,获得行像素之和>0的部分topImg,以及剩余部分bottomImg
    int matchNum = -1, matchRate = 10e6;
	while (topRes == 0)		//当仍存在行像素和>0的部分时
    {
        int leftRes = cutLeft(topImg, leftImg, rightImg);	//对行像素之和>0的部分topImg逐列扫描,获得列像素之和>0的部分leftImg,以及剩余部分rightImg
        while (leftRes == 0) {
            imgMatch(leftImg, matchNum, matchRate);	//数字识别
			//getSubtract(topImg);
            imshow("num", leftImg);
            if (matchRate < 300000) {
                cout << "识别数字:" << matchNum << "\t\t匹配度:" << matchRate << endl;
                //imwrite(to_string(matchingNum) + ".jpg", num[j]);
            }
			Mat srcTmp = rightImg.clone();
            leftRes = cutLeft(srcTmp, leftImg, rightImg);	//对剩余部分rightImg继续逐列扫描
        }
        Mat srcTmp = bottomImg.clone();
        topRes = cutTop(srcTmp, topImg, bottomImg);			//对剩余部分bottomImg继续逐行扫描
    }

	waitKey(0);
	destroyAllWindows();;
	return 0;
}
For the complete code that recognizes digits using the scanning method, see the scan branch of my GitHub repository.
II. Extracting the ROI from the Image
The steps for extracting the ROI are as follows:
- Read each frame from the camera
- Binarize the image
- Apply morphological processing to the image
- Set constraints to find and mark the target region (this is the key step)
2.1 Reading Camera Images
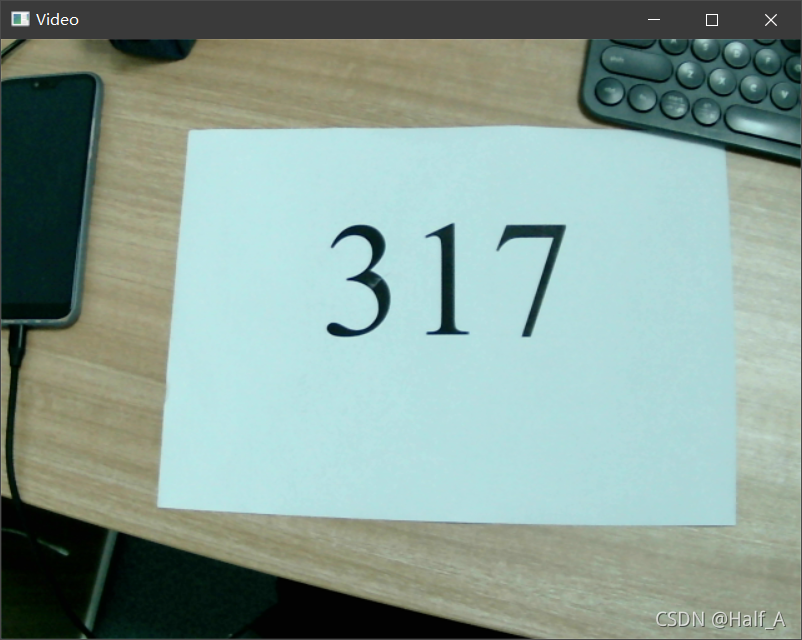
The principles of reading from a camera were covered in the previous article, Reading and Saving Camera Video. The main function used is capture.read(). This function captures each video frame and returns the frame that was just captured. The sample program is as follows:
int main()
{
    VideoCapture capture(0);	//创建VideoCapture类,打开电脑默认摄像头传参0,如果有外置摄像头参数为1
    int frame_width = capture.get(CAP_PROP_FRAME_WIDTH);	//获取摄像头的宽、高、帧数、FPS
    int frame_height = capture.get(CAP_PROP_FRAME_HEIGHT);
    Mat frame;					//定义Mat对象用于存储每一帧数据

    while (capture.isOpened()) {
        capture.read(frame);	//逐帧读取视频
        //flip(frame, frame, 1);	//将读取的视频左右反转
        if (frame.empty()) {	//如果视频结束或未检测到摄像头则跳出循环
            break;
        }

        imshow("Video", frame);	//每次循环显示一帧图像,frame就是每帧图像

        char k = waitKey(333);	//两帧读取的间隔时间
        if (k == 'q') {			//按下q键退出循环
            break;
        }
    }

    capture.release();			//释放视频
    system("pause");
    return 0;
}
2.2 Binarizing the Image
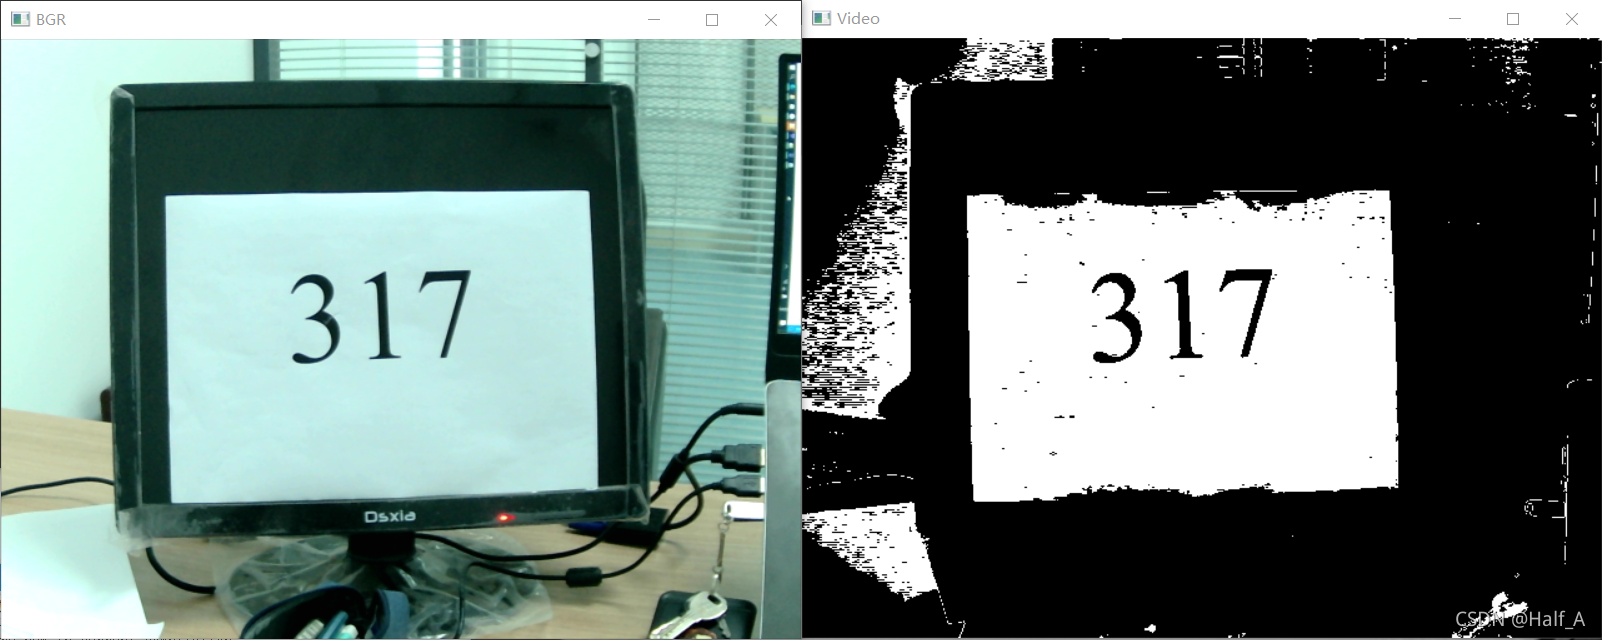
Binarize the image based on the color components of each pixel. Under normal exposure, the BGR values of A4 paper are all approximately 215, while the color information of a license plate is approximately B=138, G=63, R=23. However, color information may vary across environments, so the conditions need to be relaxed to some extent before using other conditions to locate the target region accurately.
//图像二值化
void binaryProc(Mat& image) {
	unsigned char pixelB, pixelG, pixelR;  //记录各通道值
	unsigned char DifMax = 40;             //基于颜色区分的阈值设置
	unsigned char WhiteMax = 50;		   //判断白色
	unsigned char B = 215, G = 215, R = 215; //各通道的阈值设定,针对与A4纸
	int i = 0, j = 0;
	for (i = 0; i < image.rows; i++)   //通过颜色分量将图片进行二值化处理
	{
		for (j = 0; j < image.cols; j++)
		{
			pixelB = image.at<Vec3b>(i, j)[0]; //获取图片各个通道的值
			pixelG = image.at<Vec3b>(i, j)[1];
			pixelR = image.at<Vec3b>(i, j)[2];

			if ((abs(B - pixelB) < DifMax) && (abs(G - pixelG) < DifMax) && (abs(R - pixelR) < DifMax) && abs(pixelB - pixelG) < WhiteMax && abs(pixelG - pixelR) < WhiteMax && abs(pixelB - pixelR) < WhiteMax)
			{                                           //将各个通道的值和各个通道阈值进行比较
				image.at<Vec3b>(i, j)[0] = 255;     //符合颜色阈值范围内的设置成白色
				image.at<Vec3b>(i, j)[1] = 255;
				image.at<Vec3b>(i, j)[2] = 255;
			}
			else
			{
				image.at<Vec3b>(i, j)[0] = 0;        //不符合颜色阈值范围内的设置为黑色
				image.at<Vec3b>(i, j)[1] = 0;
				image.at<Vec3b>(i, j)[2] = 0;
			}
		}
	}
}
2.3 Morphological Processing
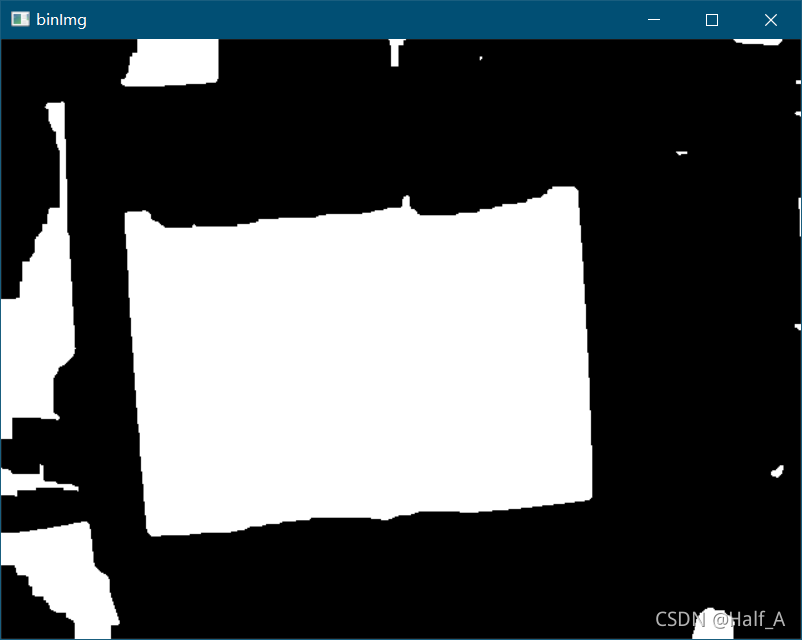
The A4 paper region is already displayed fairly clearly and completely after binarization, but some noise remains. Apply morphological processing to eliminate this noise. Dilating and then eroding the image can fill small gaps, connect nearby objects, and smooth boundaries.
//形态学处理
void morphTreat(Mat& binImg) {
	Mat BinOriImg;     //形态学处理结果图像
	Mat element = getStructuringElement(MORPH_RECT, Size(5, 5)); //设置形态学处理窗的大小
	GaussianBlur(binImg, binImg, Size(5, 5), 11, 11);
	dilate(binImg, binImg, element);     //进行多次膨胀操作
	dilate(binImg, binImg, element);
	dilate(binImg, binImg, element);
	dilate(binImg, binImg, element);
	dilate(binImg, binImg, element);

	erode(binImg, binImg, element);      //进行多次腐蚀操作
	erode(binImg, binImg, element);
	erode(binImg, binImg, element);
	erode(binImg, binImg, element);
	erode(binImg, binImg, element);
	//imshow("形态学处理后", BinOriImg);        //显示形态学处理之后的图像
	cvtColor(binImg, binImg, CV_BGR2GRAY);   //将形态学处理之后的图像转化为灰度图像
	threshold(binImg, binImg, 100, 255, THRESH_BINARY); //灰度图像二值化
}
The size of the rectangular kernel and the number of dilation and erosion operations affect the processing results. The processed result looks approximately as follows.
2.4 Setting Constraints to Find the Target Region
After morphological processing, the region containing the A4 paper is clearly visible in the image. However, the image will inevitably contain other objects whose colors are similar to the A4 paper, and these will also appear white. We therefore need to set constraints based on the characteristics of the A4 paper region to identify the A4 paper region among these white regions.
The main constraints I use here are:
- The rectangle’s area lies within a certain range
- The aspect ratio of A4 paper is 1.414; relax it to some extent and use it as a constraint
- The short side lies within a certain length range
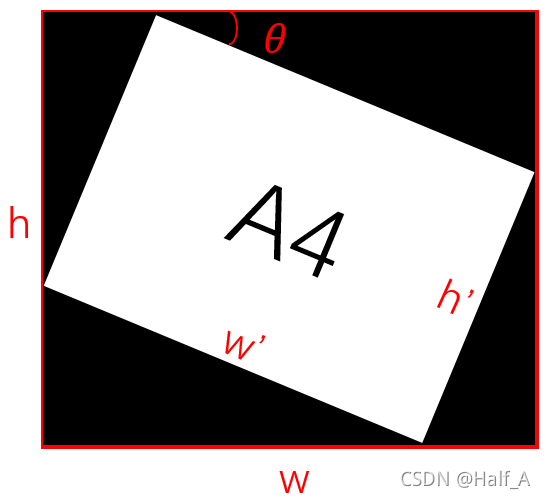
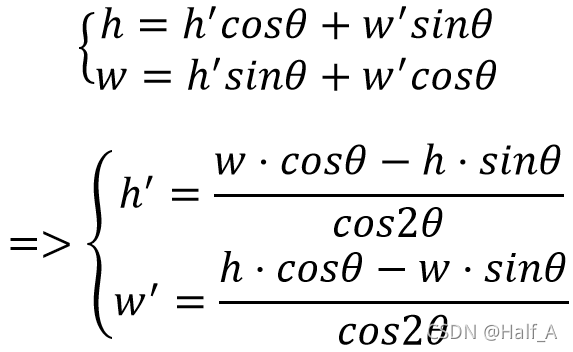
First, find the contours in the image and perform an initial check using their areas. For each contour whose area meets the criteria, obtain its bounding rectangle. Calculate the rectangle’s parameters, including vertex coordinates, length, width, area, and tilt angle, then evaluate the rectangle against the constraints. If the rectangular region meets the criteria, crop it out and use the previously calculated tilt angle to straighten the A4 paper image, making it easier to recognize the digits later. The image rotation function requires some mathematical knowledge. The height and width before and after rotation have a certain functional relationship. (h’ and w’ are the height and width of the rotated image.)
//图像旋转
void rotateProc(Mat& image, double angle) {
	Mat M;
	int h = image.rows;
	int w = image.cols;
	M = getRotationMatrix2D(Point2f(w / 2, h / 2), angle, 1.0);	//定义变换矩阵M
	double cos = abs(M.at<double>(0, 0));	//求cos值
	double sin = abs(M.at<double>(0, 1));	//求sin值
	int nw = abs(cos * w - sin * h) / abs(cos * cos - sin * sin);		//计算新的长、宽
	int nh = abs(cos * h - sin * w) / abs(cos * cos - sin * sin);
	M.at<double>(0, 2) += (nw / 2 - w / 2);		//计算新的中心
	M.at<double>(1, 2) += (nh / 2 - h / 2);
	warpAffine(image, image, M, Size(nw, nh), INTER_LINEAR, 0, Scalar(0, 0, 0));
	//imshow("Rotation", dst);
}
/************************** 提取A4纸区域并识别数字 *****************************/
		double length, area, rectArea;     //定义轮廓周长、面积、外界矩形面积
		double long2Short = 0.0;           //长边/短边
		Rect rect;           //外界矩形
		RotatedRect box;  //外接矩形
		CvPoint2D32f pt[4];    //矩形定点变量
		Mat pts;    //矩形定点变量
		double axisLong = 0.0, axisShort = 0.0;//矩形的长边和短边
		double Length;     //中间变量
		float  angle = 0;      //记录倾斜角度
		double location_x = 0.0;
		double location_y = 0.0;
		vector<vector<Point>> contours;
		vector<Vec4i>hierarchy;
		findContours(binImg, contours, hierarchy, CV_RETR_EXTERNAL, CV_CHAIN_APPROX_NONE);
		for (int i = 0; i < contours.size(); i++)
		{
			//绘制轮廓的最小外接矩形
			length = arcLength(contours[i], true);      //获取轮廓周长
			area = contourArea(contours[i]);			//获取轮廓面积
			if (area > 2000 && area < 300000)			//矩形区域面积大小判断,符合条件的继续
			{
				rect = boundingRect(contours[i]);		//计算矩形边界
				box = minAreaRect(contours[i]);		//获取轮廓的矩形
				boxPoints(box, pts);				//获取矩形四个顶点坐标(左上,右上,右下,左下)
				for (int row = 0; row < pts.rows; row++) {		//从列表中依次读出四个顶点坐标
					pt[row].x = pts.at<uchar>(row, 0);
					pt[row].y = pts.at<uchar>(row, 1);
				}
				angle = box.angle;              //得到倾斜角度
				if (angle > 45) {					//对于逆时针偏转的情况,倾斜角度为-(90-angle)
					angle = angle - 90;
				}

				axisLong = sqrt(pow(pt[1].x - pt[0].x, 2) + pow(pt[1].y - pt[0].y, 2));  //计算长轴(勾股定理)
				axisShort = sqrt(pow(pt[2].x - pt[1].x, 2) + pow(pt[2].y - pt[1].y, 2)); //计算短轴(勾股定理)


				if (axisShort > axisLong)		//如果短轴大于长轴,交换数据
				{
					Length = axisLong;
					axisLong = axisShort;
					axisShort = Length;
				}

				rectArea = axisLong * axisShort;	//计算矩形的实际面积

				long2Short = axisLong / axisShort;	//计算长宽比

				// 长宽比A4纸为1.414,利用长宽比、矩形面积和短边长度作为限制条件
				if (long2Short > 1 && long2Short < 1.8  && rectArea > 5000 && rectArea < 300000 && axisShort > 50)
				{
					rectangle(frame, rect, Scalar(0, 0, 255), 2, 8, 0);		//在摄像头图像中画出矩形区域
					if (rect.width > 100 && rect.height > 100 && axisShort>100) {	//缩小矩形范围,便于数字识别
						rect.x += 40;
						rect.y += 40;
						rect.width -= 40;
						rect.height -= 40;
					}
					imshow("Video", frame);					//显示摄像头拍摄画面
					location_x = rect.x + rect.width / 2;	//获得矩形中心坐标,即A4纸中心坐标
					location_y = rect.y + rect.height / 2;
					Mat a4Img = frame(rect);				//提取A4纸区域
					Mat a4binImg;
					cvtColor(a4Img, a4binImg, CV_BGR2GRAY);   //将A4纸区域转化为灰度图像
					threshold(a4binImg, a4binImg, 120, 255, THRESH_BINARY); //灰度图像二值化
					colorReverse(a4binImg);					//颜色反转
					rotateProc(a4binImg, angle);		//根据前所计算角度,对图像进行旋转,保证数字水平存在
					imshow("A4", a4binImg);

					/*******************  数字识别方法  ********************/

					//所获得的a4binImg就是经过二值化处理后的A4纸区域
					//使用上面介绍的数字识别方法即可级别

					/*****************************************************/
				}
			}
		}

Comments