![[OpenCV/C++] Implementation Principles and Code Walkthrough for Digit Recognition with KNN](https://img.mahaofei.com/img/202112231934427-opencv-knn-2.png)
Contents
I. KNN Principles
1.1 Introduction to KNN Principles
The KNN algorithm, or K-nearest neighbors algorithm, is aptly named: when predicting a new value x, determine which class x belongs to based on which class most of the K points nearest to it belong to.
zzzzMing - Big Data Technology - A Plain-Language Introduction to the KNN Algorithm
When K=3, the three shapes nearest to x include two triangles and one circle. Because 2>1, x is more likely to be a triangle.
When K=5, the five shapes nearest to x include two triangles and three circles. Because 3>2, x is more likely to be a circle.
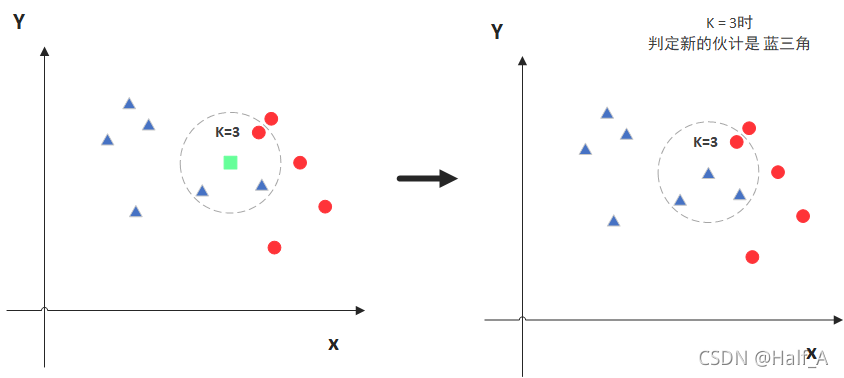
By the same analogy applied to image recognition, before using the KNN algorithm we need a large number of training samples, and we need to know the class of each sample. (For example, a large number of digit images, with each image labeled with which digit it represents). When we recognize a digit, we are essentially finding the K samples in the training set that are closest to the image to be recognized, then counting which digit appears most often among those K samples—that digit is the recognition result.
1.2 Key Parameters of KNN
① How many nearest-neighbor samples to find—the choice of K
The value of K determines how many nearest-neighbor images are searched during image recognition. As shown in the example above, choosing different K values can yield completely different recognition results. Therefore K is one of the most critical parameters in the KNN algorithm, and it directly affects model performance.
If K is too small, the recognition result will be heavily influenced by sample quality. If some training samples contain errors or noise, and the nearest-neighbor search happens to pick those items, the recognition result will certainly be wrong. Increasing K to search among more samples effectively reduces the impact of noisy samples.
If K is too large—for example, if K equals the number of training samples—then regardless of which image is to be recognized, the result will always be whichever class is most common in the sample set.
So how should we choose K? In theory, there is an optimal value in the relationship between K and recognition accuracy. We can run multiple experiments and choose the best K based on the results. (For example, accuracy is 72 when K=3; 91 when K=5; 81 when K=8—then choosing K=5 would be a relatively good choice.)
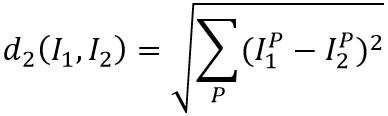
② How to measure “closeness”—distance calculation Distance functions commonly use Manhattan distance or Euclidean distance.
Manhattan distance is the sum of the absolute differences across every dimension of the sample features. (For images, this means taking the difference at each pixel between two images.)

Euclidean distance is the square root of the sum of squared differences across every dimension of the sample features.
II. KNN Algorithm for Handwritten Digit Recognition
KNN algorithm handwritten digit recognition source program - Download here
2.1 Training Process Code Walkthrough
First, we need to obtain training samples. The OpenCV installation directory provides sample images of handwritten digits at opencv\sources\samples\data\digits.png. This image contains 5x100 samples for each digit, and each digit occupies a 20x20 pixel region, so we can extract the training samples we need from this image.
We crop the sample image column by column. Each time we crop one sample, we add it to data and simultaneously add the corresponding digit to lable. This way we obtain data and lable with a one-to-one correspondence between images and digits.
	Mat img = imread("E:/Program/OpenCV/vcworkspaces/knn_test/images/data/digits.png");
	Mat gray;
	cvtColor(img, gray, COLOR_BGR2GRAY);
	int b = 20;
	int m = gray.rows / b;   //原图为1000*2000
	int n = gray.cols / b;   //裁剪为5000个20*20的小图块
	Mat data, labels;   //特征矩阵

	for (int i = 0; i < n; i++)
	{
	    int offsetCol = i * b; //列上的偏移量
	    for (int j = 0; j < m; j++)
	    {
	        int offsetRow = j * b;  //行上的偏移量
	                              //截取20*20的小块
	        Mat tmp;
	        gray(Range(offsetRow, offsetRow + b), Range(offsetCol, offsetCol + b)).copyTo(tmp);
	        //reshape  0:通道不变  其他数字,表示要设置的通道数
	        //reshape  表示矩阵行数,如果设置为0,则表示保持原有行数不变,如果设置为其他数字,表示要设置的行数
	        data.push_back(tmp.reshape(0, 1));  //序列化后放入特征矩阵
	        labels.push_back((int)j / 5);  //对应的标注
	    }
	}
With these training samples we can create a KNN model.
If we need to test the model’s recognition accuracy, we can select the first 3000 samples from the 5000 samples we obtained as training data, and the remaining 2000 as test data. Use the KNN model to evaluate how correctly the test data is recognized against the samples.
	data.convertTo(data, CV_32F); //uchar型转换为cv_32f
	int samplesNum = data.rows;
	int trainNum = 500;
	Mat trainData, trainLabels;
	trainData = data(Range(0, trainNum), Range::all());   //前3000个样本为训练数据
	trainLabels = labels(Range(0, trainNum), Range::all());

	//使用KNN算法
	int K = 5;
	Ptr<TrainData> tData = TrainData::create(trainData, ROW_SAMPLE, trainLabels);
	model = KNearest::create();
	model->setDefaultK(K);
	model->setIsClassifier(true);
	model->train(tData);
	//预测分类
	double train_hr = 0, test_hr = 0;
	Mat response;
	// compute prediction error on train and test data
	for (int i = 0; i < samplesNum; i++)
	{
	    Mat sample = data.row(i);
	    float r = model->predict(sample);   //对所有行进行预测
	                                        //预测结果与原结果相比,相等为1,不等为0
	    r = std::abs(r - labels.at<int>(i)) <= FLT_EPSILON ? 1.f : 0.f;

	    if (i < trainNum)
	        train_hr += r;  //累积正确数
	    else
	        test_hr += r;
	}

	test_hr /= samplesNum - trainNum;
	train_hr = trainNum > 0 ? train_hr / trainNum : 1.;

	printf("accuracy: train = %.1f%%, test = %.1f%%\n",
	    train_hr * 100., test_hr * 100.);
2.2 Prediction and Classification Workflow
After the training samples are prepared, prediction is very simple: read in the image to be recognized, binarize it, then resize it to match the sample image size (20x20). Push the processed image into test, and you can directly use the KNN model created above for prediction.
    //预测分类
    Mat img = imread("E:/Program/OpenCV/vcworkspaces/knn_test/images/test/4.jpg");
    cvtColor(img, img, COLOR_BGR2GRAY);
    //threshold(src, src, 0, 255, CV_THRESH_OTSU);
    imshow("Image", img);
    resize(img, img, Size(20, 20));
    Mat test;
    test.push_back(img.reshape(0, 1));
    test.convertTo(test, CV_32F);
    int result = model->predict(test);
    cout << "识别数字:" << result << endl;
III. KNN Algorithm for Printed Digit Recognition
KNN algorithm printed digit recognition source program -Download here Recognizing printed digits follows the same principle as recognizing handwritten digits; only the training samples differ. Here I created 1000 training samples in different fonts. An example loading approach:
	//训练结果不存在,重新训练
	int add_image_num = 1000;   //扩充训练数据的文件夹个数
	int filenum = 0;
	Mat data, labels;   //特征矩阵

	for (int i = 0; i < add_image_num; i++)
	{
	    Mat addimg = imread("E:/Program/OpenCV/vcworkspaces/knn_test/images/data/" + to_string(filenum) + ".jpg");
	    cvtColor(addimg, addimg, COLOR_BGR2GRAY);
	    //threshold(src, src, 0, 255, CV_THRESH_OTSU);
	    resize(addimg, addimg, Size(20, 20));

	    data.push_back(addimg.reshape(0, 1));  //序列化后放入特征矩阵
	    labels.push_back((int)((filenum++) % 10));  //对应的标注
	}
After the training samples are loaded, create a KNN model the same way as above, then run prediction and recognition.
Comments