Contents
I. Qt
1.1 Introduction to Qt
Qt is a cross-platform C++ graphical user interface application framework. It provides application developers with everything needed to build professional-grade graphical interfaces. Qt is fully object-oriented, easy to extend, and supports true component programming.
It supports full-platform development on Windows, Linux, MacOS, embedded platforms, and more.
Advantages of Qt
- Cross-platform; supports almost all platforms
- Simple interfaces, easy to learn
- Simplified memory reclamation mechanism
- High development efficiency; you can quickly build applications
- Strong community atmosphere
- Supports embedded development
Examples built with Qt
- Linux desktop environment KDE
- WPS Office
- Skype
- Google Earth
- VirtualBox All of the above are developed with Qt.
1.2 Installing Qt
(1) Qt Main Program and Qt Creator
Download the Windows installer from the Qt official website: [Index of /archive/qt/5.12/5.12.12](Index of /archive/qt/5.12/5.12.12)
Find qt-opensource-windows-x86-5.12.12 on the site above, download and install it, and select these components during installation:

(2) Configuring the Qt Extension in Visual Studio
In the Extensions menu, click Manage Extensions, click Online Extensions, search for QT, download the Qt Visual Studio Tools plugin, and after the download completes restart VS2022 and install the plugin (when you close VS, the plugin installation UI pops up automatically; click Modify).
Open 【Extensions -> Qt VS Tools -> Qt Versions】.
Add an environment; the path is msvc2017 in the QT5 installation path you just used.
After configuration is complete, click OK and close VS2022.
Open VS2022, create a new project, select the Qt Widgets Application project, choose the debug build with debug information, and click OK to finish.
II. First Qt Program
2.1 Interface Overview
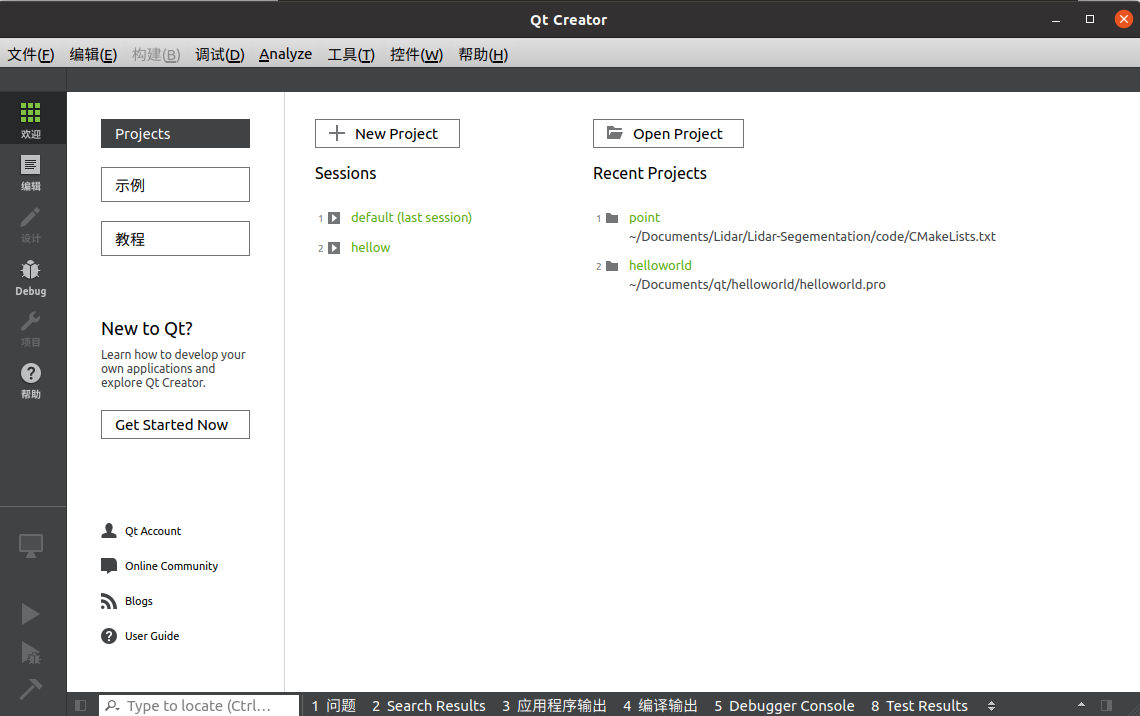
- Welcome
- Projects: create and open projects
- Examples: provides ready-made Qt projects across industries; you can open them directly to study the code
- Tutorials: official Qt tutorials—I feel they’re not as good as Bilibili University
- Edit
- Write application code in C++
- Design
- Design the UI
- Debug
- As the name suggests
- Projects
- Configure project settings
- Help
- Very important; many features you want can be implemented by consulting the help documentation
2.2 First Project
Note: do not use Chinese characters or spaces in the project name or path.
(1) Create Project
Base classes:
- QWidget: parent class of the two below; after creation you get a blank slate
- QMainWindow: adds a menu bar, toolbar, and status bar at the bottom
- QDialog: adds a dialog
Class name:
- Create your own class

After creation it looks like the figure above. Note that the UI file was not checked here, so the project directory is as shown on the left.
(2) main File
#include "learning01.h"  //新建qt工程后的类.h文件
#include <QApplication>  //包含一个应用程序类的头文件

// main程序入口,argc命令行变量的数量,argv命令行变量的数组
int main(int argc, char *argv[])
{
	//a是应用程序对象,在Qt中有且只有一个
    QApplication a(argc, argv);
    //通过自定义的类,实例化一个对象(窗口对象)
    //其父类在创建项目时选择
    learning01 w;
    //窗口对象默认不会显示,必须调用show方法显示窗口
    w.show();

	//让应用程序对象进入消息循环机制
    return a.exec();
}
Message loop mechanism:
In normal C++, after the program runs the window flashes by; usually you need system(“pause”) to see the output window. In Qt, the application blocks at the return line, waiting for mouse or keyboard input, or clicking the X in the top-right corner of the window to exit the program.
(3) .pro File
Note: unless you know what you’re doing, do not touch the .pro file; its contents are updated automatically based on the project.
# Qt包含的模块
QT       += core gui

# 大于4版本以上,包含 wigdet 模块
greaterThan(QT_MAJOR_VERSION, 4): QT += widgets

# 目标,生成的.exe程序的名称
TARGET = learning01
# 模板,应用程序模板
TEMPLATE = app


DEFINES += QT_DEPRECATED_WARNINGS

# 源文件,自动追加
SOURCES += \
        main.cpp \
        learning01.cpp
# 头文件,自动追加
HEADERS += \
        learning01.h
(4) Header File
#ifndef LEARNING01_H
#define LEARNING01_H

//包含头文件QWidget窗口类
#include <QWidget>

class learning01 : public QWidget
{
    Q_OBJECT    //Q_OBJECT宏,允许类中 使用信号和槽的机制

public:
    learning01(QWidget *parent = 0);    //构造函数
    ~learning01();    //析构函数
};

#endif // LEARNING01_H
(5) cpp File
#include "learning01.h"
#include <QApplication>

int main(int argc, char *argv[])
{
    QApplication a(argc, argv);
    learning01 w;
    w.show();

    return a.exec();
}
(6) Shortcuts
- Comment: ctrl + /
- Run: ctrl + r
- Compile: ctrl + b
- Find: ctrl + f
- Move entire line: ctrl + shift + ↑/↓
- Font zoom: ctrl + scroll wheel
- Auto-align: ctrl + i
- Switch between .h and .cpp of the same name: F4
III. Button Control
(1) Creating Buttons
Use QPushButton to create buttons. You need to specify the parent (otherwise a new window is created for the button) and set the text.
    QPushButton * btn1 = new QPushButton();
    btn1->setParent(this);
    btn1->setText("第一个按钮");

    QPushButton * btn2 = new QPushButton("第二个按钮", this);
(2) Other Operations
See the code comments:
#include "learning01.h"
#include <QPushButton>
learning01::learning01(QWidget *parent)
    : QWidget(parent)
{
    //创建按钮,按照空间的大小创建窗口
    QPushButton * btn1 = new QPushButton();
    btn1->setParent(this);
    btn1->setText("第一个按钮");
    QPushButton * btn2 = new QPushButton("第二个按钮", this);

    //移动btn2按钮
    btn2->move(100, 100);

    //重置窗口大小(可以拖拽边框)
    resize(600, 400);

    //设置固定的窗口大小(不可拖拽边框)
    setFixedSize(600, 400);

    //设置窗口标题
    setWindowTitle("第一个窗口");
}

learning01::~learning01()
{

}
IV. Object Tree
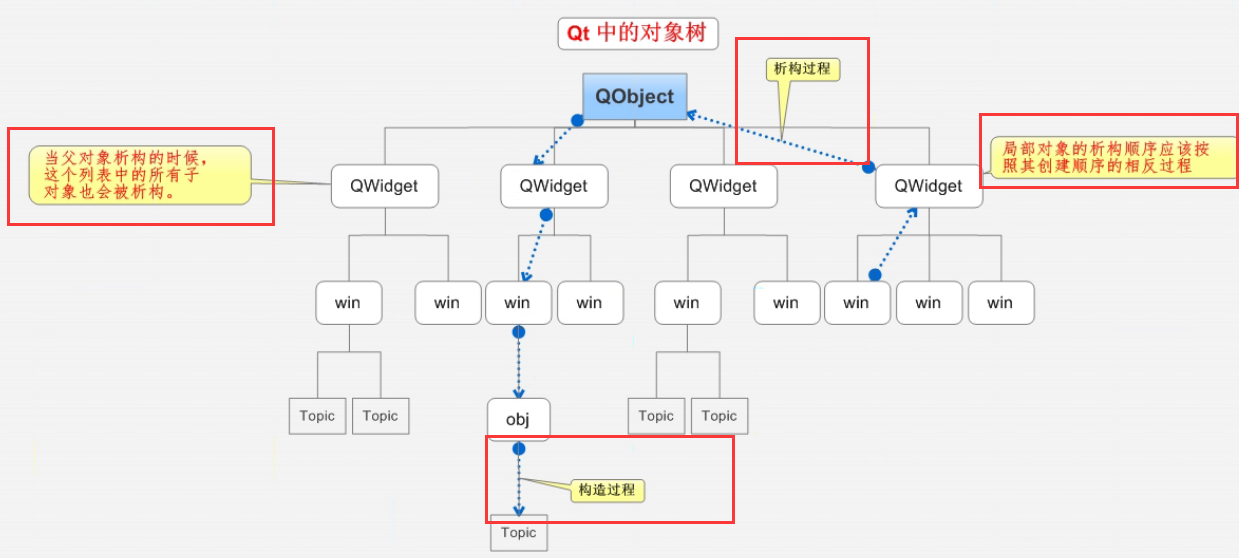
QObject is organized in the form of an object tree.
When you create a QObject object and specify a parent object pointer, it is automatically added to the parent’s children() list.
When the parent object is destructed, all objects in the children() list are destructed.
V. Signals and Slots
Implement closing the window by clicking a button.
The process is as follows:
- Sender of the signal
- The specific signal sent
- Receiver of the signal
- Handling the signal (slot function)
These four items are the four parameters of connect for signal delivery.
Advantages of signals and slots: loose coupling—the signal sender and receiver are not inherently associated; they are connected via the connect function.
connect() function parameters
- Parameter 1: sender of the signal—the button object
- Parameter 2: signal sent—clicked, pressed, released, toggled
- Parameter 3: receiver of the signal—the window, this
- Parameter 4: signal handling—close
#include "learning01.h"
#include <QPushButton>
learning01::learning01(QWidget *parent)
    : QWidget(parent)
{
    /************* 创建按钮 ************/
    //创建按钮,按照空间的大小创建窗口
    QPushButton * btn1 = new QPushButton();
    btn1->setParent(this);
    btn1->setText("第一个按钮");
    QPushButton * btn2 = new QPushButton("第二个按钮", this);

    //移动btn2按钮
    btn2->move(100, 100);

    //重置窗口大小(可以拖拽边框)
    resize(600, 400);

    //设置固定的窗口大小(不可拖拽边框)
    setFixedSize(600, 400);

    //设置窗口标题
    setWindowTitle("第一个窗口");

    /************* 按钮关闭窗口 ************/
    //参数1:信号的发送者; 参数2:发送的信号;
    connect(btn1, &QPushButton::clicked, this, &QWidget::close);
}

learning01::~learning01()
{

}
Comments