
Contents
- I. Environments/Libraries
- 1.1 curl: error while loading shared libraries
- 1.2 Adjust Docker Download Speed
- 1.3 How to Fix “The Following Signatures Couldn’t Be Verified Because the Public Key Is Not Available: NO_PUBKEY”
- 1.4 Updating the CMake Version
- 1.5 cuDNN Issue: apt upgrade Shows /sbin/ldconfig.real Warnings
- 1.6 Source Package Installation Issues Caused by a Conda Environment
- 1.7 the provided PTX was compiled with an unsupported toolchain
- II. ROS
- 2.1 Using a Package from Another Workspace Without Sourcing That Workspace
- 2.2 Multiple .so Files Being Referenced at the Same Time
- 2.3 PCL Requires C++11 or Later
- 2.4 error while loading shared libraries
- III. System Issues
- 3.1 Windows+Ubuntu Dual Boot: Ubuntu Boot Entry Disappears After a Windows Update
- 3.2 Cursor Blinks in the Upper-Left Corner After Ubuntu Starts, with an snd_hda_intel cannot probe codecs Error
- 3.3 Kernel panic - not syncing: Attempted to kill init!
- 3.4 HP OMEN 9/Victus 9 Cannot Use an External Display
- 3.5 System Enters (initramfs) After Startup
- 3.6 A stop job is running for session X of user XXX
- 3.7 No Network Connection Icon for a Realtek Network Card
- IV. Utilities
- 4.1 Extract All zip Archives in the Current Directory into Same-Named Directories
I. Environments/Libraries
1.1 curl: error while loading shared libraries
- Find the missing shared library on the machine
find ~ -name libssl.so.1.0.0The returned value is /home/huffie/anaconda3/pkgs/openssl-1.0.2p-h14c3975_0/lib/libssl.so.1.0.0.
- Check the software installation path
which curlThe returned value is ~/anaconda3/bin/curl, indicating that it was installed using Anaconda.
- Create a symbolic link
ln -s /home/huffie/anaconda3/pkgs/openssl-1.0.2p-h14c3975_0/lib/libssl.so.1.0.0 ~/anaconda3/lib/libssl.so.1.0.0- Add
libcrypto.so.1.0.0in the same way
ln -s /home/huffie/anaconda3/pkgs/openssl-1.0.2p-h14c3975_0/lib/libcrypto.so.1.0.0 ~/anaconda3/lib/libcrypto.so.1.0.01.2 Adjust Docker Download Speed
- Back up the configuration file
sudo cp /etc/docker/daemon.json /etc/docker/daemon.json.backup- Open the configuration file, delete everything in it, and add the following content
sudo vim /etc/docker/daemon.json{
"registry-mirrors" : ["https://docker.mirrors.ustc.edu.cn"]
}1.3 How to Fix “The Following Signatures Couldn’t Be Verified Because the Public Key Is Not Available: NO_PUBKEY”
(1) Problem Description
When I ran apt-get update today, I suddenly encountered an error stating that the following signatures couldn’t be verified because the public key was not available. After trying many methods found online, I finally found one that worked in my own test:
(2) Solution
Enter this in the terminal:
sudo apt-key adv --keyserver hkp://keyserver.ubuntu.com:80 --recv 76F1A20FF987672FThe code at the end is the last part of the error message: The following signatures couldn’t be verified because the public key is not available: NO_PUBKEY 76F1A20FF987672F
(3) Result
Executing: /tmp/apt-key-gpghome.uBwlOPqFFF/gpg.1.sh --keyserver hkp://keyserver.ubuntu.com:80 --recv 76F1A20FF987672F
gpg: key 76F1A20FF987672F: 1 signature not checked due to a missing key
gpg: 密钥 76F1A20FF987672F:公钥“WineHQ packages <wine-devel@winehq.org>”已导入
gpg: 合计被处理的数量:1
gpg:               已导入:1
1.4 Updating the CMake Version
Update CMake.
(1) Error Message
CMake Error at CMakeLists.txt:15 (cmake_minimum_required):
  CMake 3.13 or higher is required.  You are running version 3.10.2

-- Configuring incomplete, errors occurred!
(2) Solution
Try this first:
sudo apt update
sudo apt upgrade
If that still does not work, install a newer version of CMake from the official website.
Download the latest CMake installation package from the CMake official download page. The following uses cmake-3.25.2.tar.gz as an example.
Extract the installation package:
tar -zxvf cmake-3.25.2.tar.gzEnter the package directory:
cd cmake-3.25.2Start the installation:
chmod 777 ./configure
./configure
make -j8
sudo make install
sudo update-alternatives --install /usr/bin/cmake cmake /usr/local/bin/cmake 1 --force
(3) Result
Run the following command to check whether cmake was installed correctly:
cmake --version1.5 cuDNN Issue: apt upgrade Shows /sbin/ldconfig.real Warnings
Problem Description:
When installing software or using sudo apt upgrade, the following warnings appear on the command line:
/sbin/ldconfig.real: /usr/local/cuda-12.1/targets/x86_64-linux/lib/libcudnn_cnn_train.so.8 is not a symbolic link

/sbin/ldconfig.real: /usr/local/cuda-12.1/targets/x86_64-linux/lib/libcudnn_ops_train.so.8 is not a symbolic link

/sbin/ldconfig.real: /usr/local/cuda-12.1/targets/x86_64-linux/lib/libcudnn_adv_train.so.8 is not a symbolic link

/sbin/ldconfig.real: /usr/local/cuda-12.1/targets/x86_64-linux/lib/libcudnn.so.8 is not a symbolic link

/sbin/ldconfig.real: /usr/local/cuda-12.1/targets/x86_64-linux/lib/libcudnn_ops_infer.so.8 is not a symbolic link

/sbin/ldconfig.real: /usr/local/cuda-12.1/targets/x86_64-linux/lib/libcudnn_cnn_infer.so.8 is not a symbolic link

/sbin/ldconfig.real: /usr/local/cuda-12.1/targets/x86_64-linux/lib/libcudnn_adv_infer.so.8 is not a symbolic link
Cause:
The symbolic links for the CUDA and cuDNN libraries are invalid and need to be recreated.
Solution:
Be sure to modify the paths according to your own error messages.
sudo ln -sf /usr/local/cuda-12.1/targets/x86_64-linux/lib/libcudnn_ops_train.so.8.9.1 /usr/local/cuda-12.1/targets/x86_64-linux/lib/libcudnn_ops_train.so.8
sudo ln -sf /usr/local/cuda-12.1/targets/x86_64-linux/lib/libcudnn_cnn_train.so.8.9.1 /usr/local/cuda-12.1/targets/x86_64-linux/lib/libcudnn_cnn_train.so.8
sudo ln -sf /usr/local/cuda-12.1/targets/x86_64-linux/lib/libcudnn_adv_train.so.8.9.1 /usr/local/cuda-12.1/targets/x86_64-linux/lib/libcudnn_adv_train.so.8
sudo ln -sf /usr/local/cuda-12.1/targets/x86_64-linux/lib/libcudnn.so.8.9.1 /usr/local/cuda-12.1/targets/x86_64-linux/lib/libcudnn.so.8
sudo ln -sf /usr/local/cuda-12.1/targets/x86_64-linux/lib/libcudnn_ops_infer.so.8.9.1 /usr/local/cuda-12.1/targets/x86_64-linux/lib/libcudnn_ops_infer.so.8
sudo ln -sf /usr/local/cuda-12.1/targets/x86_64-linux/lib/libcudnn_cnn_infer.so.8.9.1 /usr/local/cuda-12.1/targets/x86_64-linux/lib/libcudnn_cnn_infer.so.8
sudo ln -sf /usr/local/cuda-12.1/targets/x86_64-linux/lib/libcudnn_adv_infer.so.8.9.1 /usr/local/cuda-12.1/targets/x86_64-linux/lib/libcudnn_adv_infer.so.8
1.6 Source Package Installation Issues Caused by a Conda Environment
Problem Description:
If you compile and install a package from source in a Conda environment, the following problem may appear during the CMake stage:
CMake Warning at cmake/CMakeHelper.cmake:103 (add_executable):
  Cannot generate a safe runtime search path for target colmap_main because
  files in some directories may conflict with libraries in implicit
  directories:

    runtime library [libmpfr.so.6] in /usr/lib/x86_64-linux-gnu may be hidden by files in:
      /home/mahaofei/anaconda3/lib
    runtime library [libgmp.so.10] in /usr/lib/x86_64-linux-gnu may be hidden by files in:
      /home/mahaofei/anaconda3/lib
    runtime library [liblz4.so.1] in /usr/lib/x86_64-linux-gnu may be hidden by files in:
      /home/mahaofei/anaconda3/lib
    runtime library [libsqlite3.so.0] in /usr/lib/x86_64-linux-gnu may be hidden by files in:
      /home/mahaofei/anaconda3/lib
    runtime library [libgomp.so.1] in /usr/lib/gcc/x86_64-linux-gnu/9 may be hidden by files in:
      /home/mahaofei/anaconda3/lib

  Some of these libraries may not be found correctly.
Call Stack (most recent call first):
  src/colmap/exe/CMakeLists.txt:67 (COLMAP_ADD_EXECUTABLE)
Solution:
Exit the Conda environment, then compile and install the package again.
# 临时退出
conda deactivate
# 取消终端自动进入conda
conda config --set auto_activate_base false
1.7 the provided PTX was compiled with an unsupported toolchain
Problem Description:
Some packages cannot be used after being compiled and installed from source. For example, my COLMAP kept reporting the following errors:
CuTexImage::BindTexture:        invalid device symbol
FilterH:        the provided PTX was compiled with an unsupported toolchain.
E1220 10:33:57.020385 2392647 feature_extraction.cc:276] Failed to extract features.
CuTexImage::BindTexture:        the provided PTX was compiled with an unsupported toolchain.
Solution:
Update the graphics card driver. This worked in my own test.
II. ROS
2.1 Using a Package from Another Workspace Without Sourcing That Workspace
(1) Error Message
Failed to load nodelet '/camera/realsense2_camera` of type `realsense2_camera/RealSenseNodeFactory` to manager `realsense2_camera_manager'(2) Cause
The realsense2_camera package could not be found. When installing the package for the D435, I thought the path to be added was already in the bashrc file, so I did not execute the command.
(3) Solution
source ~/catkin_ws/devel/setup.bashAlternatively:
echo "source ~/catkin_ws/devel/setup.bash" >> ~/.bashrc
source ~/.bashrc
2.2 Multiple .so Files Being Referenced at the Same Time
(1) Error Message
symbol lookup error: /home/huffie/catkin_ws/devel/lib//librealsense2_camera.so: undefined symbol: _ZN20ddynamic_reconfigure19DDynamicReconfigureC1ERKN3ros10NodeHandleE(2) Cause
There is more than one librealsense2_camera.so on the system, with copies of the library present in multiple paths.
(3) Solution
Check the dynamic library paths:
echo $LD_LIBRARY_PATHDelete the build and devel folders from the other workspaces shown in the output.
2.3 PCL Requires C++11 or Later
(1) Error Message
error: #error PCL requires C++14 or above(2) Cause
The C++14 configuration was not added to CMakeLists.txt.
(3) Solution
Add the following lines to CMakeLists.txt:
add_compile_options(-std=c++11 )
add_compile_options(-std=c++14 )
set(CMAKE_CXX_STANDARD 14)
2.4 error while loading shared libraries
(1) Error Message
/opt/ros/noetic/lib/rosout/rosout: error while loading shared libraries: libxmlrpcpp.so: cannot open shared object file: No such file or directory
[rosout-1] process has died [pid 82803, exit code 127, cmd /opt/ros/noetic/lib/rosout/rosout __name:=rosout __log:=/home/huffie/.ros/log/834eb474-ba51-11ed-861b-470c5d943dac/rosout-1.log].
log file: /home/huffie/.ros/log/834eb474-ba51-11ed-861b-470c5d943dac/rosout-1*.log
(2) Cause
The linker cannot find the library file. Searching for libxmlrpcpp.so shows that it is located at /opt/ros/noetic/lib.
(3) Solution
sudo gedit /etc/ld.so.conf.d/libc.confAdd the directory containing libxmlrpcpp.so:
/opt/ros/noetic/libThen run:
sudo ldconfigThat is all.
III. System Issues
3.1 Windows+Ubuntu Dual Boot: Ubuntu Boot Entry Disappears After a Windows Update
First, check in the BIOS whether Ubuntu comes before Windows in the boot order. You must boot Ubuntu first so that the boot menu is available.
Insert an Ubuntu bootable drive, restart the computer, select the USB drive as the boot device, and then select try ubuntu without install.
Connect to the network after entering the desktop.
Enter the following commands:
sudo apt-add-repository ppa:yannubuntu/boot-repair
sudo apt-get update
sudo apt-get install boot-repair
After the installation succeeds, continue by entering the following command in the terminal:
boot-repairIt will scan for boot entries during the process. Just wait for it to finish.
When it is done, click Recommended repair.
Wait a little while, and the boot entry will be restored successfully.
3.2 Cursor Blinks in the Upper-Left Corner After Ubuntu Starts, with an snd_hda_intel cannot probe codecs Error
Problem Description:
The system had been running normally, but after I restarted the server, I could no longer reach the desktop. The cursor kept blinking in the upper-left corner, and after a while the snd_hda_intel cannot probe codecs error appeared.
Solution:
Empty the Trash. In my case, the disk had run out of space, preventing a driver from starting. After connecting to the system over SSH, use the following command to empty the Trash:
sudo rm -rf ~/.local/share/Trash/*3.3 Kernel panic - not syncing: Attempted to kill init!
Problem Description:
While I was using the computer normally, all the icons suddenly turned into blank squares, including those in the dock on the left and all system icons in the upper-right corner. The system froze completely. No applications, including the command line, could be opened; Settings could not be opened; and clicking Restart had no effect.
After a forced restart, ubuntu could not boot and displayed many lines of code. The final line was Kernel panic - not syncing: Attempted to kill init!. The Win11 installation in the dual-boot system still worked normally.
Solution:
Based on the information I found, the problem was probably caused by an automatic kernel update, although some sources say it occurs when the /boot partition is full.
After turning on the computer, select Advance option for ubuntu on the boot menu. The first two entries are the latest kernel versions; do not select either one. Select the third entry to boot an older kernel.
Check whether the /boot partition is at 100% usage:
dfView all installed kernels:
dpkg --get-selections| grep linuxView the kernel currently in use:
uname -aRemove the latest (faulty) kernel / if boot is full, remove overly old kernels. In my case, only the following two packages were related to the new kernel version. Adjust this for your own situation. Be careful not to remove the wrong packages.
sudo apt-get remove --purge linux-modules-5.15.0-88-generic linux-image-5.15.0-88-genericClean up afterward:
sudo dpkg -P linux-modules-5.15.0-88-generic
sudo dpkg -P linux-image-5.15.0-88-generic
3.4 HP OMEN 9/Victus 9 Cannot Use an External Display
Problem Description
On an HP OMEN 9/Victus 9 with ubuntu20.04 installed, the graphics card driver was installed correctly and nvidia-smi produced normal output, but the external display was not detected.
Entering xrandr showed only the laptop display.
The NVIDIA control panel showed that NVIDIA had detected the external display.
Switching graphics card drivers did not work, nor did disabling secure boot.
Solution
Enter the BIOS and, under Configuration, change the direct discrete-GPU mode (NVIDIA ... Advance; I do not remember the exact wording) to hybrid mode (Discrete). The display will then work.
3.5 System Enters (initramfs) After Startup
Problem Description:
In an ubuntu+win dual-boot system, I used windows to access ubuntu files. The next time I started ubuntu, an error occurred: the system entered a command-line interface after startup and displayed the following:
BusyBox v1.30.1 (Ubuntu 1:1.30.1-4ubuntu6.1) built-in shell (ash)
Enter 'help' for a list of built-in commands.

(initramfs)
Solution:
Refer to How To Fix Busybox Initramfs Error On Ubuntu.
Use the fsck command to repair the filesystem on the damaged partition:
(You can use cat /proc/partitions, blkid, or lsblk in Busybox to obtain details about your Linux partitions.)
# 如果是机械硬盘,则为sdax,例如
fsck /dev/sda1 -y
# 如果是固态硬盘,则为nvmexnxpx
fsck 则为nvme1n1p2 -y
After a few minutes, you will see output like the following, indicating that the repair is complete:
/dev/sda1: ***** FILE SYSTEM WAS MODIFIED *****
/dev/sda1: 497733/30531584 files (1.5% non-contiguous), ........
Then restart the system. If reboot does not work, enter exit and press Enter to restart.
reboot3.6 A stop job is running for session X of user XXX
Problem Description:
Ubuntu shuts down or restarts very slowly. Pressing any key on the shutdown screen displays the message A stop job is running for session 2 of user mahaofei.
Solution:
Edit the file:
sudo nano /etc/systemd/system.confUncomment the DefaultTimeoutStopSec line and change the duration to the desired value, such as 5s.
DefaultTimeoutStopSec=5sReload the configuration file:
sudo systemctl daemon-reload3.7 No Network Connection Icon for a Realtek Network Card
Problem Description:
On an Ubuntu 22.04 desktop computer using a Realtek network card, there was no network connection option after Ubuntu was installed.
No wired network connection appeared in Settings.
Solution:
Reference: https://juejin.cn/post/7155368447243714574
First, check which driver the network card requires:
lspci | grep net
# 显示:
# Ethernet controller: Realtek Semiconductor Co., Ltd. Device 8126
# 这里 8126 就是所需要的驱动版本
Check whether a conflicting network card driver is installed:
lspci -k
# 显示
# Ethernet controller: Realtek Semiconductor Co., Ltd. Device 8126
# Subsystem: ASUSTEK Computer Inc. Device XXXX
# Kernel modules: 8169
# 比如如果第三行显示 8169,而第一行显示 8126,则说明应该安装 r8126 驱动,但是错装了 r8169 驱动,有冲突导致无法正常使用网络。
If present, remove the conflicting driver:
# 找到网卡驱动的位置 并删除
modinfo r8169 | grep filename
sudo rm -rf <找到的path>/r8169.ko
# 卸载驱动
sudo rmmod r8169
# 查看是否卸载成功
sudo lsmod | grep r8169Download the new driver. Find and download the driver version that meets your needs from https://www.realtek.com/Download/List?cate_id=584. In this example, download the r8126 driver.
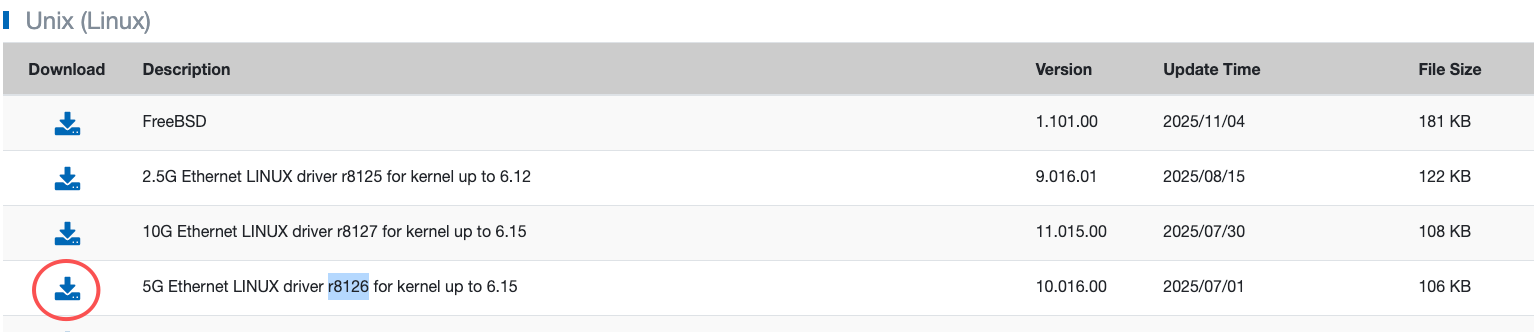
Extract the driver installation package:
# 解压到 /usr/src
sudo tar xvf r8126-10.016.00.tar.bz2 -C /usr/src
cd /usr/src/r8126-10.016.00
touch dkms.confOpen the file using gedit dkms.conf or vim dkms.conf, enter the following content, and save it. Be sure to change it to your own driver version.
PACKAGE_NAME=Realtek_r8126
PACKAGE_VERSION=10.016.00
DEST_MODULE_LOCATION=/updates/dkms
BUILT_MODULE_NAME=r8126
BUILT_MODULE_LOCATION=src/
MAKE="'make' -C src/ all"
CLEAN="'make' -C src/ clean"
AUTOINSTALL="yes"Install the driver using the following commands:
# 安装 dkms
sudo apt update
sudo apt install dkms
# 编译dkms 并 挂载驱动
sudo dkms add -m r8126 -v 10.016.00
sudo dkms build -m r8126 -v 10.016.00
sudo dkms install -m r8126 -v 10.016.00
sudo depmod -a
sudo modprobe r8126Follow-up Issue: The Wired Network Icon Disappears After a Restart
This happens because the system kernel was upgraded after some time, but the compiled network card driver has a compatibility problem with the current kernel. As a result, manually loading the driver with sudo modprobe r8126 reports the error modprobe: ERROR: could not insert 'r8126': Exec format error.
Solution: Remove the existing driver, then compile and install it again.
# 先卸载掉 r8126 驱动,根据自己的驱动版本号来
sudo dkms remove r8126/10.016.00 --all
# 然后 cd 到驱动包路径,执行如下操作
cd /usr/src/r8126-10.016.00
sudo dkms add -m r8126 -v 10.016.00
sudo dkms build -m r8126 -v 10.016.00
sudo dkms install -m r8126 -v 10.016.00
sudo depmod -a
sudo modprobe r8126At this point, if sudo modprobe r8126 produces no error output, the driver has been loaded correctly, and the wired network also appears in Settings.
IV. Utilities
4.1 Extract All zip Archives in the Current Directory into Same-Named Directories
Using unzip directly extracts the contents of a zip archive into the current directory. The following script instead extracts all zip archives in the current directory into their corresponding folders.
#!/bin/bash

# Loop through all .zip files in the current directory
for zipfile in *.zip; do
    # Check if there are no zip files
    if [ "$zipfile" == "*.zip" ]; then
        echo "No zip files found."
        exit 1
    fi

    # Get the base name of the file (without extension)
    foldername="${zipfile%.*}"

    # Create the folder (if it doesn't exist) and unzip into it
    mkdir -p "$foldername"
    unzip "$zipfile" -d "$foldername"
done

echo "All zip files have been extracted."
Comments