Contents
- Zero: Install the System
- 0.1 BIOS Settings
- 0.2 Graphics Card Issues
- One: System Configuration
- 1.1 System Updates
- 1.2 Install openssh-server
- 1.3 Install net-tools
- 1.4 Install vim
- 1.5 Synchronize the Time
- 1.6 Change the Default Boot Order on a Dual-Boot System
- 1.7 Mount a Drive
- 1.8 Automatic Login
- 1.9 Terminal Tool—Terminator
- Two: System Drivers
- 2.1 NVIDIA Graphics Driver
- 2.2 ROS System (Ubuntu20.04+ROS Noetic)
- 2.2 ROS System (Ubuntu22.04+ROS2 Humble)
- 2.3 RealSense Driver
- Three: Common Software
- 3.0 AppImage Applications
- 3.1 Browsers
- 3.2 Install xrdp Remote Desktop
- 3.3 Install a Tool for Accessing the Global Internet
- 3.4 Install an Input Method
- 3.5 OneDrive
- 3.6 Zotero
- 3.7 VMWare
- 3.8 QQ
- 3.9 QQ Music
- 3.10 WeChat
- 3.11 WPS
- 3.12 Tailscale
- Four: Programming Tools
- 4.1 Anaconda
- 4.2 Qt5.9
- 4.3 VSCode
- 4.4 PyCharm
- 4.5 CUDA
- 4.6 CuDNN
- 4.7 GitHub Desktop
- 4.8 Docker
Zero: Install the System
Install win10, then follow the steps below to install Ubuntu.
0.1 BIOS Settings
(1) Before installation
Press the appropriate key during startup (Delete for an MSI motherboard/F10 for HP) to enter the BIOS. Set SETTINGS/BOOT/UEFI Hard Disk Drive BBS Priorities to Disable.
Enable the direct discrete-GPU connection (Discreate).
Disable Secure Boot.
Save the settings, then select the USB drive as the boot device during startup.
(2) After installation
Return to the same option above and give ubuntu the highest priority.
0.2 Graphics Card Issues
The graphics card needs to be temporarily disabled while installing ubuntu; otherwise, various problems may occur.
(1) During installation
On the boot selection screen, highlight the option for installing Ubuntu and press e.
Change quiet splash --- to quiet splash pci=nomis pci noaer pcie_aspm=off.
Then press F10 to continue the installation.
Reference: https://zhuanlan.zhihu.com/p/142114459
(2) On the first startup
On the boot selection screen, highlight the option for starting Ubuntu and press e.
On the line containing quiet splash @xxxxxxxx, append nomodeset pcie_aspm=off at the end.
Then press F10 to start normally.
(3) After the first startup
Edit the configuration file:
sudo nano /etc/default/grubFind this line and change it as shown:
GRUB_CMDLINE_LINUX_DEFAULT=“quiet splash”
# 修改为:
GRUB_CMDLINE_LINUX_DEFAULT=“quiet splash nomodeset pcie_aspm=off”
One: System Configuration
1.1 System Updates
Optional, not required Open
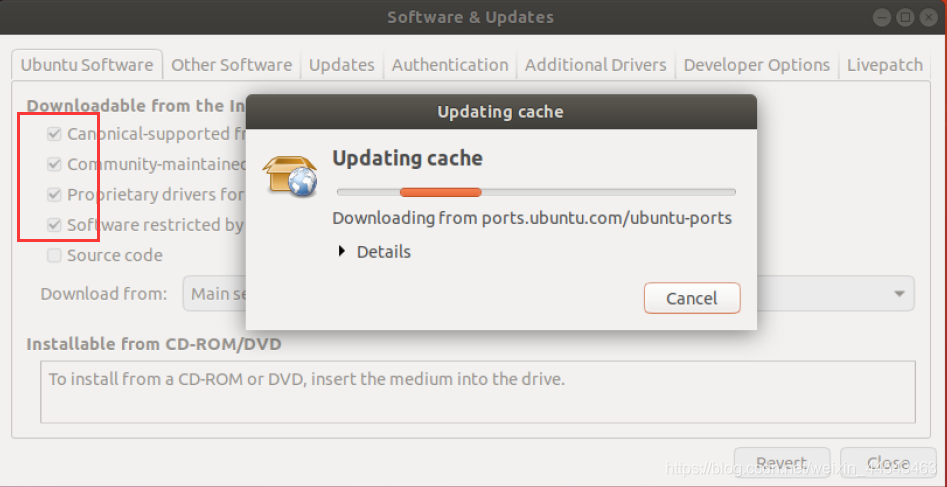
Software & Updates. CheckSource code. Change the software source tohttps://mirrors.hit.edu.cn/ubuntu; this will be much faster.
Then update the software sources:
sudo apt update
sudo apt upgrade
Install the components required for compilation:
sudo apt-get install build-essential libncurses-dev bison flex libssl-dev libelf-dev git git-lfs1.2 Install openssh-server
This is the basic package required for remote connections to Ubuntu. If you try to connect directly with Putty without installing this package, you will get the error Network error Connection refused.
sudo apt install openssh-server1.3 Install net-tools
After installing net-tools, you can use ifconfig to view the local IP address.
sudo apt install net-tools1.4 Install vim
A commonly used file-editing tool.
sudo apt install vim1.5 Synchronize the Time
After installing an ubuntu and windows dual-boot system, you may find that the time is incorrect when you reopen windows because the time zones of the two systems do not match. Run the following commands in ubuntu to resolve this:
sudo apt-get install ntpdate
sudo ntpdate time.windows.com
sudo hwclock --localtime --systohc
timedatectl set-local-rtc 1
1.6 Change the Default Boot Order on a Dual-Boot System
sudo gedit /etc/default/grubChange the boot order (generally, 0 is ubuntu and 2 is windows; the default is 0, ubuntu):
GRUB_DEFAULT=2Change the wait time as needed (the default is 10s):
GRUB_TIMEOUT=5Regenerate the boot configuration:
sudo update-grub1.7 Mount a Drive
View the drives:
sudo fdisk -lConfigure a permanent mount:
sudo gedit /etc/fstabAdd the following line at the bottom:
/dev/nvme0n1p4 /home/mahaofei/Data ntfs utf8,umask=0 1.8 Automatic Login
Open [Setting-Users] and enable Automatic Login.
Open [Applications List-Utilities-Passwords and Keys], right-click Login, select Change Password, set the new password to empty, and save.
1.9 Terminal Tool—Terminator
Install Terminator:
sudo apt install terminatorSet it as the default terminal:
gsettings set org.gnome.desktop.default-applications.terminal exec /usr/bin/terminator
gsettings set org.gnome.desktop.default-applications.terminal exec-arg "-x"
Alternative: restore the system terminal
gsettings reset org.gnome.desktop.default-applications.terminal execgsettings reset org.gnome.desktop.default-applications.terminal exec-arg
Customize the terminal configuration:
gedit ~/.config/terminator/config[global_config]
title_hide_sizetext = True
title_transmit_bg_color = "#3d3846"
inactive_color_offset = 1.0
[keybindings]
[profiles]
[[default]]
background_color = "#2E3436"
background_darkness = 0.75
background_type = transparent
cursor_color = "#aaaaaa"
font = MesloLGS NF 12
foreground_color = "#D3D7CF"
scrollback_infinite = True
palette = "#000000:#cc0000:#4e9a06:#c4a000:#3465a4:#75507b:#06989a:#d3d7cf:#555753:#ef2929:#8ae234:#fce94f:#729fcf:#ad7fa8:#34e2e2:#eeeeec"
use_system_font = False
bold_is_bright = True
[layouts]
[[default]]
[[[window0]]]
type = Window
parent = ""
[[[child1]]]
type = Terminal
parent = window0
[plugins]Add an option to open Terminator here from the right-click menu:
sudo apt install python3-nautilus gettext
git clone https://github.com/Stunkymonkey/nautilus-open-any-terminal.git
cd nautilus-open-any-terminal && make
sudo make install schema
nautilus -q
sudo glib-compile-schemas /usr/share/glib-2.0/schemas
gsettings set com.github.stunkymonkey.nautilus-open-any-terminal terminal terminator
Two: System Drivers
2.1 NVIDIA Graphics Driver
First check whether a graphics driver is already present. Enter
nvidia-smi; if a list appears, the driver has already been installed.
I recommend first opening Software & Updates and checking which NVIDIA driver versions your graphics card supports under Additional Drivers, then selecting one there and installing it directly.
(1) Method One (recommended): install through Software & Updates
Open Software & Updates, then click Additional Drivers. You will see a series of drivers. Select any version and apply the installation. (I recommend choosing the latest version; among identical versions, prefer one without -server or -open, such as nvidia-driver-xxx.)
(2) Method Two (recommended): install from the command line
View the recommended graphics driver models available for installation. The one with the recommend suffix is the version recommended by the system:
sudo apt update
sudo ubuntu-drivers devices
Install a specific graphics driver model:
sudo apt install nvidia-driver-xxx(3) Method Three (not recommended): download and install the driver from the official website
I tried this method with my 4060 graphics card: I downloaded the driver installer from the official website and ran the installation manually. After rebooting,
nvidia-smiworked normally, but the external HDMI display did not respond.
Download the driver from the NVIDIA website: https://www.nvidia.cn/geforce/drivers/
Then use the chmod +x command to make the downloaded driver file executable.
Then use sudo ./驱动文件名.run to install the driver.
2.2 ROS System (Ubuntu20.04+ROS Noetic)
(1) Add the software source
Open Software & Updates and select the first four download options. Make sure they are all selected, or dependency issues will occur during the subsequent installation.
Then run the following command to add the software source:
sudo sh -c 'echo "deb https://mirrors.tuna.tsinghua.edu.cn/ros/ubuntu $(lsb_release -sc) main" > /etc/apt/sources.list.d/ros-latest.list'(2) Add the public key
sudo apt-key adv --keyserver 'hkp://keyserver.ubuntu.com:80' --recv-key C1CF6E31E6BADE8868B172B4F42ED6FBAB17C654Update the index:
sudo apt-get update(3) Install ROS
I recommend installing the complete desktop version:
sudo apt install ros-noetic-desktop-fullSet the environment variables:
echo "source /opt/ros/noetic/setup.bash" >> ~/.bashrc
source ~/.bashrc
First install rosdep:
sudo apt install python3-rosdepThen initialize it:
sudo rosdep init
rosdep update
If rosdep init reports [ERROR: cannot download default sources list from:… Website may be down.] or rosdep update times out, use this solution: 1.
sudo apt-get install python3-pip2.sudo pip3 install rosdepc3.sudo rosdepc init4.rosdepc update
(4) Install other tools and dependency packages
sudo apt install python3-rosdep python3-rosinstall python3-rosinstall-generator python3-wstool build-essential(5) Configure the bash environment
echo "source /opt/ros/noetic/setup.bash" >> ~/.bashrc
source ~/.bashrc
2.2 ROS System (Ubuntu22.04+ROS2 Humble)
Reference: https://docs.ros.org/en/humble/Installation/Alternatives/Ubuntu-Install-Binary.html
(1) Configure UTF-8 encoding
sudo apt update
sudo apt install locales
sudo locale-gen en_US en_US.UTF-8
sudo update-locale LC_ALL=en_US.UTF-8 LANG=en_US.UTF-8
export LANG=en_US.UTF-8
(2) Add the ROS2 apt repository
Enable the Ubuntu Universe repository.
sudo apt install software-properties-common
sudo add-apt-repository universe
Add the ROS2 GPG key:
sudo apt update && sudo apt install curl -y
sudo curl -sSL https://raw.githubusercontent.com/ros/rosdistro/master/ros.key -o /usr/share/keyrings/ros-archive-keyring.gpg
echo "deb [arch=$(dpkg --print-architecture) signed-by=/usr/share/keyrings/ros-archive-keyring.gpg] http://packages.ros.org/ros2/ubuntu $(. /etc/os-release && echo $UBUNTU_CODENAME) main" | sudo tee /etc/apt/sources.list.d/ros2.list > /dev/null
(3) Install ROS2
Update the software list:
sudo apt update
sudo apt upgrade
Install ROS2:
sudo apt install ros-humble-desktop-fullInstall dependencies:
sudo apt install python3-colcon-common-extensions python3-vcstool python3-pip python3-rosdep2
sudo rosdep init & rosdep update
sudo apt install python3-colcon-ros
(4) Set environment variables
source /opt/ros/humble/setup.bash
echo " source /opt/ros/humble/setup.bash" >> ~/.bashrc
(5) Test
Test the classic ROS turtle:
# terminal 1
ros2 run turtlesim turtlesim_node
# terminal 2
ros2 run turtlesim turtle_teleop_key
2.3 RealSense Driver
Reference the official documentation: librealsense/distribution_linux.md at master · IntelRealSense/librealsense · GitHub
(1) Install the RealSense SDK
Register the server’s public key:
sudo apt-key adv --keyserver keyserver.ubuntu.com --recv-key F6E65AC044F831AC80A06380C8B3A55A6F3EFCDE || sudo apt-key adv --keyserver hkp://keyserver.ubuntu.com:80 --recv-key F6E65AC044F831AC80A06380C8B3A55A6F3EFCDEIf the public key still cannot be retrieved, check and specify the proxy setting export http_proxy="http://<proxy>:<port>".
Add the server to the repository list:
sudo add-apt-repository "deb https://librealsense.intel.com/Debian/apt-repo $(lsb_release -cs) main" -uInstall the libraries:
sudo apt-get install librealsense2-dkms
sudo apt-get install librealsense2-utils
sudo apt-get install librealsense2-dev
sudo apt-get install librealsense2-dbg
Verify the installation by using realsense-viewer to test whether the driver has been installed.
(2) Install the ROS package
mkdir -p ~/catkin_ws/src
cd ~/catkin_ws/src
git clone -b ros1-legacy https://github.com/IntelRealSense/realsense-ros.git
cd ~/catkin_ws && catkin_make
Be sure to use the correct branch when cloning. The default is ros2; for a ros1 environment, you need to specify the branch.
Three: Common Software
3.0 AppImage Applications
Note: It is best to open the application first and check its application name in the dock on the left. The desktop file name and the application name inside the file must match it. Otherwise, even after adding the application to the dock, opening it will add another identical icon at the bottom.
Software directory
- MeshLab_64bit_fp: https://www.meshlab.net/
- picgo: https://github.com/Molunerfinn/PicGo
- OneDriveGUI: https://github.com/bpozdena/OneDriveGUI (reference)
sudo chmod +x ./*.AppImageAdd to the favorites dock
Create a shortcut:
cd ~/Desktop
touch 软件名称.desktop
gedit 软件名称.desktop
Modify the information to suit your setup:
[Desktop Entry]
Encoding=UTF-8
Name=软件名称
Exec=/home/用户名/Software/AppImage/软件名称.AppImage
Icon=/home/用户名/Software/AppImage/软件名称.png
Terminal=False
Type=Application
StartupNotify=False
Categories=Application
Make the file readable, writable, and executable:
sudo chmod 777 软件名称.desktop
sudo mv 软件名称.desktop /usr/share/applications
3.1 Browsers
Google Chrome: https://www.google.cn/chrome/index.html Edge browser: https://www.microsoft.com/zh-cn/edge/download
3.2 Install xrdp Remote Desktop
This script created by an expert overseas is extremely convenient.
Script download link: http://www.c-nergy.be/products.html (xRDP Installation Script)
Official tutorial: https://c-nergy.be/blog/?p=18205
The official tutorial is as follows:
-
Download the script, which was already done above.
-
Extract the archive.
unzip xrdp-installer-1.4.3.zip- Set executable permissions.
chmod +x xrdp-installer-1.4.3.sh- Run the script with normal user permissions. Do not add sudo. The user’s home directory must also contain a Downloads folder. (If the download folder has a Chinese name, create /home/用户名/Downloads.)
./xrdp-installer-1.4.3.sh- View the local IP.
sudo apt install net-tools
ifconfig
Remember this 192.168.x.x IP address.
Reboot after completion.
Important!!! After rebooting, do not log in as a user. Search for Remote Desktop Connection directly in win10 and connect.
If a black screen appears when connecting from win10
Restart both the ubuntu machine and the windows computer.
3.3 Install a Tool for Accessing the Global Internet
For details about the principles and usage, see Methods for Accessing the Global Internet (How to Access Google and ChatGPT).
(1) Clash Verge rev
- Download
First download the latest version of clash verge rev from GitHub.
Download link: https://github.com/clash-verge-rev/clash-verge-rev/releases
(If the backup link above cannot be opened, download it here: https://clashverge.net/clash-verge-rev/)
Download clash-verge_1.x.x_amd64.deb.
- Extract
After the download is complete, enter the download directory and install it directly.
sudo dpkg -i clash-verge_1.6.1_amd64.deb- Configure the subscription link
Obtain the subscription link from the proxy service provider, enter it in clash, and select a node.
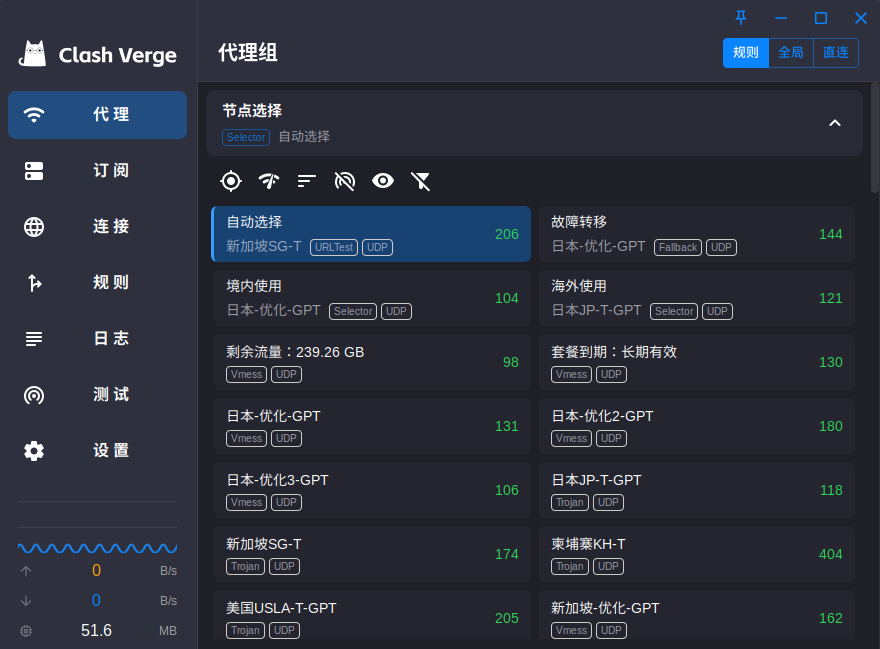
- In the clash verge settings, enable launch at startup and silent startup to improve the experience.
3.4 Install an Input Method
(1) Sogou Input Method (recommended)
Install the fcitx input method framework:
sudo apt-get install fcitx
sudo cp /usr/share/applications/fcitx.desktop /etc/xdg/autostart/
sudo apt purge ibus
Install Sogou Input Method:
sudo dpkg -i sogoupinyin_版本号_amd64.debInstall dependencies:
sudo apt install libqt5qml5 libqt5quick5 libqt5quickwidgets5 qml-module-qtquick2
sudo apt install libgsettings-qt1
sudo apt install fcitx5-frontend-gtk4
Restart the computer.
If Sogou Pinyin is still unavailable, click [keyboard icon-Configure] in the upper-right corner, click the plus sign + in the lower-left corner, uncheck Only Show Current Language, search for so, and add Sogou Input Method.
(2) ibus Input Method (recommended)
First install the Chinese language in Settings and set the keyboard system to ibus.
Return to the language settings and add Chinese(Intelligent Pinyin) under Input Sources.
Next, install the ibus input method. To install the ibus framework, enter the following in Terminal:
sudo apt-get install ibus ibus-clutter ibus-gtk ibus-gtk3 ibus-qt4After installing the ibus framework, switch to the ibus framework by entering the following in Terminal:
im-config -s ibusAfter switching to the ibus framework, install the Chinese Pinyin engine by entering the following in Terminal:
sudo apt-get install ibus-pinyinThen open the IBus Preference window to add the Chinese Pinyin input method by entering the following in Terminal:
sudo ibus-setupIf you need a word library, download a Sogou word library, convert it to txt format with this online tool, and then import it into the user data.
(3) Rime Input Method (not very useful in my tests)
Install:
sudo apt install ibus-rime
curl -fsSL https://raw.githubusercontent.com/rime/plum/master/rime-install | bash
Apply: In the ubuntu system settings, go to Region & Language -> Input Sources and set it to Rime. (You may need to log out and log back in before it appears.)
Configure multi-device synchronization for rime:
gedit ~/.config/ibus/rime/installation.yamldistribution_code_name: "ibus-rime"
distribution_name: Rime
distribution_version: 1.4.0
install_time: "Mon Nov 20 13:45:04 2023"
installation_id: "ubuntu" # 区分多个设备
rime_version: 1.5.3
sync_dir: "/home/mahaofei/Documents/OneDrive/Documents/Rime" # 同步路径Configure a horizontal layout for rime:
gedit ~/.config/ibus/rime/build/ibus_rime.yamlstyle:
horizontal: trueConfigure the number of candidate words:
gedit ~/.config/ibus/rime/default.yamlmenu:
page_size: 9Update the configuration: click Deploy in the rime input method menu in the upper-right corner, or restart ibus (ibus restart).
3.5 OneDrive
Refer to the abraunegg/onedrive project to use OneDrive file synchronization.
(1) Install dependencies
sudo apt update
sudo apt install build-essential
sudo apt install libcurl4-openssl-dev -y
sudo apt install libsqlite3-dev -y
sudo apt install pkg-config -y
sudo apt install libnotify-dev -y
curl -fsS https://dlang.org/install.sh | bash -s dmd
Activate DMD (modify the command according to your version number):
source ~/dlang/dmd-2.082.0/activate(2) Install the onedrive client
You must download onedrive 2.4.25. In my tests, file synchronization has problems in version 2.5.x, including accidental folder deletion. Although 2.5.x offers better synchronization efficiency and more features, stability is the most important factor for cloud synchronization. URL: https://github.com/abraunegg/onedrive/releases/tag/v2.4.25
# 解压onedrive-2.4.25.zip
cd onedrive-2.4.25
./configure
make clean
make
sudo make install
(3) Initial configuration
Enter the following command to log in to onedrive:
onedriveDownload the config file:
mkdir -p ~/.config/onedrive
wget https://raw.githubusercontent.com/abraunegg/onedrive/master/config -O ~/.config/onedrive/config
nano ~/.config/onedrive/config
Uncomment the following lines in the config file:
sync_dir = "~/disk/ubuntu/onedrive"
monitor_interval = "60"
skip_dir = "图片|应用|附件" #跳过同步的路径,可以用|来分割,例如:"Desktop|Documents/IISExpress*"
(4) Synchronization
First synchronization:
onedrive --synchronizeReal-time synchronization (this can be added to Startup Applications):
onedrive --monitor(5) Graphical interface
Download the AppImage from the OneDriveGUI project. You must download OneDriveGUI-1.0.3; version 1.1.x is also very unstable.
Grant executable permission:
chmod +x OneDriveGUI-1.0.3-x86_64.AppImageFor the first launch, double-click it or start it from the command line:
/home/mahaofei/Downloads/OneDriveGUI-1.0.3-x86_64.AppImageSelect [Import from existing config], enter your Microsoft account as the username, and choose the ~/.config/onedrive/config file you just modified as the config file.
Finally, add the command /home/mahaofei/Downloads/OneDriveGUI-1.0.3-x86_64.AppImage to [Startup Applications] in the Start menu so that it launches automatically at startup.
3.6 Zotero
Download the tar.bz2 installer from the Zotero website, extract it, and move it to the location where you store software.
sudo mv Zotero_linux-x86_64/* /opt/zotero/Then update the location of zotero’s desktop file:
cd /opt/zotero
sudo ./set_launcher_icon
Then create a symbolic link to add the icon (note that it must use an absolute path):
ln -s /opt/zotero/zotero.desktop /home/mahaofei/.local/share/applications/zotero.desktop3.7 VMWare
Download the installer from the VMware website, then install it with the following commands:
chmod +x VMware-Workstation-Full-17.0.2-21581411.x86_64.bundle
sudo ./VMware-Workstation-Full-17.0.2-21581411.x86_64.bundle
Use the following commands to stop the VMware services, navigate to the installation package, run the uninstall command, and delete the data:
# 停止vmware服务
sudo systemctl stop vmware.service
sudo systemctl stop vmware-workstation-server.service
# 找到安装包执行卸载命令
cd path_to_vmware_install_package/vmware-workstation/
sudo ./vmware-installer --uninstall-product vmware-workstation
# 删除数据
sudo rm -rf /usr/lib/vmware-workstation/
sudo rm -rf /etc/vmware-workstation/
sudo rm -rf /var/lib/vmware-workstation/
rm -rf ~/.vmware/
3.8 QQ
Download link: https://im.qq.com/linuxqq/index.shtml
Download the x86 .deb file.
Install:
# 请更换为自己的版本号
sudo dpkg -i linuxqq_3.2.2-18394_amd64.deb
3.9 QQ Music
Download link: https://y.qq.com/download/download.html
Download the Linux .deb file.
Install:
# 请更换为自己的版本号
sudo dpkg -i qqmusic_1.1.5_amd64.deb
3.10 WeChat
Open this webpage: https://archive2.kylinos.cn/DEB/KYLIN_DEB/pool/main/deb/wechat/
Download the amd version of the installation package.
Install:
sudo dpkg -i wechat-beta_4.0.0.21_amd64.deb3.11 WPS
Official website: https://www.wps.com/office/linux/
After downloading the deb installation package, install it with the following command (remember to modify the version number).
sudo dpkg -i wps-office_11.1.0.11719.XA_amd64.deb3.12 Tailscale
Tailscale is a tool for remotely creating a local area network. It lets you operate every device logged in to your tailscale account from any network as if you were accessing devices on a local area network.
Installation:
curl -fsSL https://tailscale.com/install.sh | shStart it, then log in to your account. You can view your tailscale IP in the console. As long as your other computers are also logged in to the same account, you can use this IP directly for ssh or remote desktop access from any network.
sudo tailscale upConfigure startup at boot (because sudo permission is required, it cannot be added directly to Startup Applications)
Check the system file /lib/systemd/system/rc-local.service. If it does not exist, create it with the following content. (If the file exists, it does not have an [Install] section by default, so you need to add it yourself.)
sudo gedit /lib/systemd/system/rc-local.service#### 文件中本身就有的
[Unit]
Description=/etc/rc.local Compatibility
Documentation=man:systemd-rc-local-generator(8)
ConditionFileIsExecutable=/etc/rc.local
After=network.target
[Service]
Type=forking
ExecStart=/etc/rc.local start
TimeoutSec=0
RemainAfterExit=yes
GuessMainPID=no
#### 需要自己添加
[Install]
WantedBy=multi-user.target
Alias=rc-local.service
Check /etc/systemd/system/rc-local.service and make the same changes. If it does not exist, create it.
sudo gedit /etc/systemd/system/rc-local.serviceCreate the /etc/rc.local script file and add the program you want to run:
sudo gedit /etc/rc.local#! /bin/bash
# 这里就是需要开机启动的程序
sudo tailscale upGrant rc.local executable permission:
sudo chmod +x /etc/rc.localEnable the service:
sudo systemctl enable rc-local
sudo systemctl start rc-local.service
systemctl daemon-reload
sudo systemctl status rc-local.service
Four: Programming Tools
4.1 Anaconda
https://www.anaconda.com/products/distribution
sudo chmod +x Anaconda3-2024.06-1-Linux-x86_64.sh
sh ./Anaconda3-2024.06-1-Linux-x86_64.sh
# 按回车键继续
# 按空格翻页license
# 输入yes继续
# 默认安装位置,回车安装
4.2 Qt5.9
(1) Download
Official link: https://download.qt.io/archive/qt/
Alternatively, download it directly in the terminal:
wget http://download.qt.io/official_releases/qt/5.9/5.9.9/qt-opensource-linux-x64-5.9.9.run(2) Install
Change the permissions:
chmod +x qt-opensource-linux-x64-5.9.9.runInstall g++ (install it if g++ has not been installed; running this command again will not cause any problems):
sudo apt-get install build-essentialInstall the common font configuration library—runtime:
sudo apt-get install libfontconfig1Run the installer:
./qt-opensource-linux-x64-5.9.9.run(3) Modify the QT executable
Some errors occur when using QT for ROS development normally. Resolve them by modifying the QT executable.
Modify the executable:
gedit ~/.local/share/applications/DigiaQt-qtcreator-community.desktopChange the Exec line to the following format:
Exec=bash -i -c /home/huffie/Software/QT/Tools/QtCreator/bin/qtcreatorHowever, after this modification, QT can only be started once after each boot. Clicking the QT shortcut a second time will not start it.
You can edit ~/.bashrc and add the following code on the last line:
alias qt=/home/huffie/Software/QT/Tools/QtCreator/bin/qtcreatorThen start QT from the terminal each time with the qt command; this works.
4.3 VSCode
Download the key:
curl https://packages.microsoft.com/keys/microsoft.asc | gpg --dearmor > packages.microsoft.gpgAdd the key to the system and add the official repository URL:
sudo install -o root -g root -m 644 packages.microsoft.gpg /usr/share/keyrings/
sudo sh -c 'echo "deb [arch=amd64 signed-by=/usr/share/keyrings/packages.microsoft.gpg] https://packages.microsoft.com/repos/vscode stable main" > /etc/apt/sources.list.d/vscode.list'
Update the VSCode package information:
sudo apt-get install apt-transport-https
sudo apt-get update
Install:
sudo apt-get install code # or code-insidersAfterward, you can update and manage code directly with apt commands.
Extensions
- WakaTime: https://wakatime.com/dashboard
- Jupyter
- C++
- Python
- HTML CSS
- Remote SSH
4.4 PyCharm
The Community Edition does not support Jupyter; consider the Professional Edition.
Reference article: https://zhuanlan.zhihu.com/p/622701924
(1) Download the resources
Download version 2023.1.1 of Pycharm from the Pycharm website: https://www.jetbrains.com/pycharm/download/other.html
Download jetbrains-agent.jar (provided by the original author).
(2) Cracking files
Extract the pycharm tar.gz archive, then move the pycharm-2023.1 directory inside it to the location where you store programs.
Enter this directory, find the bin/pycharm64.vmoptions file, edit it, and append the path to fineagent.jar:
-javaagent:/your_path/fineagent.jar(3) Activate PyCharm
Run the pycharm.sh file in the bin directory from the terminal, then enter the License Server from the reference link.
Activation succeeded!
4.5 CUDA
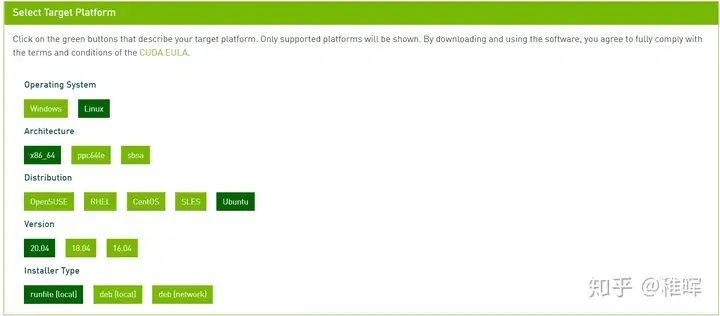
- Download the cuda installation package from the official website: CUDA Toolkit Archive. Choose a relatively recent and stable version. (One way is to check which CUDA versions the latest version on pytorch.org supports and select one of them.) After choosing, download it using the relevant options shown below (select according to your actual situation):
- Run the commands shown on the webpage to install it.
For example:
wget https://developer.download.nvidia.com/compute/cuda/11.6.0/local_installers/cuda_11.6.0_510.39.01_linux.run
sudo sh cuda_11.6.0_510.39.01_linux.run
Wait a dozen or so seconds after running the program.
A warning may appear; simply select Continue:

Then follow the prompts to select the installation options. Be sure not to select the first option, which installs the graphics driver, because it was already installed earlier. After the installation completes, the following prompt appears:
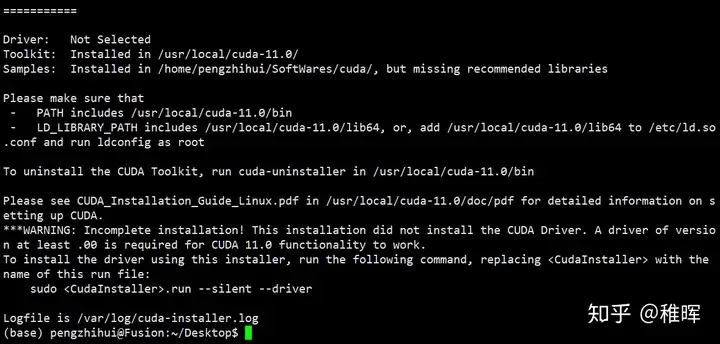
- As indicated in the image above, configure the environment variables:
nano ~/.bashrcAdd the following statements at the end of the file (remember to change them to your current CUDA version):
export CUDA_HOME=/usr/local/cuda-12.1
export LD_LIBRARY_PATH=${CUDA_HOME}/lib64
export PATH=${CUDA_HOME}/bin:${PATH}
Then make the changes take effect:
source ~/.bashrc- Use the
nvcc -Vcommand to view the installed version information:

4.6 CuDNN
Go to the CUDNN download website: cuDNN Download | NVIDIA Developer, then click Download and select a version. You need to log in before downloading. The version selection screen is shown below:
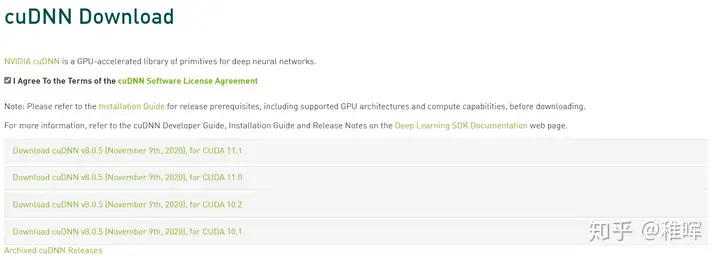
Select the cudnn version corresponding to the cuda version chosen earlier:
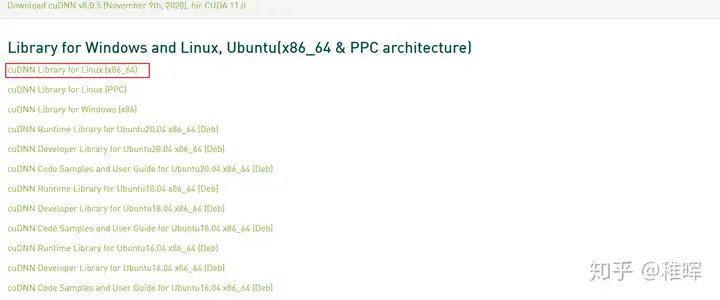
The download is an archive. Extract it with the following command:
tar -xzvf cudnn-11.x-linux-x64-v8.0.5.39.tgzUse the following two commands to copy these files to the CUDA directory:
 sudo cp cuda/lib/* /usr/local/cuda-11.6/lib64/
 sudo cp cuda/include/* /usr/local/cuda-11.6/include/
After copying, use the following command to view the CUDNN version information:
cat /usr/local/cuda/include/cudnn_version.h | grep CUDNN_MAJOR -A 2The version information appears as shown below; it is 8.0.5:

4.7 GitHub Desktop
Project link: https://github.com/shiftkey/desktop
Add the source:
wget -qO - https://mirror.mwt.me/shiftkey-desktop/gpgkey | gpg --dearmor | sudo tee /usr/share/keyrings/mwt-desktop.gpg > /dev/null
sudo sh -c 'echo "deb [arch=amd64 signed-by=/usr/share/keyrings/mwt-desktop.gpg] https://mirror.mwt.me/shiftkey-desktop/deb/ any main" > /etc/apt/sources.list.d/mwt-desktop.list'
Install:
sudo apt update && sudo apt install github-desktop4.8 Docker
(1) Install Docker
Update apt-get:
sudo apt-get update && sudo apt-get upgrade -y && sudo apt-get install wget -yDownload Docker:
wget -qO- get.docker.com | bashCheck whether Docker was installed successfully (output such as Docker version XX.X.X, build xxxxxxx indicates a successful installation):
docker -vStart Docker:
sudo systemctl start dockerEnable automatic startup at boot:
sudo systemctl enable docker**(2) Install Docker Compose **
Go to the Docker Compose project (https://github.com/docker/compose/releases) and check the latest version number, such as v2.31.0.
Download Docker Compose (change the version number in the download URL to the current latest version):
sudo curl -L "https://github.com/docker/compose/releases/download/v2.31.0/docker-compose-$(uname -s)-$(uname -m)" -o /usr/local/bin/docker-composeGrant executable permission:
sudo chmod +x /usr/local/bin/docker-composeCheck whether installation is complete (the output will be Docker Compose version vX.XX.X):
docker compose versionAdd the current user to the docker group:
sudo gpasswd -a <username> dockerUpdate the user group:
newgrp dockerRestart the system.
Comments