Contents
- I. Introduction to PyQt and Installation
- 1.1 Common GUI Frameworks
- 1.2 Installing PyQt5
- II. Basic PyQt Usage
- 2.1 QApplication
- 2.2 Widgets
- 2.3 Handling UI Actions
- 2.4 Encapsulating a Window in a Class
- III. UI Design with Qt Designer
- 3.1 Brief Introduction to Qt Designer
- 3.2 Layouts
- 3.3 Widget Adjustments
- IV. Python Program
- 4.1 Converting a .ui File to Python
- 4.2 Calling the UI from the Main Program
- 4.3 Setting Up Button and Text Box Handlers
- 4.4 Example Code
- V. Publishing the Program
- 5.1 Installing PyInstaller
- 5.2 Packaging an exe
- 5.3 Improvement: Reducing Package Size
I. Introduction to PyQt and Installation
1.1 Common GUI Frameworks
The mainstream Python GUI options today include Tkinter, PyQt5/PySide2, wxPython, and others.
| GUI | Pros | Cons |
|---|---|---|
| Tkinter | Python standard library, stable, smaller distributable | Few widgets, no drag-and-drop UI designer |
| PyQt5/PySide2 | Rich widgets, large user base, Designer for UI layout | Large library, larger distributables |
| wxPython | Rich widgets | Sparse documentation, smaller community |
1.2 Installing PyQt5
Install directly from the command line with pip:
pip install pyqt5-toolsAdd the \plugins\platforms directory under the PyQt5 install path to the Path environment variable. (First find your Python install directory, such as Python39 or Python38, then look under \Lib\site-packages\PyQt5\Qt5.)
For example, my path looks like this:
C:\Users\82785\AppData\Local\Programs\Python\Python39\Lib\site-packages\PyQt5\Qt5\plugins\platformsNote: After setting the environment variable, you need to restart your computer, because the system only picks up the new variable after a reboot.
II. Basic PyQt Usage
2.1 QApplication
QApplication provides the low-level management for the entire GUI program, such as initialization, command-line argument handling, and user event processing.
- You must create a QApplication before creating any widgets.
app = QApplication([])- At the end of the program, add the event loop so the app can receive input events and dispatch them to the right objects.
app.exec()2.2 Widgets
QMainWindow, QPlainTextEdit, and QPushButton are three widget classes: the main window, a text box, and a button. 要想在界面上创建一个控件,就需要在程序代码中创建空间对应的类的实例对象.
- Widgets are nested: When you create a text box or button, you pass a window argument to specify the parent widget (the main window). When you instantiate the main window, you do not specify a parent, because the main window is the top-level widget.
QPlainTextEdit(window)
QPushButton('文本框', window)- The move method sets where a widget appears on screen.
window.move(300, 310)	# 主窗口左上角相对屏幕左上角位置
textEdit.move(10,25) # 文本框左上角相对父窗口左上角位置- The resize method sets the widget’s display size.
window.resize(600, 400)		# 主窗口宽600像素,高400像素
textEdit.resize(200,150) # 文本框宽200像素,高150像素- The show method displays the main window and all widgets placed on it.
window.show()2.3 Handling UI Actions
In Qt, when a widget is clicked, receives text input, is dragged, and so on, it emits a signal.
To respond to those actions, you define functions in code ahead of time that handle the signal. Those functions are called slots.
For example, define a function:
def buttonPress():
	print('按钮被按下了')
Then use the following code so that when the button is pressed, buttonPress() runs:
button.clicked.connect(buttonPress)2.4 Encapsulating a Window in a Class
For modularity, easier reuse, and to avoid name clashes among widgets, people usually wrap a window and the widgets it contains in a class.
from PySide2.QtWidgets import QApplication, QMainWindow, QPushButton,  QPlainTextEdit,QMessageBox

class MyWindows():
    def __init__(self):
        self.window = QMainWindow()
        self.window.resize(500, 400)
        self.window.move(300, 300)
        self.window.setWindowTitle('示例程序')

        self.textEdit = QPlainTextEdit(self.window)
        self.textEdit.setPlaceholderText("文本框提示语")
        self.textEdit.move(10, 25)
        self.textEdit.resize(300, 350)

        self.button = QPushButton('统计', self.window)
        self.button.move(380, 80)

        self.button.clicked.connect(self.handleCalc)


    def handleCalc(self):
        text = self.textEdit.toPlainText()
        # 处理程序

app = QApplication([])
mywindow = MyWindows()
mywindow .window.show()
app.exec_()
III. UI Design with Qt Designer
3.1 Brief Introduction to Qt Designer
Qt Designer is a Qt UI generator. Unlike Tkinter, where you have to imagine the layout and write it line by line in code, Qt Designer is a visual design tool: drag widgets onto the form to lay out the interface.
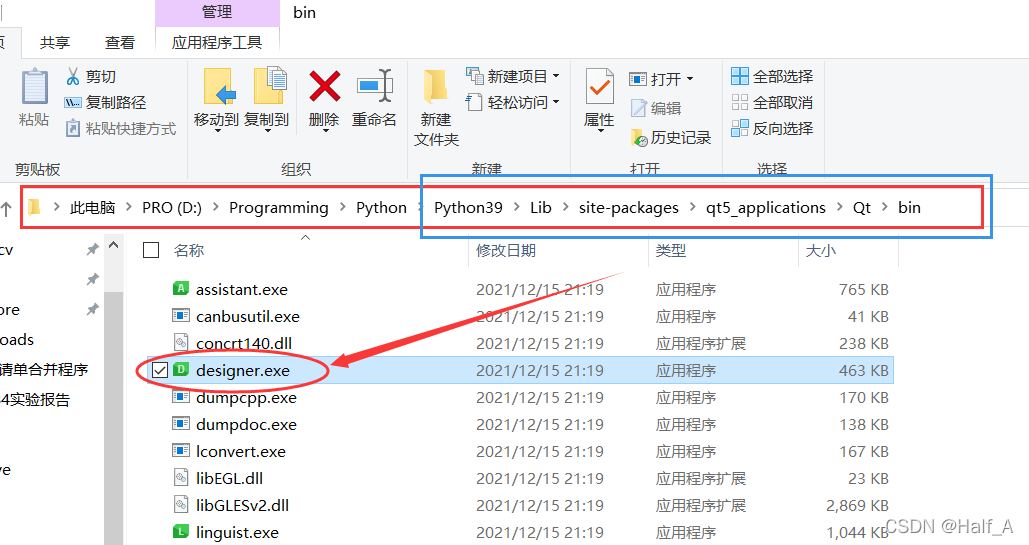
Under your Python install directory, Lib\site-packages\qt5_applications\Qt\bin\designer.exe is the Qt Designer executable.
After opening Qt Designer, the left side lists widgets; the right side has the object inspector and property editor.
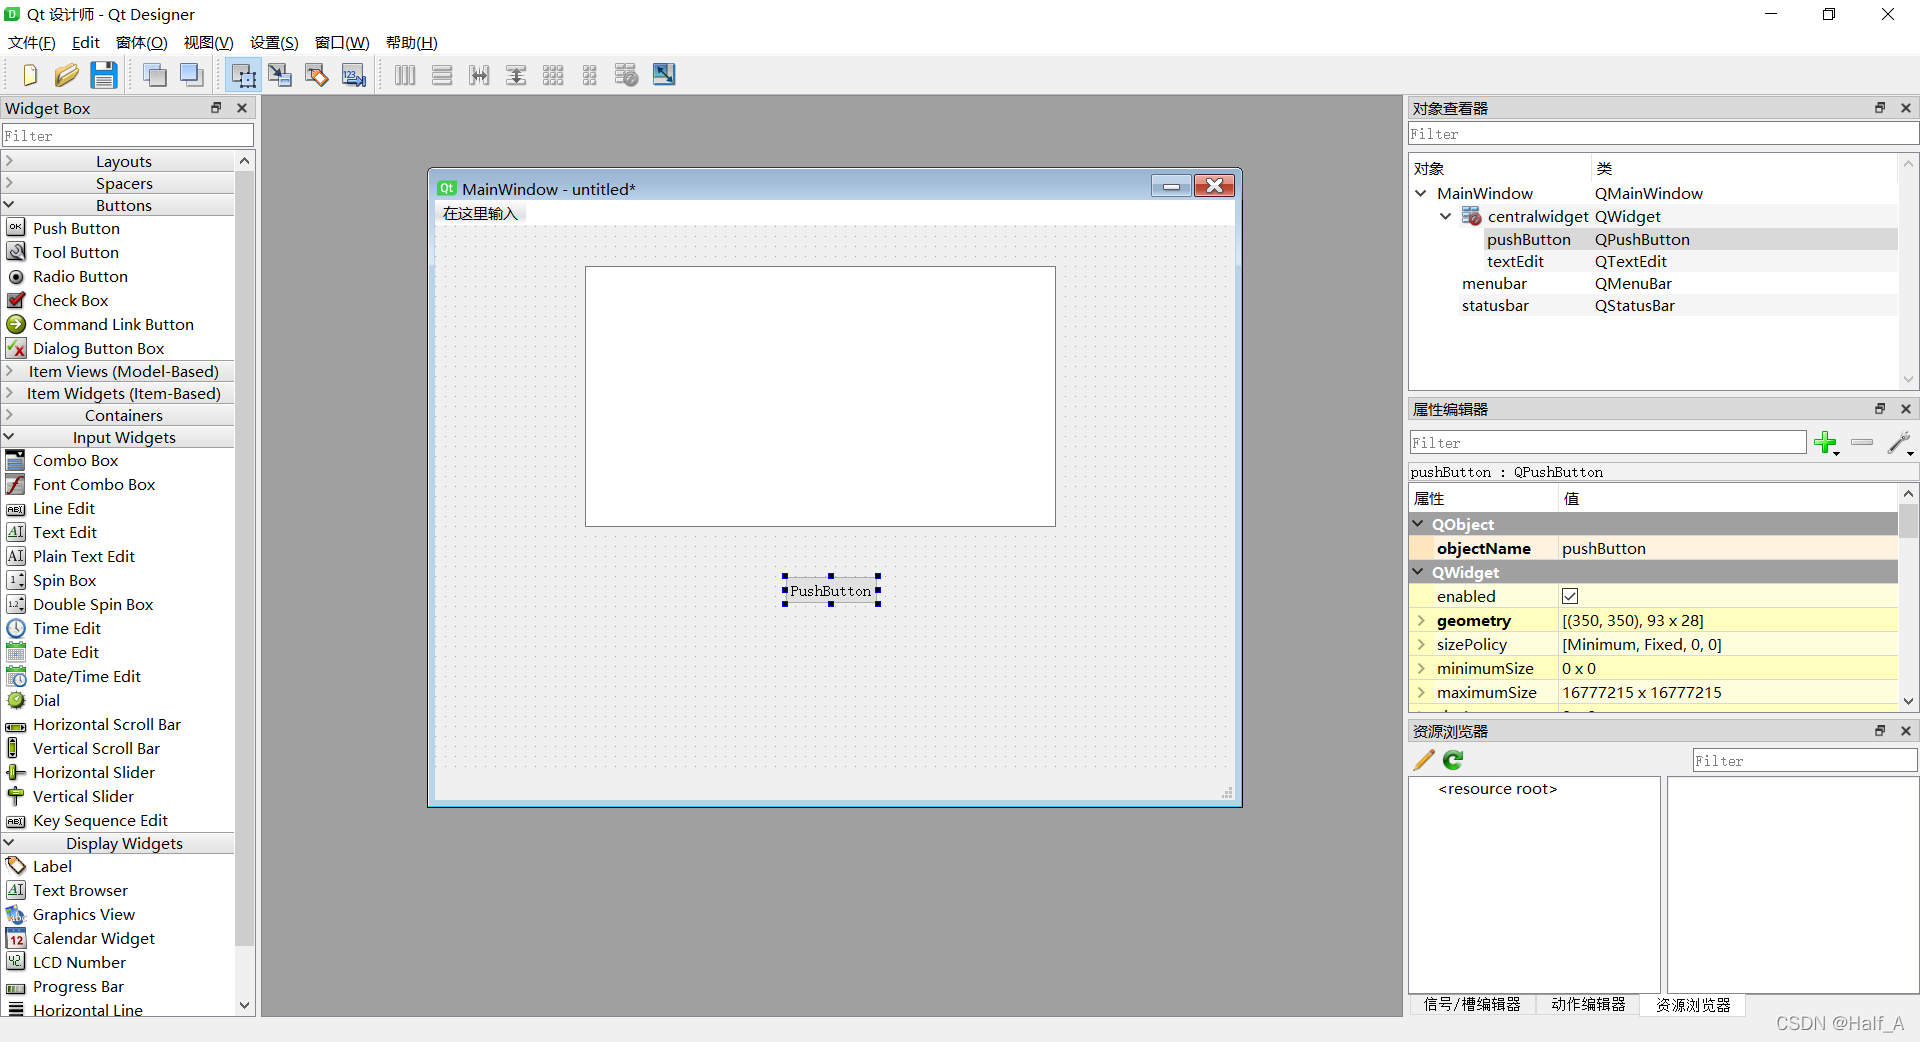
After creating a form, drag widgets from the left—text boxes, buttons, and so on—onto the form and adjust their size and position manually. On the right you can edit each space’s properties.
When the UI is ready, choose View → Preview to see how it looks, then click Save to store the layout as a .ui file. You can reopen the .ui file later whenever you need to change the interface.
3.2 Layouts
Simple drag-and-drop placement is straightforward; here is a quick overview of layout managers.
Common layout types:
| Layout | Style |
|---|---|
| Horizontal layout |  |
| Vertical layout |  |
| Grid layout |  |
| Form layout | 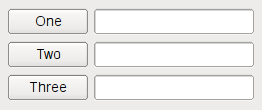 |
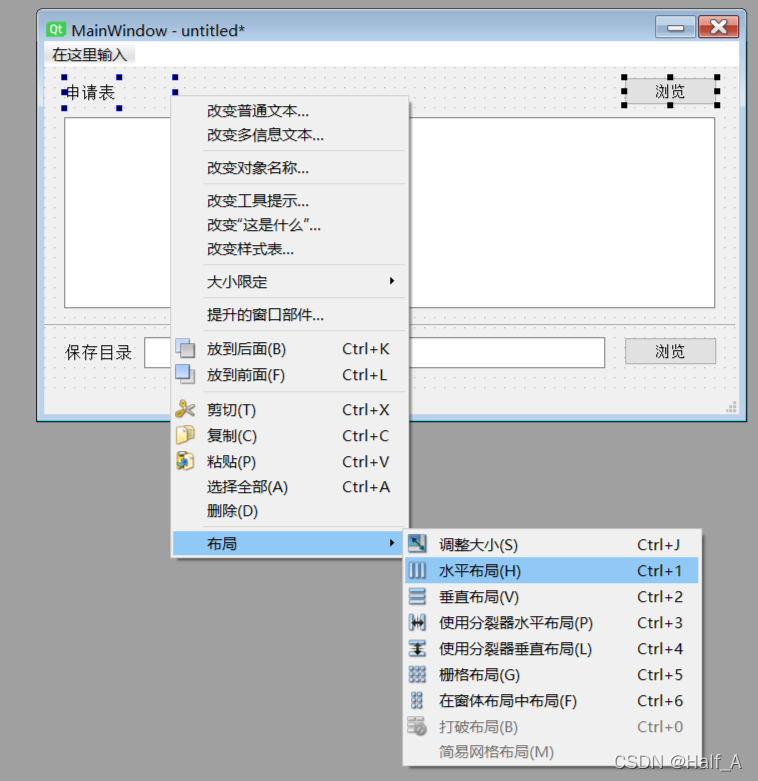
For example, select several widgets, right-click, and set them as a horizontal layout. In this way several spaces are combined into one large overall “widget.”
Select several horizontal layouts you have already set up, right-click, and choose vertical layout. That is a fast way to build a very simple UI.
3.3 Widget Adjustments
(1) Widget size
The main property here is sizePolicy.
Horizontal policy and vertical policy:
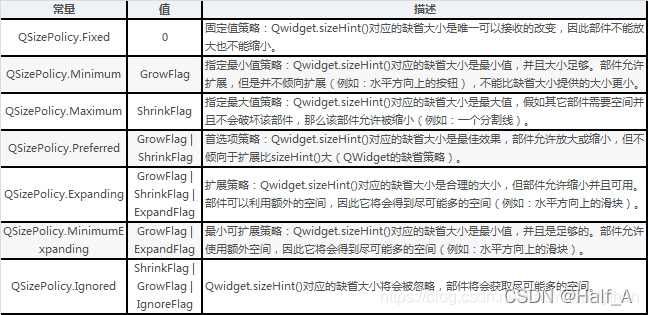
Horizontal stretch and vertical stretch: describe the relative size ratio of multiple widgets along an axis, similar to weights.
For example, if two widgets on the same horizontal row have horizontal stretch factors of 1 and 2, the size ratio of the two’s broadband is 1:2. If there are no other widgets on that row, they occupy 1/3 and 2/3 of the layout manager’s width.
(2) Widget spacing
Vertical spacing: add a layout property to the widget and adjust top and bottom padding and margin to control spacing.
Horizontal spacing: add a layout property and adjust left and right padding and margin, or add a horizontal spacer property to control spacing.
IV. Python Program
4.1 Converting a .ui File to Python
In cmd, change to the directory that contains the .ui file and run the following command to generate code. (Replace name in the command with your file name.)
pyuic5 -o name.py name.ui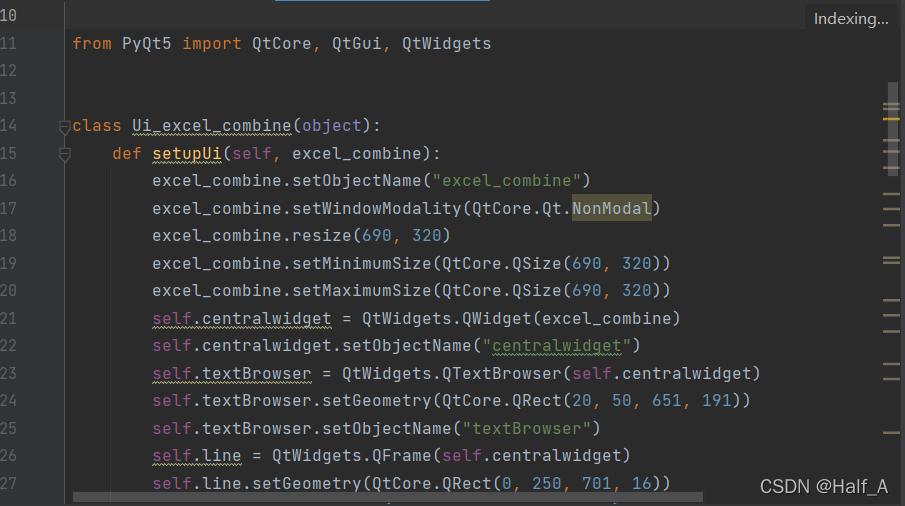
4.2 Calling the UI from the Main Program
Running the generated Python file by itself will not do anything useful, because that file has no program entry point. Create a main program that imports and uses the generated UI module.
# 导入程序运行必须模块
import sys
# PyQt5中使用的基本控件都在PyQt5.QtWidgets模块中
from PyQt5.QtWidgets import QApplication, QMainWindow, QFileDialog
# 导入designer工具生成的模块
# 注意导入时filename替换成生成的.py文件名,Ui_file替换成.py文件的类名
from filename import Ui_filename


class MyMainForm(QMainWindow, Ui_excel_combine):
    def __init__(self, parent=None):
        super(MyMainForm, self).__init__(parent)
        self.setupUi(self)

if __name__ == "__main__":
    # 固定的,PyQt5程序都需要QApplication对象。sys.argv是命令行参数列表,确保程序可以双击运行
    app = QApplication(sys.argv)
    # 初始化
    myWin = MyMainForm()
    # 将窗口控件显示在屏幕上
    myWin.show()
    # 程序运行,sys.exit方法确保程序完整退出。
    sys.exit(app.exec_())
4.3 Setting Up Button and Text Box Handlers
Configure handlers in the MyMainForm class of the main program. Buttons and text boxes are shown below as examples.
(1) Button click handler
For example, the following code runs button_clicked_handle automatically when the button is clicked:
buttonname.clicked.connect(button_clicked_handle)(2) Text box display handler
textBrowser.setPlainText('显示的字符串')4.4 Example Code
My program merges data from multiple Excel files. The GUI portion looks like this:
# 导入程序运行必须模块
import sys
import os
# PyQt5中使用的基本控件都在PyQt5.QtWidgets模块中
from PyQt5.QtWidgets import QApplication, QMainWindow, QFileDialog
from PyQt5.QtGui import QIcon
# 导入designer工具生成的模块
from excel_combine_ui import Ui_excel_combine

dir_choose = ""
filename = []

class MyMainForm(QMainWindow, Ui_excel_combine):
    def __init__(self, parent=None):
        super(MyMainForm, self).__init__(parent)
        self.setupUi(self)
        self.cwd = os.getcwd() # 获取当前程序文件位置
        self.sourceButton.clicked.connect(self.slot_source_button)
        self.targetButton.clicked.connect(self.slot_target_button)
        self.combineButton.clicked.connect(self.slot_combine_button)

    def slot_source_button(self):
        files, filetype = QFileDialog.getOpenFileNames(self, "选择多个采购申请表", self.cwd, "All Files (*);;PDF Files (*.pdf);;Text Files (*.txt)")
        global filename
        if len(files) == 0:
            print("取消选择\n")
            return
        filename_print = ""
        for file in files:
            filename.append(file)
            filename_print += file
            filename_print += '\n'
        self.textBrowser.setPlainText(filename_print)
        # print("文件筛选器类型:", filetype)

    def slot_target_button(self):
        global dir_choose
        dir_choose = QFileDialog.getExistingDirectory(self, "选择保存目录", self.cwd)
        if dir_choose == "":
            print("取消选择\n")
            return
        self.textBrowser_2.setPlainText(dir_choose)

    def slot_combine_button(self):
        wb_template = app.books.open('采购申请单模板.xls')  # 打开工作簿
        combine(wb_template, filename, dir_choose+'\采购申请表汇总.xls')


if __name__ == "__main__":
    # 固定的,PyQt5程序都需要QApplication对象。sys.argv是命令行参数列表,确保程序可以双击运行
    app1 = QApplication(sys.argv)
    app1.setWindowIcon(QIcon('logo.png'))
    # 初始化
    myWin = MyMainForm()
    # 将窗口控件显示在屏幕上
    myWin.show()
    # 程序运行,sys.exit方法确保程序完整退出。

    sys.exit(app1.exec_())
    # button.clicked.connect(handleCalc) 按钮按下
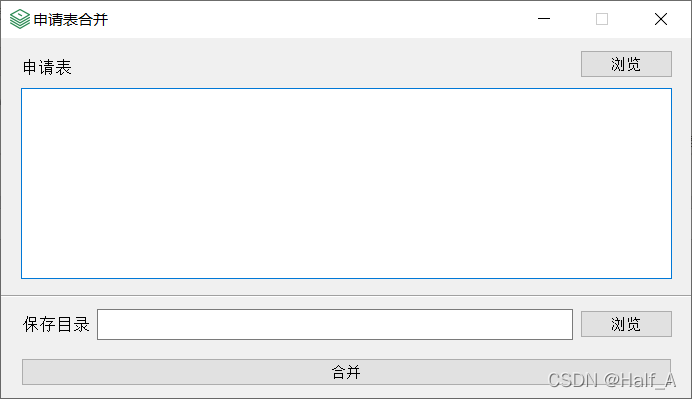
For more widget usage, see this blogger’s article: Link: https://blog.csdn.net/weixin_40841247/article/details/88781601
V. Publishing the Program
5.1 Installing PyInstaller
To package a finished Python program as an exe, use PyInstaller. Install it with pip:
pip install pyinstaller5.2 Packaging an exe
-
Open a cmd window and go to the directory that contains your Python program.
-
Package the exe with a command like the following. For example, my main program is
main.py, the packages I use arePyQt5andxlwings, and my icon file islogo.ico:
pyinstaller main.py --noconsole --hidden-import "PyQt5.QtXml","xlwings" --icon="logo.ico"
PyInstaller can only analyze which code files are needed. Resource files opened dynamically at runtime—images, Excel files, ui files, and the like—are not bundled for you.
My program needs to from-call xls spreadsheet files, and copy them manually into the dist/main directory.
Then double-click main.exe to run it successfully.
5.3 Improvement: Reducing Package Size
Packaging directly from the command line produced a very large exe. The reason is that the packager pulls in many dependency libraries the program never uses. After searching online, I found that a virtual environment helps: create a fresh virtual environment, install only the dependencies the program needs inside it, and run PyInstaller there.
(1) Creating a virtual environment with pipenv
Creating a Python virtual environment requires that Python’s venv tooling is already available on the system. Open cmd.
- Install pipenv
pip install pipenv- Go to an empty directory and initialize a virtual Python environment (make sure the Python version matches the one installed on your system)
pipenv --python 3.9- Enter the virtual environment
pipenv shell(2) Installing program dependencies
Inside the virtual environment, install only the libraries your Python program uses to keep the package as small as possible:
pip install pyinstaller
pip install pyqt5
pip install xlwings
(3) Packaging inside the virtual environment
Run PyInstaller directly inside the virtual environment:
pyinstaller main.py --noconsole --hidden-import "PyQt5.QtXml","xlwings" --icon="logo.ico"The resulting package is much smaller.
Comments