Contents
I. GDR-Net: Geometry-Guided Direct Regression Network for Monocular 6D Object Pose Estimation
Journal / Conference: CVPR2021 Author / Institution: Gu Wang, Tsinghua University, BNRist Keywords: pose estimation; end-to-end Year: 2021 Code: https://github.com/THU-DA-6D-Pose-Group/GDR-Net
1 Objective
The paper proposes an end-to-end pose estimation algorithm.
2 Method
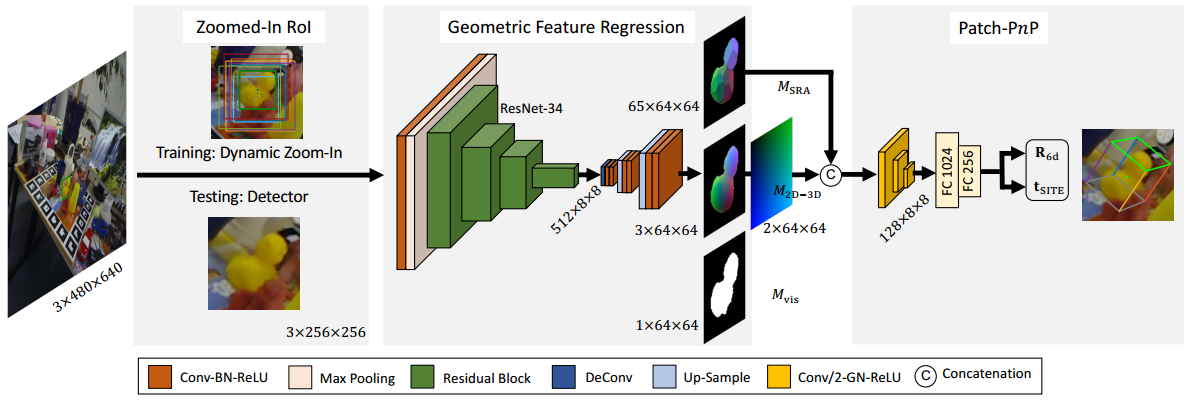
(1) Network Architecture
First, a 256x256 ROI image is fed into GDR-Net to predict three 64x64 intermediate feature maps:
- Dense correspondence map : obtained by mapping the dense coordinate map fall onto 2D pixel coordinates; it captures the object’s geometric shape information.
- Surface region attention map : obtained everywhere from using farthest-point sampling; it represents the object’s symmetry.
- Visible object mask
A simple 2D convolutional Patch-PnP module directly regresses the object’s 6D pose from the feature maps. The Patch-PnP module consists of three convolutional layers, followed by two fully connected layers that flatten the features. Finally even-a fully connected layers output the R6D rotation and tSITE translation.
3 Thoughts
This paper focuses on image feature extraction and processing, enabling pose prediction from a single image.
II. Algorithm Reproduction
2.1 Dataset Preparation
Download the BOP dataset and VOC2012 dataset, and download test_boxes from OneDrive (password: groupji) or Baidu Netdisk (password: vp58). Once complete, the datasets folder should have the following structure:
datasets/
├── BOP_DATASETS   # https://bop.felk.cvut.cz/datasets/
    ├──tudl
    ├──lmo
    ├──ycbv
    ├──icbin
    ├──hb
    ├──itodd
    └──tless
└──VOCdevkit
Download the pretrained model from OneDrive (password: groupji) or Baidu Netdisk (password 10t3), and place it in the ./output folder.
2.2 Environment Setup
Requires Ubuntu 18.04/20.04, CUDA 10.1/10.2/11.6, Python >= 3.7, PyTorch >= 1.9, and torchvision.
(1) Create a Virtual Environment
conda create -n gdrnpp python=3.7
conda activate gdrnpp
(2) Install Dependencies
Install PyTorch:
conda install pytorch==1.9.0 torchvision==0.10.0 torchaudio==0.9.0 cudatoolkit=11.3 -c pytorch -c conda-forgeInstall detectron2 from source:
python -m pip install 'git+https://github.com/facebookresearch/detectron2.git'
# (add --user if you don't have permission)

# Or, to install it from a local clone:
git clone https://github.com/facebookresearch/detectron2.git
python -m pip install -e detectron2

# On macOS, you may need to prepend the above commands with a few environment variables:
CC=clang CXX=clang++ ARCHFLAGS="-arch x86_64" python -m pip install ...
Open requirements/requirement.txt and comment out torchvision on line 30, pytorch3d on line 35, and pytorch-lightning on line 48.
Install the Ubuntu system dependencies and Python dependencies:
sh scripts/install_deps.sh
conda install pytorch-lightning
pip install pytorch3d
(4) Compile the fps C++ Extension
sh core/csrc/compile.sh(5) Compile the egl_renderer C++ Extension
sh lib/egl_renderer/compile_cpp_egl_renderer.sh2.3 Object Detection Algorithm
Download the pretrained model from OneDrive (password: groupji) or Baidu Netdisk (password: aw68).
(1) Training
./det/yolox/tools/train_yolox.sh <config_path> <gpu_ids> (other args)
(2) Testing
./det/yolox/tools/test_yolox.sh <config_path> <gpu_ids> <ckpt_path> (other args)
2.4 Pose Estimation Algorithm
(1) Training
Open core/gdrn_modeling/datasets/lm_pbr.py and comment out assert osp.exists(xyz_path), xyz_path on line 190.
./core/gdrn_modeling/train_gdrn.sh <config_path> <gpu_ids> (other args)
For example:
./core/gdrn_modeling/train_gdrn.sh configs/gdrn/ycbv/convnext_a6_AugCosyAAEGray_BG05_mlL1_DMask_amodalClipBox_classAware_ycbv.py 0
(2) Testing
./core/gdrn_modeling/test_gdrn.sh <config_path> <gpu_ids> <ckpt_path> (other args)
For example:
./core/gdrn_modeling/test_gdrn.sh configs/gdrn/ycbv/convnext_a6_AugCosyAAEGray_BG05_mlL1_DMask_amodalClipBox_classAware_ycbv.py 0 output/gdrn/ycbv/convnext_a6_AugCosyAAEGray_BG05_mlL1_DMask_amodalClipBox_classAware_ycbv/model_final_wo_optim.pth
Comments