Contents
- I. Introduction to Mask R-CNN
- II. Mask R-CNN Implementation Process
- 2.1 ResNet‑101 Backbone Feature Extraction Network
- 2.2 Feature Pyramid—Building the FPN Feature Pyramid
- 2.3 Building the RPN Proposal Network Model
- 2.4 Obtaining Anchor Boxes
- 2.5 Adjusting Anchor Boxes to Obtain Proposal Boxes
- 2.6 Using Proposal Boxes to Crop Shared Feature Layers
- 2.7 From Local Public Feature Layers to Prediction Results
- 2.8 Adjusting Proposal Boxes to Obtain Predicted Boxes
- III. Creating Your Own Dataset
- 3.1 Installing Labelme
- 3.2 Converting to COCO Format
- 3.2 Alternatively, Convert to Mask Images, Augment the Data, and Then Convert to COCO Format
- IV. Start Training
I. Introduction to Mask R-CNN
The region convolutional neural network R-CNN (Region-Convolutional Neural Networks) is a two-stage object detector. It generates candidate regions from an image, extracts features, determines the feature classes, and corrects the candidate box positions. The R-CNN series currently includes two representative models: Faster R-CNN and Mask R-CNN.
Mask R-CNN is a major 2017 work by Kaiming He. It performs instance segmentation alongside object detection and achieves excellent results.
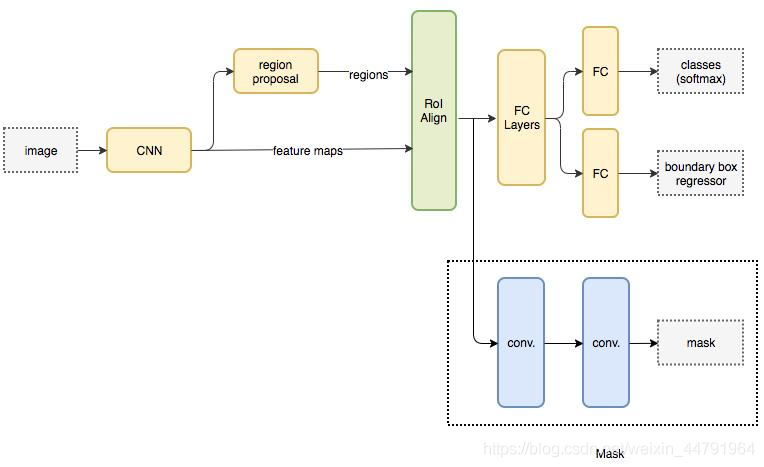
Mask R-CNN uses ResNet‑101 as its backbone feature extraction network, which is the CNN part in the figure. It requires the input image to be square, with its width and height divisible by 2 to the power of 6; otherwise, gray areas will be added around the outside.
- ResNet‑101 Backbone Feature Extraction (CNN)
After an image is fed into ResNet‑101 (CNN), its features are extracted. The image’s width and height are then downsampled two, three, four, and five times to construct a feature pyramid, with the goal of achieving multiscale feature fusion.
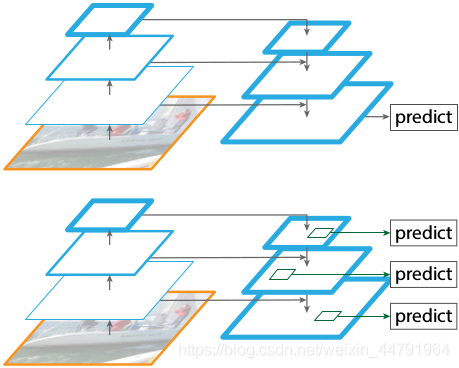
This is the left part of the figure below, where five feature layers, C2, C3, C4, and C5, are obtained (images of five sizes).
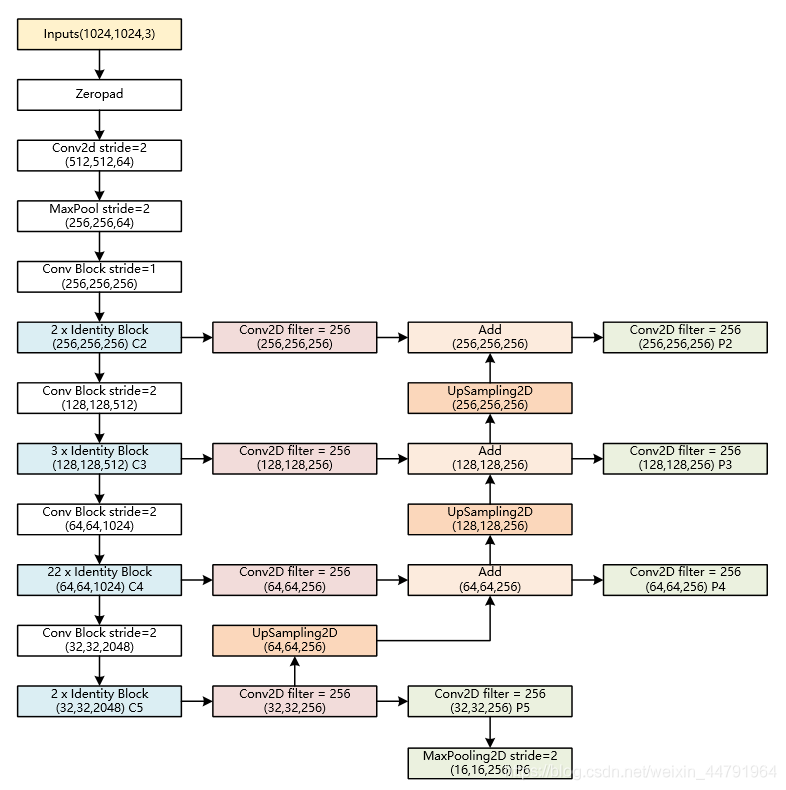
- P5: Apply a two-dimensional convolution to the smallest C5(32,32) image, then convolve it again to produce the valid feature layer P5(32,32) (the green box below).
- P6: Apply max pooling to P5(32,32) to obtain the valid feature layer P6(16,16).
- P4: Upsample the result of one convolution on C5(32,32) to obtain a (64,64) image, perform an Add operation with C4(64,64), and then convolve it again to obtain another valid feature layer, P4.
- P3: Upsample the result of one convolution on C4, perform an Add operation with C3, and then convolve it again to obtain the valid feature layer P3.
- P2: Upsample the result of one convolution on C3, perform an Add operation with C2, and convolve it again to obtain the valid feature layer P2.
The five extracted valid feature layers P2, P3, P4, P5, and P6 are the output feature maps of ResNet‑101 and can be used by the subsequent RPN proposal network to obtain proposal boxes.
- RPN Region Proposal Network (Region Proposal)
Apply the RPN proposal network (region proposal) to the valid feature layers to obtain many proposal regions. These proposal regions may or may not contain objects. Regardless of whether they do, they are subsequently used to crop the P2~P5 images, producing cropped images that may contain targets (P6 is not cropped).
- RoI Region Alignment (RoI Align)
For every image cropped using a proposal box, RoI Align adjusts the image size to a square to facilitate subsequent feature-matching operations.
- FC Layers
Based on the images cropped using the proposal boxes, a Classifier regression model determines whether the cropped regions contain objects. The Classifier bounding-box prediction network then decodes the valid feature layers to obtain the final predicted boxes.
- Mask Semantic Segmentation Network
Using the final predicted boxes, target images are cropped from the valid feature layers P2~P5 again (this time, because it is equivalent to having been performed so as to filter, so far fewer images are cropped). The images cropped this time are passed to the Mask semantic segmentation network for semantic segmentation.
II. Mask R-CNN Implementation Process
2.1 ResNet‑101 Backbone Feature Extraction Network
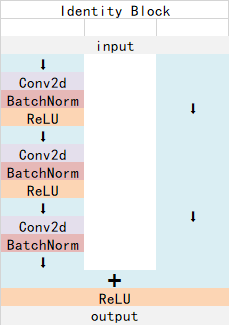
ResNet‑101 has two basic blocks: Conv Block and Identity Block. The input and output dimensions of a Conv Block differ, so these blocks cannot be chained continuously; their role is to change the network dimensions. The input and output dimensions of an Identity Block are the same, so these blocks can be chained to deepen the network.
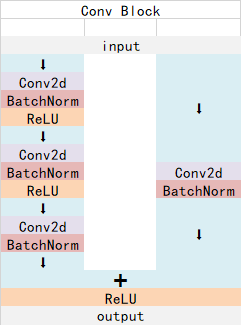
Using an input shape from the COCO dataset as an example, the input shape is 1024x1024, and the shape changes as follows:
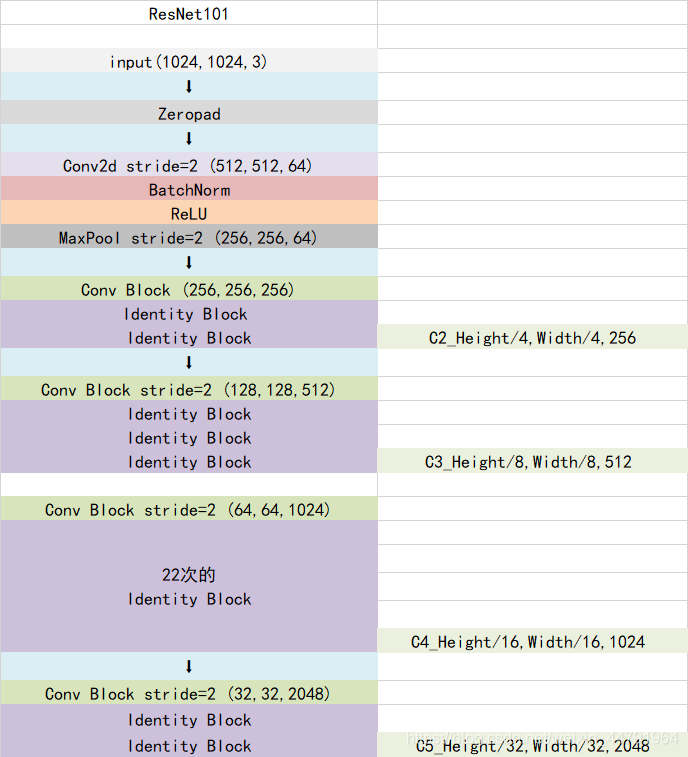
We take the results whose width and height have been downsampled two, three, four, and five times to construct the feature pyramid structure below.
Relevant code:
from keras.layers import ZeroPadding2D,Conv2D,MaxPooling2D,BatchNormalization,Activation,Add


def identity_block(input_tensor, kernel_size, filters, stage, block,
                   use_bias=True, train_bn=True):
    nb_filter1, nb_filter2, nb_filter3 = filters
    conv_name_base = 'res' + str(stage) + block + '_branch'
    bn_name_base = 'bn' + str(stage) + block + '_branch'

    x = Conv2D(nb_filter1, (1, 1), name=conv_name_base + '2a',
                  use_bias=use_bias)(input_tensor)
    x = BatchNormalization(name=bn_name_base + '2a')(x, training=train_bn)
    x = Activation('relu')(x)

    x = Conv2D(nb_filter2, (kernel_size, kernel_size), padding='same',
                  name=conv_name_base + '2b', use_bias=use_bias)(x)
    x = BatchNormalization(name=bn_name_base + '2b')(x, training=train_bn)
    x = Activation('relu')(x)

    x = Conv2D(nb_filter3, (1, 1), name=conv_name_base + '2c',
                  use_bias=use_bias)(x)
    x = BatchNormalization(name=bn_name_base + '2c')(x, training=train_bn)

    x = Add()([x, input_tensor])
    x = Activation('relu', name='res' + str(stage) + block + '_out')(x)
    return x

def conv_block(input_tensor, kernel_size, filters, stage, block,
               strides=(2, 2), use_bias=True, train_bn=True):

    nb_filter1, nb_filter2, nb_filter3 = filters
    conv_name_base = 'res' + str(stage) + block + '_branch'
    bn_name_base = 'bn' + str(stage) + block + '_branch'

    x = Conv2D(nb_filter1, (1, 1), strides=strides,
                  name=conv_name_base + '2a', use_bias=use_bias)(input_tensor)
    x = BatchNormalization(name=bn_name_base + '2a')(x, training=train_bn)
    x = Activation('relu')(x)

    x = Conv2D(nb_filter2, (kernel_size, kernel_size), padding='same',
                  name=conv_name_base + '2b', use_bias=use_bias)(x)
    x = BatchNormalization(name=bn_name_base + '2b')(x, training=train_bn)
    x = Activation('relu')(x)

    x = Conv2D(nb_filter3, (1, 1), name=conv_name_base +
                  '2c', use_bias=use_bias)(x)
    x = BatchNormalization(name=bn_name_base + '2c')(x, training=train_bn)

    shortcut = Conv2D(nb_filter3, (1, 1), strides=strides,
                         name=conv_name_base + '1', use_bias=use_bias)(input_tensor)
    shortcut = BatchNormalization(name=bn_name_base + '1')(shortcut, training=train_bn)

    x = Add()([x, shortcut])
    x = Activation('relu', name='res' + str(stage) + block + '_out')(x)
    return x

def get_resnet(input_image,stage5=False, train_bn=True):
    # Stage 1
    x = ZeroPadding2D((3, 3))(input_image)
    x = Conv2D(64, (7, 7), strides=(2, 2), name='conv1', use_bias=True)(x)
    x = BatchNormalization(name='bn_conv1')(x, training=train_bn)
    x = Activation('relu')(x)
    # Height/4,Width/4,64
    C1 = x = MaxPooling2D((3, 3), strides=(2, 2), padding="same")(x)
    # Stage 2
    x = conv_block(x, 3, [64, 64, 256], stage=2, block='a', strides=(1, 1), train_bn=train_bn)
    x = identity_block(x, 3, [64, 64, 256], stage=2, block='b', train_bn=train_bn)
    # Height/4,Width/4,256
    C2 = x = identity_block(x, 3, [64, 64, 256], stage=2, block='c', train_bn=train_bn)
    # Stage 3
    x = conv_block(x, 3, [128, 128, 512], stage=3, block='a', train_bn=train_bn)
    x = identity_block(x, 3, [128, 128, 512], stage=3, block='b', train_bn=train_bn)
    x = identity_block(x, 3, [128, 128, 512], stage=3, block='c', train_bn=train_bn)
    # Height/8,Width/8,512
    C3 = x = identity_block(x, 3, [128, 128, 512], stage=3, block='d', train_bn=train_bn)
    # Stage 4
    x = conv_block(x, 3, [256, 256, 1024], stage=4, block='a', train_bn=train_bn)
    block_count = 22
    for i in range(block_count):
        x = identity_block(x, 3, [256, 256, 1024], stage=4, block=chr(98 + i), train_bn=train_bn)
    # Height/16,Width/16,1024
    C4 = x
    # Stage 5
    if stage5:
        x = conv_block(x, 3, [512, 512, 2048], stage=5, block='a', train_bn=train_bn)
        x = identity_block(x, 3, [512, 512, 2048], stage=5, block='b', train_bn=train_bn)
        # Height/32,Width/32,2048
        C5 = x = identity_block(x, 3, [512, 512, 2048], stage=5, block='c', train_bn=train_bn)
    else:
        C5 = None
    return [C1, C2, C3, C4, C5]
For residual neural networks, see this article: ResNet: Residual Neural Network
2.2 Feature Pyramid—Building the FPN Feature Pyramid
After backbone feature extraction above, we obtain C2 with its width and height downsampled two times, C3 downsampled three times, C4 downsampled four times, and C5 downsampled five times. These results are used to construct the feature pyramid, primarily to obtain the five valid feature layers P2~P6.
The specific process is:
- P5: Apply one 256-channel convolution to [C5], followed by another 256-channel convolution, to obtain P5.
- P6: Apply max pooling to P5 to obtain P6.
- P4: Upsample [the result of one convolution on C5], perform an Add operation with [the result of applying a 256-channel convolution to C4], and then apply another 256-channel convolution to obtain P4.
- The processes for P3 and P2 are similar to that for P4.
The extracted P2, P3, P4, P5, and P6 can serve as valid feature layers for the RPN. The RPN proposal network performs the next operation on these valid feature layers, decoding the anchor boxes to obtain proposal boxes.
The extracted P2, P3, P4, and P5 can serve as valid feature layers for the Classifier and Mask networks. The Classifier bounding-box prediction network performs the next operation on the valid feature layers, decoding the proposal boxes to obtain the final predicted boxes. The Mask semantic segmentation network performs the next operation on the valid feature layers to obtain the semantic segmentation result inside each predicted box.
Specific code:
# 获得Resnet里的压缩程度不同的一些层
_, C2, C3, C4, C5 = get_resnet(input_image, stage5=True, train_bn=config.TRAIN_BN)

# 组合成特征金字塔的结构
# P5长宽共压缩了5次
# Height/32,Width/32,256
P5 = Conv2D(config.TOP_DOWN_PYRAMID_SIZE, (1, 1), name='fpn_c5p5')(C5)
# P4长宽共压缩了4次
# Height/16,Width/16,256
P4 = Add(name="fpn_p4add")([
    UpSampling2D(size=(2, 2), name="fpn_p5upsampled")(P5),
    Conv2D(config.TOP_DOWN_PYRAMID_SIZE, (1, 1), name='fpn_c4p4')(C4)])
# P4长宽共压缩了3次
# Height/8,Width/8,256
P3 = Add(name="fpn_p3add")([
    UpSampling2D(size=(2, 2), name="fpn_p4upsampled")(P4),
    Conv2D(config.TOP_DOWN_PYRAMID_SIZE, (1, 1), name='fpn_c3p3')(C3)])
# P4长宽共压缩了2次
# Height/4,Width/4,256
P2 = Add(name="fpn_p2add")([
    UpSampling2D(size=(2, 2), name="fpn_p3upsampled")(P3),
    Conv2D(config.TOP_DOWN_PYRAMID_SIZE, (1, 1), name='fpn_c2p2')(C2)])

# 各自进行一次256通道的卷积,此时P2、P3、P4、P5通道数相同
# Height/4,Width/4,256
P2 = Conv2D(config.TOP_DOWN_PYRAMID_SIZE, (3, 3), padding="SAME", name="fpn_p2")(P2)
# Height/8,Width/8,256
P3 = Conv2D(config.TOP_DOWN_PYRAMID_SIZE, (3, 3), padding="SAME", name="fpn_p3")(P3)
# Height/16,Width/16,256
P4 = Conv2D(config.TOP_DOWN_PYRAMID_SIZE, (3, 3), padding="SAME", name="fpn_p4")(P4)
# Height/32,Width/32,256
P5 = Conv2D(config.TOP_DOWN_PYRAMID_SIZE, (3, 3), padding="SAME", name="fpn_p5")(P5)
# 在建议框网络里面还有一个P6用于获取建议框
# Height/64,Width/64,256
P6 = MaxPooling2D(pool_size=(1, 1), strides=2, name="fpn_p6")(P5)

# P2, P3, P4, P5, P6可以用于获取建议框
rpn_feature_maps = [P2, P3, P4, P5, P6]
# P2, P3, P4, P5用于获取mask信息
mrcnn_feature_maps = [P2, P3, P4, P5]
2.3 Building the RPN Proposal Network Model
The RPN proposal network model:
- First, apply one 3x3 convolution with 512 channels.
- Then apply one
anchors_per_location x 2convolution and oneanchors_per_location x 4convolution.- The
anchors_per_location x 2convolution predicts whether there is an object inside each predicted box at each grid point on the shared feature layer. - The
anchors_per_location x 4convolution predicts the changes to each anchor box at each grid point on the shared feature layer.
- The
For example, when the input image shape is 1024x1024x3, the shapes of the shared feature layers are 256x256x256, 128x128x256, 64x64x256, 32x32x256, and 16x16x256. Each point on these shared feature layers maps to a grid point with a different spacing on the original image. By default, each grid has 3 (anchors_per_location) anchor boxes of different sizes.
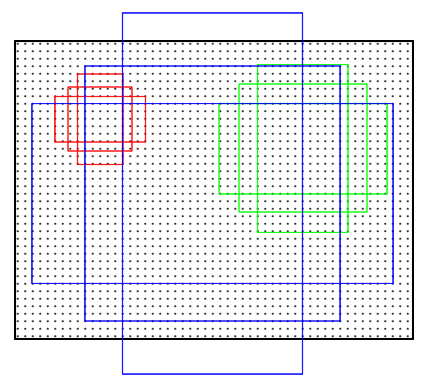
The result of the anchors_per_location x 4 convolution adjusts these anchor boxes to obtain a new box.
The anchors_per_location x 2 convolution determines whether the new box obtained above contains an object.
At this point, we can obtain some useful boxes. The anchors_per_location x 2 convolution is used to determine whether these boxes contain objects.
The implementation code is as follows:
#------------------------------------#
#   五个不同大小的特征层会传入到
#   RPN当中,获得建议框
#------------------------------------#

def rpn_graph(feature_map, anchors_per_location):
    #------------------------------------#
    #   利用一个3x3卷积进行特征整合,基础的层
    #------------------------------------#
    shared = Conv2D(512, (3, 3), padding='same', activation='relu', name='rpn_conv_shared')(feature_map)

    #------------------------------------#
    #   batch_size, num_anchors, 2
    #   代表这个先验框是否包含物体
    #   anchor_per_location的默认值是3
    #   意味着特征层对图像进行网格的划分后,每个网格上先验框的数量是3
    #------------------------------------#
    x = Conv2D(anchors_per_location * 2, (1, 1), padding='valid', activation='linear', name='rpn_class_raw')(shared)

    # reshape到最后一个维度是2的维度,是一个分类网络,有非常多先验框
    rpn_class_logits = Reshape([-1,2])(x)
    rpn_probs = Activation("softmax", name="rpn_class_xxx")(rpn_class_logits)

    #------------------------------------#
    #   batch_size, num_anchors, 4
    #   这个先验框的调整参数
    #------------------------------------#
    x = Conv2D(anchors_per_location * 4, (1, 1), padding="valid", activation='linear', name='rpn_bbox_pred')(shared)
    rpn_bbox = Reshape([-1, 4])(x)

    # 输出包括:
    # 先验框是否真实的包含物体
    # bbox先验框的调整参数
    return [rpn_class_logits, rpn_probs, rpn_bbox]


#------------------------------------#
#   建立建议框网络模型
#   RPN模型
#------------------------------------#
def build_rpn_model(anchors_per_location, depth):
    # 输入的长和宽都是None,代表输入的有效特征层大小是变化的,256、64等都可以
    # 输入的depth是256
    input_feature_map = Input(shape=[None, None, depth], name="input_rpn_feature_map")
    # 将输入的图像传入到rpn_graph中
    outputs = rpn_graph(input_feature_map, anchors_per_location)
    return Model([input_feature_map], outputs, name="rpn_model")
2.4 Obtaining Anchor Boxes
Anchor boxes are predefined regions of an image. These regions may or may not contain objects. Our network’s prediction results determine which anchor boxes contain objects and then adjust them.
In Mask R-CNN, the prediction results of the proposal network adjust these anchor boxes to obtain proposal boxes and determine which anchor boxes contain objects.
This section explains how to obtain anchor boxes.
#----------------------------------------------------------#
#  Anchors
#----------------------------------------------------------#
def generate_anchors(scales, ratios, shape, feature_stride, anchor_stride):
    #----------------------------------------------------------#
    #   获得所有框的长度和比例的组合
    #   相当于在每一个网格点上获得了两个长方形(1:2)、(2:1)和一个正方形
    #----------------------------------------------------------#
    scales, ratios = np.meshgrid(np.array(scales), np.array(ratios))
    scales = scales.flatten()
    ratios = ratios.flatten()
    heights = scales / np.sqrt(ratios)
    widths = scales * np.sqrt(ratios)

    #----------------------------------------------------------#
    #   生成网格中心
    #----------------------------------------------------------#
    shifts_y = np.arange(0, shape[0], anchor_stride) * feature_stride
    shifts_x = np.arange(0, shape[1], anchor_stride) * feature_stride
    shifts_x, shifts_y = np.meshgrid(shifts_x, shifts_y)

    #----------------------------------------------------------#
    #   获得先验框的中心和宽高
    #----------------------------------------------------------#
    box_widths, box_centers_x = np.meshgrid(widths, shifts_x)
    box_heights, box_centers_y = np.meshgrid(heights, shifts_y)

    #----------------------------------------------------------#
    #   更变格式
    #----------------------------------------------------------#
    # 对先验框的中心堆叠,然后reshape,reshape后的结果代表每一个先验框的中心坐标
    box_centers = np.stack([box_centers_y, box_centers_x], axis=2).reshape([-1, 2])
    # 对先验框的高和宽堆叠,然后reshape,reshape后的结果代表每一个先验框的高和宽
    box_sizes = np.stack([box_heights, box_widths], axis=2).reshape([-1, 2])

    #----------------------------------------------------------#
    #   计算出(y1, x1, y2, x2)
    #----------------------------------------------------------#
    boxes = np.concatenate([box_centers - 0.5 * box_sizes, box_centers + 0.5 * box_sizes], axis=1)

    return boxes


# 生成特征金字塔先验框
def generate_pyramid_anchors(scales, ratios, feature_shapes, feature_strides,  anchor_stride):
    """
    生成不同特征层的anchors,并利用concatenate进行堆叠
    """
    #----------------------------------------------------------#
    #   Anchors
    #   [anchor_count, (y1, x1, y2, x2)]
    #   P2对应的scale是32
    #   P3对应的scale是64
    #   P4对应的scale是128
    #   P5对应的scale是256
    #   P6对应的scale是512
    #----------------------------------------------------------#
    anchors = []

    # 对scales进行for循环,是传入的anchor_scales,是32、64、128、256、512
    # 对应不同特征层上先验框的基础大小,再在此基础上获得调整,获得不同长宽大小的先验框
    for i in range(len(scales)):
        # ratio的值是0.5、1、2,对应每个网格点上三个先验框
        # feature_shapes就是获得的每一个有效特征层的大小,代表我们要将图片分割成多少网格
        # feature_strides对应backbone_strides,是4、8、16、32、64
        # anchor_stride的值为1
        anchors.append(generate_anchors(scales[i], ratios, feature_shapes[i], feature_strides[i], anchor_stride))

    return np.concatenate(anchors, axis=0)

def compute_backbone_shapes(config, image_shape):
    return np.array( [[int(math.ceil(image_shape[0] / stride)), int(math.ceil(image_shape[1] / stride))] for stride in config.BACKBONE_STRIDES])


# 利用下面的函数获取先验框
def get_anchors(config, image_shape):
    # 计算主干特征提取网络获得的有效特征层的shape
    # 为了事先放置先验框,我们需要知道网格大小,因此需要先获得有效特征层的shape
    backbone_shapes = compute_backbone_shapes(config, image_shape)
    anchor_cache = {}
    if not tuple(image_shape) in anchor_cache:
        # 将backbone_shapes传入下面的函数
        # 生成特征金字塔的先验框
        a = generate_pyramid_anchors(
            config.RPN_ANCHOR_SCALES,
            config.RPN_ANCHOR_RATIOS,
            backbone_shapes,
            config.BACKBONE_STRIDES,
            config.RPN_ANCHOR_STRIDE)
        anchor_cache[tuple(image_shape)] = norm_boxes(a, image_shape[:2])
    return anchor_cache[tuple(image_shape)]
2.5 Adjusting Anchor Boxes to Obtain Proposal Boxes
Use ProposalLayer to decode the anchor boxes and obtain proposal boxes.
    #------------------------------------------------------------------#
    #   对先验框进行解码,获得先验框解码后的建议框的坐标
    #   rpn_rois            : Batch_size, proposal_count, 4
    #------------------------------------------------------------------#

    proposal_count = config.POST_NMS_ROIS_TRAINING
    rpn_rois = ProposalLayer(proposal_count=proposal_count, nms_threshold=config.RPN_NMS_THRESHOLD, name="ROI", config=config)([rpn_class, rpn_bbox, anchors])
    active_class_ids = Lambda(lambda x: parse_image_meta_graph(x)["active_class_ids"])(input_image_meta)
There are three input parameters: rpn_class, rpn_bbox, and anchors. Here, rpn_class represents the confidence that each anchor box contains an object, rpn_bbox represents the adjustment parameters for all anchor boxes, and anchors represents all the anchor boxes obtained previously.
The specific code for ProposalLayer is as follows:
#----------------------------------------------------------#
#   Proposal Layer
#   该部分代码用于将先验框转化成建议框
#----------------------------------------------------------#

class ProposalLayer(Layer):
    def __init__(self, proposal_count, nms_threshold, config=None, **kwargs):
        super(ProposalLayer, self).__init__(**kwargs)
        self.config = config
        self.proposal_count = proposal_count
        self.nms_threshold = nms_threshold

    def call(self, inputs):
        #----------------------------------------------------------#
        #   输入的inputs有三个内容
        #   inputs[0]   rpn_class   : Batch_size, num_anchors, 2
        #   inputs[1]   rpn_bbox    : Batch_size, num_anchors, 4
        #   inputs[2]   anchors     : Batch_size, num_anchors, 4
        #----------------------------------------------------------#

        #----------------------------------------------------------#
        #   获得先验框内部是否有物体[Batch_size, num_anchors, 1]
        #----------------------------------------------------------#
        scores = inputs[0][:, :, 1]

        #----------------------------------------------------------#
        #   获得先验框的调整参数[batch, num_rois, 4]
        #----------------------------------------------------------#
        deltas = inputs[1]

        #----------------------------------------------------------#
        #   获得先验框的坐标
        #----------------------------------------------------------#
        anchors = inputs[2]

        #----------------------------------------------------------#
        #   RPN_BBOX_STD_DEV[0.1 0.1 0.2 0.2] 改变数量级
        #----------------------------------------------------------#
        deltas = deltas * np.reshape(self.config.RPN_BBOX_STD_DEV, [1, 1, 4])

        #----------------------------------------------------------#
        #   筛选出得分前6000个的框
        #----------------------------------------------------------#
        pre_nms_limit = tf.minimum(self.config.PRE_NMS_LIMIT, tf.shape(anchors)[1])

        #----------------------------------------------------------#
        #   获得这些框的索引
        #----------------------------------------------------------#
        ix = tf.nn.top_k(scores, pre_nms_limit, sorted=True, name="top_anchors").indices

        #----------------------------------------------------------#
        #   获得先验框、及其得分与调整参数
        #----------------------------------------------------------#
        scores = batch_slice([scores, ix], lambda x, y: tf.gather(x, y), self.config.IMAGES_PER_GPU)
        deltas = batch_slice([deltas, ix], lambda x, y: tf.gather(x, y), self.config.IMAGES_PER_GPU)
        pre_nms_anchors = batch_slice([anchors, ix], lambda a, x: tf.gather(a, x), self.config.IMAGES_PER_GPU, names=["pre_nms_anchors"])

        #----------------------------------------------------------#
        #   [batch, pre_nms_limit, (y1, x1, y2, x2)]
        #   对先验框进行解码
        #----------------------------------------------------------#
        boxes = batch_slice([pre_nms_anchors, deltas], lambda x, y: apply_box_deltas_graph(x, y), self.config.IMAGES_PER_GPU, names=["refined_anchors"])

        #----------------------------------------------------------#
        #   [batch, pre_nms_limit, (y1, x1, y2, x2)]
        #   防止超出图片范围
        #----------------------------------------------------------#
        window = np.array([0, 0, 1, 1], dtype=np.float32)
        boxes = batch_slice(boxes, lambda x: clip_boxes_graph(x, window), self.config.IMAGES_PER_GPU, names=["refined_anchors_clipped"])

        #---------------------------------------------------------#
        #   在非极大抑制后
        #   获得一个shape为[batch, NMS_ROIS, 4]的proposals
        #---------------------------------------------------------#
        def nms(boxes, scores):
            indices = tf.image.non_max_suppression(boxes, scores, self.proposal_count, self.nms_threshold, name="rpn_non_max_suppression")
            proposals = tf.gather(boxes, indices)
            padding = tf.maximum(self.proposal_count - tf.shape(proposals)[0], 0)
            proposals = tf.pad(proposals, [(0, padding), (0, 0)])
            return proposals
        proposals = batch_slice([boxes, scores], nms, self.config.IMAGES_PER_GPU)
        return proposals

    def compute_output_shape(self, input_shape):
        return (None, self.proposal_count, 4)
The following function is used to adjust the positions, widths, and heights of the proposal boxes.
#------------------------------------------------------------------#
#   利用先验框调整参数调整先验框,获得建议框的坐标
#------------------------------------------------------------------#
def apply_box_deltas_graph(boxes, deltas):
    #---------------------------------------#
    #   计算先验框的中心和宽高
    #---------------------------------------#
    height = boxes[:, 2] - boxes[:, 0]
    width = boxes[:, 3] - boxes[:, 1]
    center_y = boxes[:, 0] + 0.5 * height
    center_x = boxes[:, 1] + 0.5 * width

    #---------------------------------------#
    #   计算出调整后的先验框的中心和宽高
    #---------------------------------------#
    center_y += deltas[:, 0] * height
    center_x += deltas[:, 1] * width
    height *= tf.exp(deltas[:, 2])
    width *= tf.exp(deltas[:, 3])

    #---------------------------------------#
    #   计算左上角和右下角的点的坐标
    #---------------------------------------#
    y1 = center_y - 0.5 * height
    x1 = center_x - 0.5 * width
    y2 = y1 + height
    x2 = x1 + width

    result = tf.stack([y1, x1, y2, x2], axis=1, name="apply_box_deltas_out")
    return result
2.6 Using Proposal Boxes to Crop Shared Feature Layers
The RoI Align layer uses proposal boxes to crop different feature layers. The main code is shown below. Its function is to determine which feature layer a proposal box belongs to based on the size of the box, and then use the proposal box to crop the corresponding feature layer.
    #---------------------------------------------------------------#
    #   ROI Pooling,利用建议框在特征层上进行截取
    #   x   : [batch, num_rois, POOL_SIZE, POOL_SIZE, channels]
    #   pool_size 是对共享特征层截取后resize后的局部特征层的大小
    #   rois是初步筛选后的建议框
    #   image_meta是保存了图片的必要信息
    #   feature_maps共享特征层
    #---------------------------------------------------------------#
    x = PyramidROIAlign([pool_size, pool_size], name="roi_align_classifier")([rois, image_meta] + feature_maps)
The PyramidROIAlign function is defined as follows:
First, obtain the proposal-box coordinates, image information, and feature layers. Then determine which feature layer each proposal box belongs to based on the size of the box (a larger feature layer, such as 256x256, has a dense grid division, and each proposal box is relatively small; this is used for the determination). Use a loop to crop the five feature layers P2~P5.
#----------------------------------------------------------#
#   ROIAlign Layer
#   利用建议框在特征层上截取内容
#----------------------------------------------------------#
class PyramidROIAlign(Layer):
    def __init__(self, pool_shape, **kwargs):
        super(PyramidROIAlign, self).__init__(**kwargs)
        self.pool_shape = tuple(pool_shape)

    def call(self, inputs):
        #----------------------------------------------------------#
        #   获得建议框的坐标
        #----------------------------------------------------------#
        boxes = inputs[0]
        #----------------------------------------------------------#
        #   image_meta包含了一些必要的图片信息
        #----------------------------------------------------------#
        image_meta = inputs[1]
        #----------------------------------------------------------#
        #   取出所有的特征层[batch, height, width, channels]
        #----------------------------------------------------------#
        feature_maps = inputs[2:]

        #----------------------------------------------------------#
        #   获得建议框的宽高
        #----------------------------------------------------------#
        y1, x1, y2, x2 = tf.split(boxes, 4, axis=2)
        h = y2 - y1
        w = x2 - x1

        #----------------------------------------------------------#
        #   获得输入进来的图像的大小,对image的内容进行分割
        #----------------------------------------------------------#
        image_shape = parse_image_meta_graph(image_meta)['image_shape'][0]
        #----------------------------------------------------------#
        #   通过建议框的大小找到这个建议框属于哪个特征层,第一层256划分区域多建议框较小32
        #----------------------------------------------------------#
        image_area = tf.cast(image_shape[0] * image_shape[1], tf.float32)
        roi_level = log2_graph(tf.sqrt(h * w) / (224.0 / tf.sqrt(image_area)))
        roi_level = tf.minimum(5, tf.maximum(2, 4 + tf.cast(tf.round(roi_level), tf.int32)))
        # roi_level是每张图片里每个建议框对应的特征层是哪个
        roi_level = tf.squeeze(roi_level, 2)

        pooled = []
        box_to_level = []
        # 分别在P2-P5中进行截取
        for i, level in enumerate(range(2, 6)):
            #-----------------------------------------------#
            #   找到每个特征层对应的建议框
            #   level_boxes存放所有属于该特征层的建议框
            #-----------------------------------------------#
            ix = tf.where(tf.equal(roi_level, level))
            level_boxes = tf.gather_nd(boxes, ix)
            box_to_level.append(ix)

            #-----------------------------------------------#
            #    获得这些建议框所属的图片
            #-----------------------------------------------#
            box_indices = tf.cast(ix[:, 0], tf.int32)

            # 停止梯度下降
            level_boxes = tf.stop_gradient(level_boxes)
            box_indices = tf.stop_gradient(box_indices)

            #--------------------------------------------------------------------------#
            #   利用建议框对特征层进行截取
            #   [batch * num_boxes, pool_height, pool_width, channels]
            #   box_indices表示是截取哪张图片里的特征层
            #--------------------------------------------------------------------------#
            pooled.append(tf.image.crop_and_resize(
                feature_maps[i], level_boxes, box_indices, self.pool_shape,
                method="bilinear"))

        pooled = tf.concat(pooled, axis=0)
        #--------------------------------------------------------------------------#
        #   将顺序和所属的图片进行堆叠
        #--------------------------------------------------------------------------#
        box_to_level = tf.concat(box_to_level, axis=0)
        box_range = tf.expand_dims(tf.range(tf.shape(box_to_level)[0]), 1)
        box_to_level = tf.concat([tf.cast(box_to_level, tf.int32), box_range], axis=1)

        # box_to_level[:, 0]表示第几张图
        # box_to_level[:, 1]表示第几张图里的第几个框
        sorting_tensor = box_to_level[:, 0] * 100000 + box_to_level[:, 1]
        # 进行排序,将同一张图里的某一些聚集在一起
        ix = tf.nn.top_k(sorting_tensor, k=tf.shape(
            box_to_level)[0]).indices[::-1]

        # 按顺序获得图片的索引
        ix = tf.gather(box_to_level[:, 2], ix)
        pooled = tf.gather(pooled, ix)

        #--------------------------------------------------------------------------#
        #   重新reshape为如下
        #   [batch, num_rois, POOL_SIZE, POOL_SIZE, channels]
        #--------------------------------------------------------------------------#
        shape = tf.concat([tf.shape(boxes)[:2], tf.shape(pooled)[1:]], axis=0)
        pooled = tf.reshape(pooled, shape)
        return pooled
2.7 From Local Public Feature Layers to Prediction Results
How to use the adjusted local feature layers to obtain prediction results:
    mrcnn_class_logits, mrcnn_class, mrcnn_bbox =\

        fpn_classifier_graph(rpn_rois, mrcnn_feature_maps, input_image_meta,

                                config.POOL_SIZE, config.NUM_CLASSES,

                                train_bn=config.TRAIN_BN,

                                fc_layers_size=config.FPN_CLASSIF_FC_LAYERS_SIZE)
#------------------------------------#
# 建立classifier模型,该函数主要实现目标检测功能
# 这个模型的预测结果会调整建议框
# 获得最终的预测框
#------------------------------------#
def fpn_classifier_graph(rois, feature_maps, image_meta,
pool_size, num_classes, train_bn=True,
fc_layers_size=1024):
#---------------------------------------------------------------#
# ROI Pooling,利用建议框在特征层上进行截取
# x : [batch, num_rois, POOL_SIZE, POOL_SIZE, channels],调整后的局部特征层
# pool_size 是对共享特征层截取后resize后的局部特征层的大小
# rois是初步筛选后的建议框
# image_meta是保存了图片的必要信息
# feature_maps共享特征层
#---------------------------------------------------------------#
x = PyramidROIAlign([pool_size, pool_size], name="roi_align_classifier")([rois, image_meta] + feature_maps)
#------------------------------------------------------------------#
# 利用卷积进行特征整合,首先进行7x7的卷积,相当于两次全连接
# x : [batch, num_rois, 1, 1, fc_layers_size]
#------------------------------------------------------------------#
x = TimeDistributed(Conv2D(fc_layers_size, (pool_size, pool_size), padding="valid"), name="mrcnn_class_conv1")(x)
x = TimeDistributed(BatchNormalization(), name='mrcnn_class_bn1')(x, training=train_bn)
x = Activation('relu')(x)
#------------------------------------------------------------------#
# x : [batch, num_rois, 1, 1, fc_layers_size]
#------------------------------------------------------------------#
x = TimeDistributed(Conv2D(fc_layers_size, (1, 1)), name="mrcnn_class_conv2")(x)
x = TimeDistributed(BatchNormalization(), name='mrcnn_class_bn2')(x, training=train_bn)
x = Activation('relu')(x)
#------------------------------------------------------------------#
# x : [batch, num_rois, fc_layers_size]
#------------------------------------------------------------------#
shared = Lambda(lambda x: K.squeeze(K.squeeze(x, 3), 2), name="pool_squeeze")(x)
#------------------------------------------------------------------#
# Classifier head
# 这个的预测结果代表这个先验框内部的物体的种类
# mrcnn_probs : [batch, num_rois, num_classes],每一张图片里,每一个先验框里面,物体的种类
#------------------------------------------------------------------#
mrcnn_class_logits = TimeDistributed(Dense(num_classes), name='mrcnn_class_logits')(shared)
mrcnn_probs = TimeDistributed(Activation("softmax"), name="mrcnn_class")(mrcnn_class_logits)
#------------------------------------------------------------------#
# BBox head
# 这个的预测结果会对先验框进行调整
# mrcnn_bbox : [batch, num_rois, num_classes, 4]
#------------------------------------------------------------------#
x = TimeDistributed(Dense(num_classes * 4, activation='linear'), name='mrcnn_bbox_fc')(shared)
mrcnn_bbox = Reshape((-1, num_classes, 4), name="mrcnn_bbox")(x)
return mrcnn_class_logits, mrcnn_probs, mrcnn_bbox
#----------------------------------------------#
# 建立mask模型
# 这个模型会利用预测框对特征层进行ROIAlign
# 根据截取下来的特征层进行语义分割
#----------------------------------------------#
def build_fpn_mask_graph(rois, feature_maps, image_meta,
pool_size, num_classes, train_bn=True):
#--------------------------------------------------------------------#
# ROI Pooling,利用预测框在特征层上进行截取
# x : batch, num_rois, MASK_POOL_SIZE, MASK_POOL_SIZE, channels
#--------------------------------------------------------------------#
x = PyramidROIAlign([pool_size, pool_size], name="roi_align_mask")([rois, image_meta] + feature_maps)
#--------------------------------------------------------------------#
# x : batch, num_rois, MASK_POOL_SIZE, MASK_POOL_SIZE, 256
#--------------------------------------------------------------------#
x = TimeDistributed(Conv2D(256, (3, 3), padding="same"), name="mrcnn_mask_conv1")(x)
x = TimeDistributed(BatchNormalization(), name='mrcnn_mask_bn1')(x, training=train_bn)
x = Activation('relu')(x)
#--------------------------------------------------------------------#
# x : batch, num_rois, MASK_POOL_SIZE, MASK_POOL_SIZE, 256
#--------------------------------------------------------------------#
x = TimeDistributed(Conv2D(256, (3, 3), padding="same"), name="mrcnn_mask_conv2")(x)
x = TimeDistributed(BatchNormalization(), name='mrcnn_mask_bn2')(x, training=train_bn)
x = Activation('relu')(x)
#--------------------------------------------------------------------#
# x : batch, num_rois, MASK_POOL_SIZE, MASK_POOL_SIZE, 256
#--------------------------------------------------------------------#
x = TimeDistributed(Conv2D(256, (3, 3), padding="same"), name="mrcnn_mask_conv3")(x)
x = TimeDistributed(BatchNormalization(), name='mrcnn_mask_bn3')(x, training=train_bn)
x = Activation('relu')(x)
#--------------------------------------------------------------------#
# x : batch, num_rois, MASK_POOL_SIZE, MASK_POOL_SIZE, 256
#--------------------------------------------------------------------#
x = TimeDistributed(Conv2D(256, (3, 3), padding="same"), name="mrcnn_mask_conv4")(x)
x = TimeDistributed(BatchNormalization(), name='mrcnn_mask_bn4')(x, training=train_bn)
x = Activation('relu')(x)
#--------------------------------------------------------------------#
# x : batch, num_rois, 2xMASK_POOL_SIZE, 2xMASK_POOL_SIZE, 256
#--------------------------------------------------------------------#
x = TimeDistributed(Conv2DTranspose(256, (2, 2), strides=2, activation="relu"), name="mrcnn_mask_deconv")(x)
#--------------------------------------------------------------------#
# 反卷积后再次进行一个1x1卷积调整通道,
# 使其最终数量为numclasses,代表分的类
# x : batch, num_rois, 2xMASK_POOL_SIZE, 2xMASK_POOL_SIZE, numclasses
#--------------------------------------------------------------------#
x = TimeDistributed(Conv2D(num_classes, (1, 1), strides=1, activation="sigmoid"), name="mrcnn_mask")(x)
return x2.8 Adjusting Proposal Boxes to Obtain Predicted Boxes
    #------------------------------------------------------------#
    #   detections          : Batch_size, num_detections, 6
    #   detection_boxes     : Batch_size, num_detections, 4
    #------------------------------------------------------------#
    detections = DetectionLayer(config, name="mrcnn_detection")([rpn_rois, mrcnn_class, mrcnn_bbox, input_image_meta])
    detection_boxes = Lambda(lambda x: x[..., :4])(detections)
All our work takes place in DetectionLayer. Its four parameters are rpn_rois, the proposal boxes; mrcnn_class, the class confidence of the object inside each proposal; mrcnn_bbox, the adjustment parameters for the proposal boxes; and input_image_meta, the basic information about the input image.
The definition of DetectionLayer is as follows:
#----------------------------------------------------------#
#   Detection Layer
#   利用classifier的预测结果对建议框进行调整获得预测框
#----------------------------------------------------------#
class DetectionLayer(Layer):
    def __init__(self, config=None, **kwargs):
        super(DetectionLayer, self).__init__(**kwargs)
        self.config = config

    def call(self, inputs):
        #------------------------------------------------------------------#
        #   获得的inputs
        #   rpn_rois            : Batch_size, proposal_count, 4
        #   mrcnn_class         : Batch_size, num_rois, num_classes
        #   mrcnn_bbox          : Batch_size, num_rois, num_classes,
        #------------------------------------------------------------------#
        rois = inputs[0]
        mrcnn_class = inputs[1]
        mrcnn_bbox = inputs[2]
        image_meta = inputs[3]

        #------------------------------------------------------------------#
        #   找到window的小数形式,指出原始的图片在调整后(加灰条)图片中的位置
        #------------------------------------------------------------------#
        m = parse_image_meta_graph(image_meta)
        image_shape = m['image_shape'][0]
        window = norm_boxes_graph(m['window'], image_shape[:2])

        #------------------------------------------------------------------#
        #   对每一张图的结果进行解码
        #------------------------------------------------------------------#
        detections_batch = batch_slice(
            [rois, mrcnn_class, mrcnn_bbox, window],
            lambda x, y, w, z: refine_detections_graph(x, y, w, z, self.config),
            self.config.IMAGES_PER_GPU)

        #------------------------------------------------------------#
        #   最终输出的shape为
        #   Batch_size, num_detections, 6]
        #------------------------------------------------------------#
        return tf.reshape(
            detections_batch,
            [self.config.BATCH_SIZE, self.config.DETECTION_MAX_INSTANCES, 6])
III. Creating Your Own Dataset
3.1 Installing Labelme
Open a cmd window and enter activate tensorflow2 to activate your Anaconda environment.
Then install Labelme:
pip install labelmeAfter installation is complete, enter labelme directly on the command line to open it.
Use Labelme to annotate the images, then place the generated JSON files and the original JPG images in the same folder.
3.2 Converting to COCO Format
Refer to the labelme2coco package on PyPI
pip install labelme2coco
# 或者使用清华源
pip install -i https://pypi.tuna.tsinghua.edu.cn/simple labelme2coco
labelme2coco path/to/labelme/dir --train_split_rate 0.853.2 Alternatively, Convert to Mask Images, Augment the Data, and Then Convert to COCO Format
(1) Convert Labelme Results to Mask Images
import cv2
import json
import os
import numpy as np
from PIL import Image, ImageDraw

'''
从./images文件夹中读取图片和json文件
生成01_my0003.png和对应的01_my0003.png
分别保存在./images/rgb和./images/label文件夹下(先新建)
'''

obj_dic = {1: 'ammeter', 2: 'realsensebox', 3: 'coffeebox', 4: 'sucker'}
obj_list = list(obj_dic.values())

dataset_dir = "./MaskRCNN"
file_list = os.listdir(dataset_dir)
file_list.sort()
for filename in file_list:
    if filename[-4:] != 'json':
        continue
    img = cv2.imread(os.path.join(dataset_dir, filename[:-5] + ".jpg"))
    json_path = os.path.join(dataset_dir, filename)
    # 读取标注数据
    with open(json_path, 'r') as f:
        data = json.load(f)

    # 针对每个标注,将其表示为掩码图像
    for shape in data['shapes']:
        # 新建空白图像
        mask_img = Image.new('L', (640, 480), 0)    # 注意!修改成自己图片的分辨率
        # 读取标签点
        label_name = shape['label']
        label_index = "%02d" % (obj_list.index(label_name) + 1)
        polygon_points = shape['points']
        # 绘制区域
        mask_img_draw = ImageDraw.Draw(mask_img)
        # mask_img_draw.polygon(polygon_points, outline=1, fill=1)
        mask_img_draw.polygon(tuple(map(tuple, polygon_points)), outline=1, fill=1)
        mask_img = cv2.cvtColor(np.array(mask_img)*255, cv2.COLOR_GRAY2BGR)
        # 将掩码图像保存为PNG文件
        mask_path = os.path.join(dataset_dir + "/label", label_index + "_" + filename)[:-5] + ".png"
        img_path = os.path.join(dataset_dir + "/rgb", label_index + "_" + filename)[:-5] + ".png"
        cv2.imwrite(mask_path, mask_img)
        cv2.imwrite(img_path, img)
(2) Data Augmentation
Apply the same transformations to the RGB images and mask images to obtain augmented RGB images and mask images.
import imgaug.augmenters as iaa
from imgaug.augmentables.segmaps import SegmentationMapsOnImage
import cv2
import os
import numpy as np

'''
从./MaskRCNN/rgb中读取rgb图像,从./MaskRCNN/label中读取mask图像
生成数据增广的rgb图像保存在./MaskRCNN/rgb_aug中,mask掩码图保存在./MaskRCNN/label_aug中(先新建)
'''

# 图像数据增强
def data_augmentation(images_folder_path, output_folder_path, augment_times=3):
    # 定义数据增强操作
    seq = iaa.Sequential([
        iaa.Sometimes(0.5, iaa.GaussianBlur(sigma=(0, 0.5))),
        iaa.Affine(
            scale={"x": (0.8, 1.2), "y": (0.8, 1.2)},
            translate_percent={"x": (-0.2, 0.2), "y": (-0.2, 0.2)},
            rotate=(-45, 45),
            shear=(-16, 16)
        ),
        iaa.SomeOf((0, 5), [
            iaa.OneOf([
                iaa.Dropout(p=(0, 0.1)),
                iaa.CoarseDropout(p=(0, 0.1), size_percent=(0.02, 0.05)),
            ]),
            iaa.AddToHueAndSaturation(value=(-10, 10), per_channel=True),
            iaa.LinearContrast(alpha=(0.95, 1.05), per_channel=True),
            iaa.AdditiveGaussianNoise(scale=(0, 0.05 * 255), per_channel=True),
            iaa.Multiply((0.8, 1.2), per_channel=0.2),
        ], random_order=True)
    ])

    # 获取图片列表
    img_list = os.listdir(images_folder_path)
    # 对每张图片进行增强
    for img_name in img_list:
        img_path = os.path.join(images_folder_path, img_name)
        mask_path = img_path.replace(".png", ".png")
        mask_path = mask_path.replace("rgb", "label")
        img = cv2.imread(img_path)
        mask = cv2.imread(mask_path)
        for i in range(augment_times):
            segmap_mask = SegmentationMapsOnImage(mask, shape=img.shape)
            # 对 RGB 图像和 mask 掩码图同时进行增强
            aug_det = seq.to_deterministic()
            aug_img = aug_det.augment_image(img)
            segmap_aug  = aug_det.augment_segmentation_maps(segmap_mask)

            aug_mask = segmap_aug .get_arr()
            aug_mask = np.array(aug_mask, dtype=np.uint8)
            thresh, aug_mask_bin = cv2.threshold(aug_mask, 127, 255, cv2.THRESH_BINARY)
            # 定义结构元素
            kernel = np.ones((5,5), np.uint8)

            # 对掩码图像进行腐蚀操作
            aug_mask_bin = cv2.erode(aug_mask_bin, kernel, iterations=2)

            # 保存增强后的图像
            output_name = os.path.splitext(img_name)[0] + '_aug_{}'.format(i) + os.path.splitext(img_name)[1]
            output_path = os.path.join(output_folder_path, output_name)
            output_mask_name = os.path.splitext(img_name)[0]  + '_aug_{}'.format(i) + os.path.splitext(img_name)[1]
            output_mask_path = os.path.join(output_folder_path.replace("rgb", "label"), output_mask_name)
            cv2.imwrite(output_path, aug_img)
            cv2.imwrite(output_mask_path, aug_mask_bin)

# 测试
if __name__ == '__main__':
    images_folder_path = './MaskRCNN/rgb'
    output_folder_path = './MaskRCNN/rgb_aug'
    data_augmentation(images_folder_path, output_folder_path)
(3) Generate COCO Data from RGB and Mask Images
IV. Start Training
Run json_to_dataset.py to convert the annotated JSON images into a dataset.
In dataset.py, add your own classes in load_shapes, and also add your own classes in the final loop.
In train.py, modify the image size in ShapesConfig. The two image sizes IMAGE_MIN_DIM and IMAGE_MAX_DIM can be the same, and the value of NUM_CLASSES is the number of classes
Comments