Contents
- I. Creating a Workspace
- II. Creating and Building a ROS Package
- III. Basic ROS Commands
- 3.1 Nodes
- 3.2 Topics
- 3.3 Services
- 3.4 Parameter Server
- IV. Creating and Running Nodes
- 4.1 Create the Source Files
- 4.2 Modify CMakeLists.txt
- 4.3 Build the Nodes
- 4.4 Run the Nodes
- V. Creating and Using Services
- 5.1 Create the msg File
- 5.2 Create the srv File
- 5.3 Create the .cpp Source Files
- 5.4 Test the Program
- VI. Configuring a Launch File
- 6.1 Create a .launch File
- 6.2 Start the Nodes
- VII. Using Dynamic Parameters
- 7.1 Create the Configuration File
- 7.2 Modify CMakeLists.txt to Build the Configuration File
- 7.3 Create a Node
- 7.4 Modify CMakeLists.txt to Build the Node
- 7.5 Run the Configuration
I. Creating a Workspace
1. Create a new folder
Create a folder named catkin_ws, then create an src subdirectory inside it.
mkdir -p ~/dev/catkin_ws/src
cd ~/dev/catkin_ws/src
2. Initialize the workspace In the newly created src subdirectory, use the following command to create the workspace. At this point, the workspace does not contain any packages; it contains only CMakeLists.txt.
catkin_init_workspace3. Build the workspace
Return to the top-level catkin_ws directory and run the catkin_make command to build the workspace. After the build is complete, use the ll command to see the two generated directories, build and devel.
cd ..
catkin_make
4. Complete the configuration
Reload the setup.bash file to complete the final configuration step for creating the workspace.
source devel/setup.bashIf you add this command line to ~/.bashrc, restarting the terminal will have the same effect. Add the following command, where noetic is the version number of my ROS system. If your version is different, be sure to change it.
echo "source /opt/ros/noetic/setup.bash" >> ~/.bashrcII. Creating and Building a ROS Package
1. Create a package
Packages can be created manually, but for convenience, the catkin_create_pkg command is usually used. The command has the following format:
catkin_create_pkg [package_name] [depend1] [depend2] [depend3]The dependency options include:
std_msgs: Contains common message types, representing primitive data types and other basic message structures.roscpp: Used to implement various ROS functions in C++.
例:
cd ~dev/catkin_ws/src
catkin_create_pkg test_package std_msgs roscpp
2. Build the package
Return to the catkin_ws directory and run the build. If no error is reported, the package has been built successfully.
cd ..
catkin_make
III. Basic ROS Commands
3.1 Nodes
1. rosnode commands The rosnode tool can print information related to ROS nodes. The specific commands are as follows:
| rosnode command | Purpose | |
|---|---|---|
rosnode ping NODE | Test connectivity to a node | |
rosnode list | List active nodes | |
rosnode info NODE | Display information about this node | |
rosnode machine | Print the nodes running on a specific machine | |
rosnode kill NODE | Terminate a node process | |
rosnode cleanup | Remove registration information for unreachable nodes |
2. Run a node
First, use the roscore command to start ROS, then open a new terminal window for the following operations.
We can use the rosrun command to run a node:
例:
rosrun turtlesim turtlesim_node
After the node starts successfully, use rosnode list again to see the running nodes. Use rosnode info /turtlesim to view detailed information about this node, including its publications (Publications), subscriptions (Subscriptions), services (Services), and more.
3.2 Topics
1. rostopic commands Nodes can transfer data by publishing and subscribing to topics. Message transfer through a topic does not require nodes to connect directly, and a topic can have multiple subscribers and multiple publishers. Use rostopic commands to interact with topics and nodes.
| rostopic command | Purpose |
|---|---|
rostopic bw TOPIC | Display the bandwidth used by a topic |
rostopic echo TOPIC | Print messages from a topic to the screen |
rostopic find TOPIC | Find a topic |
rostopic hz TOPIC | Display a topic’s publication frequency |
rostopic info TOPIC | Display detailed information about a topic |
rostopic list TOPIC | List active topics |
rostopic pubs TOPIC | Publish data to a topic |
rostopic type TOPIC | Display a topic’s type |
2. Publish a topic
Use rostopic list to list the current node’s topics. The echo parameter can print messages sent by the node, for example: rostopic echo /turtle1/cmd_vel.
We can also publish directly to a topic with rostopic pub, as follows:
例:
rostopic pub -r 10 /turtle1/cmd_vel geometry_msgs/Twist -r 1 -- '{linear: {x: 1, y: 0, z: 0}, angular: {x: 0, y: 0, z: 1}}'
3.3 Services
1. rosservice commands Services are another way for nodes to communicate with each other. Services allow nodes to send requests and receive responses. Use rosservice commands to work with services.
roservice args /service: Display service argumentsrosservice call /service: Call a service using command-line argumentsrosservice find msgtype: Find a service by service typerosservice info /service: Display service informationrosservice list: List active servicesrosservice type /service: Display a service’s typerosservice uri /service: Display a service’s ROSRPC URI
2. Use services
Use rosservice list to list all services, and use rosservice call [service] [args] to call a service. For example, rosservice call /clear clears the lines from the turtle display.
In addition, use rossrv show turtlesim/Spawn to view the detailed parameters of the /spawn service.
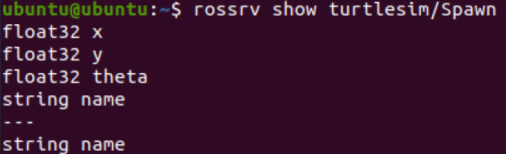
You can use these parameters to call the /spawn service and create a second turtle.
rosservice call /spawn 3 3 0.5 "new_turtle"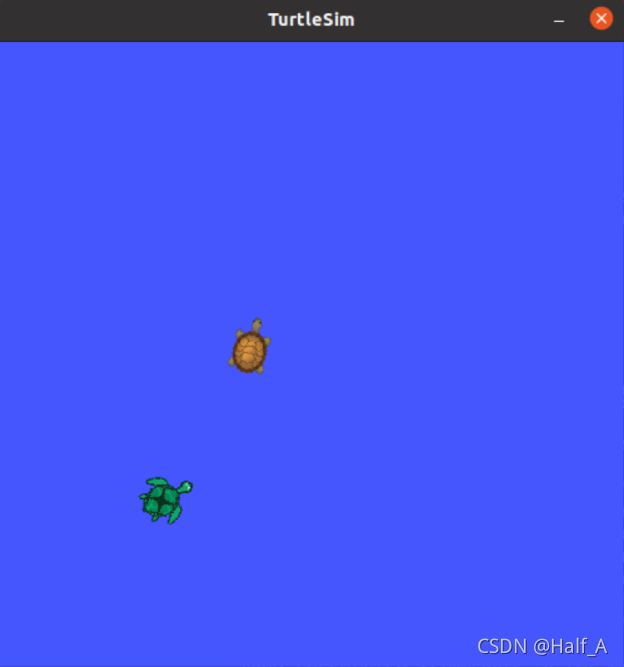
3.4 Parameter Server
1. rosparam commands The parameter server stores shared data that all nodes can access. Use rosparam commands to manage the parameter server.
| rosparam command | Purpose |
|---|---|
rosparam set parameter value | Set a parameter value |
rosparam get parameter | Get a parameter value |
rosparam load file | Load parameters from a file |
rosparam dump file | Save parameters to a file |
rosparam delete parameter | Delete a parameter |
rosparam list | List all parameter names |
2. Use the parameter server Using turtlesim as an example, run rosparam list to list the parameters. You can see that the background parameter belongs to the turtlesim node, so we can use the get command to retrieve its value.
rosparam list
rosparam get /turtlesim/background_g
rosparam set /turtlesim/background_g 200
IV. Creating and Running Nodes
This section uses a specific experiment to explain how to create nodes. We will create a talker and a listener and enable them to exchange information.
4.1 Create the Source Files
First, enter the ~/dev/catkin_ws workspace’s test_package/src/ package directory. Create two cpp files here, one as the message sender and the other as the receiver. I name the two source files talker.cpp and listener.cpp.
//talker.cpp
#include "ros/ros.h"	//包含ros节点的必要文件
#include "std_msgs/String.h"	//包含要使用的消息类型
#include <sstream>

int main(int argc, char **argv){
        ros::init(argc, argv, "talker");	//启动节点并设置名称
        ros::NodeHandle n;	//设置节点进程的句柄
        ros::Publisher chatter_pub = n.advertise<std_msgs::String>("message", 1000);
        //将节点设置成发布者,并设置主题名称为message,缓冲区1000个消息
        ros::Rate loop_rate(10);	//数据发送频率10HZ
        while(ros::ok()){
                std_msgs::String msg;
                std::stringstream ss;
                ss << "I'm talker node~~~";
                msg.data = ss.str();		//创建了一个消息变量
                ROS_INFO("%s", msg.data.c_str());	//屏幕输出消息信息
                chatter_pub.publish(msg);	//发布消息
                ros::spinOnce();			//如果有订阅者出现,就会更新所有主题
                loop_rate.sleep();
        }
        return 0;
}
//listener.cpp
#include "ros/ros.h"
#include "std_msgs/String.h"

//回调函数,节点每收到一条消息都会调用此函数
void messageCallback(const std_msgs::String::ConstPtr& msg){
        ROS_INFO("I am listener, I heard: [%s]",msg->data.c_str());
}

int main(int argc, char **argv){
        ros::init(argc, argv, "listener");
        ros::NodeHandle n;
        ros::Subscriber sub = n.subscribe("message", 1000, messageCallback);
        //创建一个订阅者,从message主题获取消息,设置缓冲区1000个消息,处理消息的回调函数为messageCallback
        ros::spin();	//消息回调处理,调用后不再返回
        return 0;
}
4.2 Modify CMakeLists.txt
Edit CMakeLists.txt in catkin_ws/src/test_package/ and add the following content at the end.
#include_directories(
        include
        ${catkin_INCLUDE_DIRS}
)

# 指定编译后可执行文件的名称
add_executable(talker src/talker.cpp)
add_executable(listener src/listener.cpp)
# 定义目标的依赖文件
add_dependencies(talker test_package_generate_messages_cpp)
add_dependencies(listener test_package_generate_messages_cpp)

target_link_libraries(talker ${catkin_LIBRARIES})
target_link_libraries(listener ${catkin_LIBRARIES})
4.3 Build the Nodes
Return to the workspace root directory and build:
cd ~/dev/catkin_ws
catkin_make
If the error The dependency target does not exist. occurs, change the CMake version at the beginning of CMakeLists.txt to 2.8.3.
After the build is complete, set the environment variables.
echo "source ~/ros/tr3_6/devel/setup.bash" >> ~/.bashrc
source ~/.bashrc
4.4 Run the Nodes
Now run the nodes. First, run roscore:
roscoreThen open two more windows and run the following commands in them:
rosrun test_package example1_a
rosrun test_package example1_b
You can see the messages being received and sent.

V. Creating and Using Services
This section creates two nodes, one as the server and the other as the client. Calling the service transfers data between the two nodes and calculates the sum of numbers.
5.1 Create the msg File
Before using a service, first create the msg and srv files. They specify the types and values of the data to be transferred.
1. First, create the msg file
Under the test_package package, create an msg folder, then create a new msg file named test_msg.msg in it. Enter the following content in the file:
int32 num1
int32 num2
int32 num3
2. Edit the package.xml file
Find the following two lines in the package.xml file and remove the <!-- --> comments around them:
<!-- <build_depend>message_generation</build_depend> -->

<!-- <exec_depend>message_runtime</exec_depend> --><build_depend>message_generation</build_depend>
<exec_depend>message_runtime</exec_depend>3. Edit the CMakeLists.txt file
Open the CMakeLists.txt file in the package directory.
Find find_package() and add message_generation to it as follows:
find_package(catkin REQUIRED COMPONENTS
  roscpp
  std_msgs
  message_generation
)
Find the following two sections, uncomment them, and add the name of the test_message.msg message created earlier:
## Generate messages in the 'msg' folder
add_message_files(
  FILES
  test_msg.msg
)
## Generate added messages and services with any dependencies listed here
generate_messages(
DEPENDENCIES
std_msgs
)4. Test the build After completing the steps above, run the following commands to build:
cd ~/dev/catkin_ws/
catkin_make
After the build is complete, use the rosmsg show command to check whether the msg file created earlier was built successfully:
rosmsg show test_package/test_msgIf the output matches the content of the test_msg.msg file, the build is correct.
5.2 Create the srv File
1. Create the srv file
Under the test_package package, create an srv folder, then create a new srv file named test_srv.srv in it. Enter the following content in the file:
int32 num1
int32 num2
int32 num3
---
int32 sum
2. Edit the package.xml file The package.xml file was already edited when the msg file was created, so no additional changes are required here.
3. Edit CMakeLists.txt
Find catkin_package, uncomment it, and configure it as follows:
catkin_package(
#  INCLUDE_DIRS include
#  LIBRARIES test_package
#  CATKIN_DEPENDS roscpp std_msgs
#  DEPENDS system_lib
  CATKIN_DEPENDS message_runtime
)
Uncomment add_service_files and add the name of the service file created earlier.
## Generate services in the 'srv' folder
add_service_files(
  FILES
  test_srv.srv
)
4. Test the build After creating and modifying the files above, run the following commands to build:
cd ~/dev/catkin_ws
catkin_make
After the build is complete, use the rossrv show command to check whether the service file was built correctly:
rossrv show test_package/test_srv.srvIf the printed output matches the content of the test_srv.srv file, the build is correct.
5.3 Create the .cpp Source Files
1. Create the source files
In the package’s src directory, catkin_ws/test_package/src, create two .cpp files named server.cpp and client.cpp, which serve as the server and client, respectively.
#include "ros/ros.h"
#include "test_package/test_srv.h"	//包含创建的srv文件

//对三个变量求和,并将计算结果发送给其他节点
bool add(test_package::test_srv::Request &req, test_package::test_srv::Response &res){
        res.sum = req.num1 + req.num2 + req.num3;
        ROS_INFO("request: num1=%ld, num2=%ld, num3=%ld", (int)req.num1, (int)req.num2, (int)req.num3);
        ROS_INFO("sending back response: [%ld]", (int)res.sum);
        return true;
}

int main(int argc, char **argv){
        ros::init(argc, argv, "add_3_ints_server");
        ros::NodeHandle n;
        //创建服务"add_3_ints"的服务端,并在ROS中广播
        ros::ServiceServer service = n.advertiseService("add_3_ints", add);
        ROS_INFO("Ready to add 3 ints!");
        ros::spin();
        return 0;
}
#include "ros/ros.h"
#include "test_package/test_srv.h"
#include <cstdlib>
int main(int argc, char **argv){
ros::init(argc, argv, "add_3_ints_client");
if(argc != 4){
ROS_INFO("usage: add_3_ints_client num1 num2 num3");
return 1;
}
ros::NodeHandle n;
//以"add_3_ints"为名称创建客户端
ros::ServiceClient client = n.serviceClient<test_package::test_srv>("add_3_ints");
//创建srv文件的一个实例,并在其中加入需要发送的数据值
test_package::test_srv srv;
srv.request.num1 = atoll(argv[1]);
srv.request.num2 = atoll(argv[2]);
srv.request.num3 = atoll(argv[3]);
//调用服务并发送数据,如果调用成功,服务端会返回true,否则返回false
if(client.call(srv)){
ROS_INFO("Sum: %ld", (long int)srv.response.sum);
}
else{
ROS_ERROR("Failed to call service add_3_ints");
return 1;
}
return 0;
} 2. Edit CMakeLists.txt
add_executable(server src/server.cpp)
add_executable(client src/client.cpp)

add_dependencies(server test_package_generate_messages_cpp)
add_dependencies(client test_package_generate_messages_cpp)

target_link_libraries(server ${catkin_LIBRARIES})
target_link_libraries(client ${catkin_LIBRARIES})
5.4 Test the Program
Return to the catkin_ws workspace and build.
cd ~/dev/catkin_ws
catkin_make
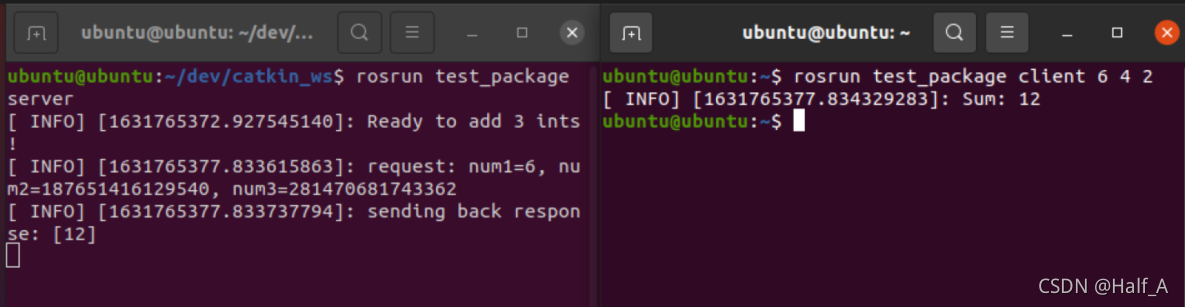
After the build is complete, open a terminal and run roscore. Then open two more terminal windows and run the following commands in each:
rosrun test_package serverrosrun test_package client 6 4 2You can see the server and client communicating through messages and completing the sum calculation for the three numbers.
VI. Configuring a Launch File
Earlier, we created and used nodes, but each node must be run in a separate command-line window. With more nodes, starting them becomes very cumbersome.
A launch file lets us start multiple nodes from one command-line window. Simply run a file with the .launch extension to start multiple nodes.
6.1 Create a .launch File
First, create a folder named launch in the package, then create a test.launch file in it.
roscd test_package
mkdir launch
cd launch
vim test.launch
Enter the following content in the test.launch file:
<?xml version="1.0"?>
<launch>
	<node name="talker" pkg="test_package" type="talker" />
	<node name="listener" pkg="test_package" type="listener" />
</launch>
6.2 Start the Nodes
The launch file written above can start the talker and listener nodes from the earlier experiment. Run the following command:
roslaunch test_package test.launchThe system outputs the following information, indicating that the launch succeeded.
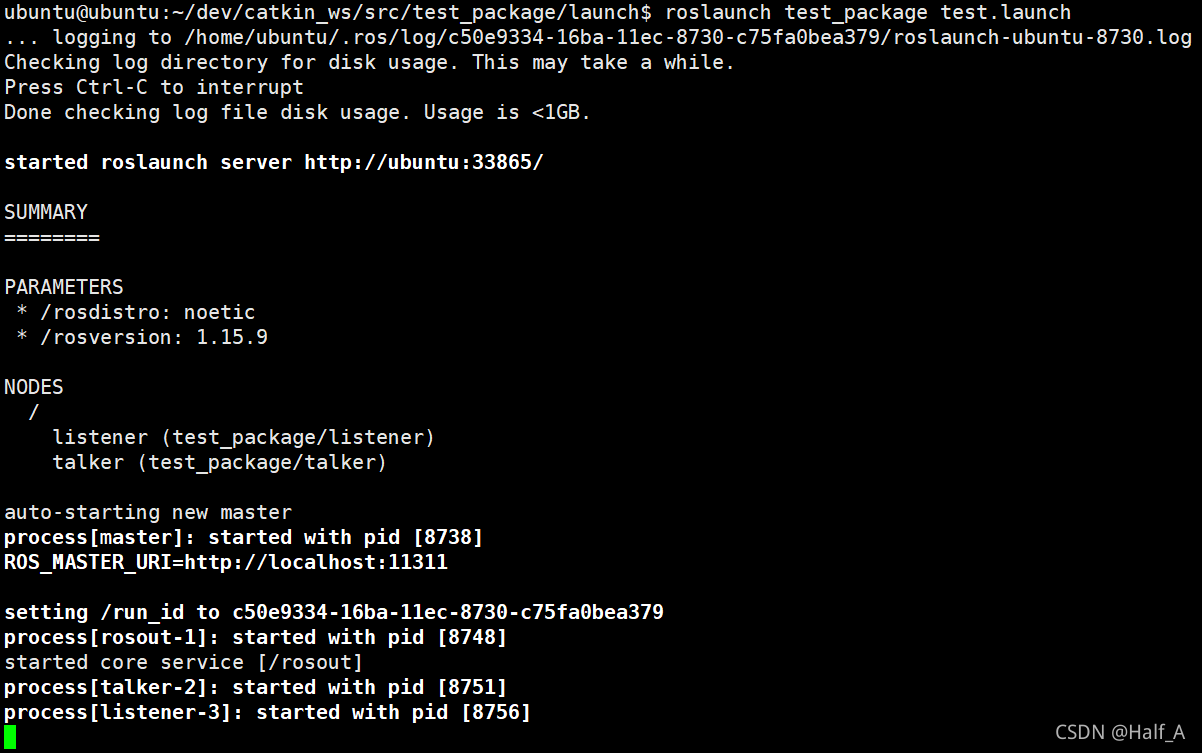
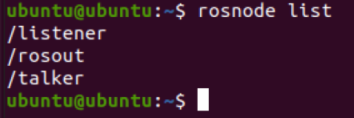
Use rosnode list to list the active nodes. You can see that we successfully started the talker and listener nodes.
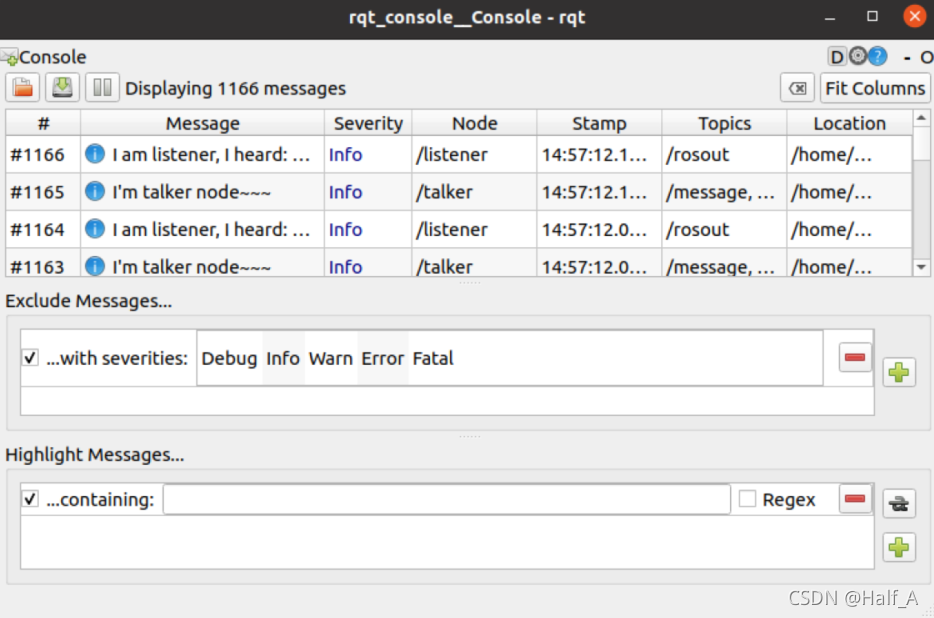
To see the information exchanged between the two nodes, use rqt_console.
VII. Using Dynamic Parameters
Normally, when we write a node, we can only initialize its internal variables with data. To change the values of these variables, we can use topics, services, or the parameter server, but this approach does not support dynamic online updates. Unless the listener queries them proactively, we cannot tell whether the parameters have been updated. Sometimes we need to update parameters dynamically online, which requires dynamic parameters.
7.1 Create the Configuration File
First, create a folder named cfg in the package, then create a test.cfg file in it.
roscd test_package
mkdir cfg
cd cfg
vim test.cfg
Add the following code to test.cfg:
# 初始化ROS并导入参数生成器
#!/usr/bin/env python
PACKAGE = "test_package"
from dynamic_reconfigure.parameter_generator_catkin import *

# 初始化参数生成器,通过gen我们可以添加参数
gen = ParameterGenerator()

# 加入不同的参数类型并设置默认值、描述、取值范围等
# gen.add(name, type, level, description, default, min, max)
gen.add("double_param", double_t, 0, "A double parameter", .1, 0, 1)
gen.add("str_param", str_t, 0, "A string parameter", "test_default_string")
gen.add("int_param", int_t, 0, "An Integer parameter", 1, 0, 100)
gen.add("bool_param", bool_t, 0, "A Boolean parameter", True)

size_enum = gen.enum([gen.const("Low", int_t, 0, "Low is 0"), gen.const("Medium", int_t, 1, "Medium is 1"), gen.const("High", int_t, 2, "High is 2"), gen.const("Exlarge", int_t, 3, "Exlarge is 3")], "Select from the list")

gen.add("size", int_t, 0, "Select from the list", 1, 0, 3, edit_method=size_enum)

# 生成必要的文件并退出程序
exit(gen.generate(PACKAGE, "test_package", "test_"))
Because test.cfg is an executable file run by ROS, we need to change its file permissions:
chmod a+x test.cfg7.2 Modify CMakeLists.txt to Build the Configuration File
Open CMakeLists.txt, find find_package, and add dynamic_reconfigure at the end as follows:
find_package(catkin REQUIRED COMPONENTS
  roscpp
  std_msgs
  message_generation
  dynamic_reconfigure
)
Find generate_dynamic_reconfigure_options, uncomment it, and replace the configuration file inside with the one created earlier.
## Generate dynamic reconfigure parameters in the 'cfg' folder
generate_dynamic_reconfigure_options(
  cfg/test.cfg
)
7.3 Create a Node
Next, create a new node with dynamic configuration support.
Create a new file in the src folder as follows:
roscd test_package
vim src/dynamic_param.cpp
Write the following code in the file:
#include <ros/ros.h>
#include <dynamic_reconfigure/server.h>
#include <test_package/test_Config.h>

//回调函数将输出参数的新值,参数名称必须与test.cfg配置文件相同
void callback(test_package::test_Config &config, uint32_t level){
        ROS_INFO("Reconfigure Request: %d %f %s %s %d", config.int_param, config.double_param, config.str_param.c_str(), config.bool_param?"True":"False", config.size);
}

int main(int argc, char **argv){
        ros::init(argc, argv, "test_dynamic_reconfigure");
        //初始化服务器
        dynamic_reconfigure::Server<test_package::test_Config> server;
		//向服务器发送回调函数,当服务器得到重新配置请求,会调用回调函数
        dynamic_reconfigure::Server<test_package::test_Config>::CallbackType f;
        f = boost::bind(&callback, _1, _2);
        server.setCallback(f);

        ros::spin();
        return 0;
}
7.4 Modify CMakeLists.txt to Build the Node
add_executable(dynamic_param src/dynamic_param.cpp)
add_dependencies(dynamic_param test_package_gencfg)
target_link_libraries(dynamic_param ${catkin_LIBRARIES})
7.5 Run the Configuration
Open three terminal windows and run the following commands:
roscore
rosrun test_package dynamic_param
rosrun rqt_reconfigure rqt_reconfigure
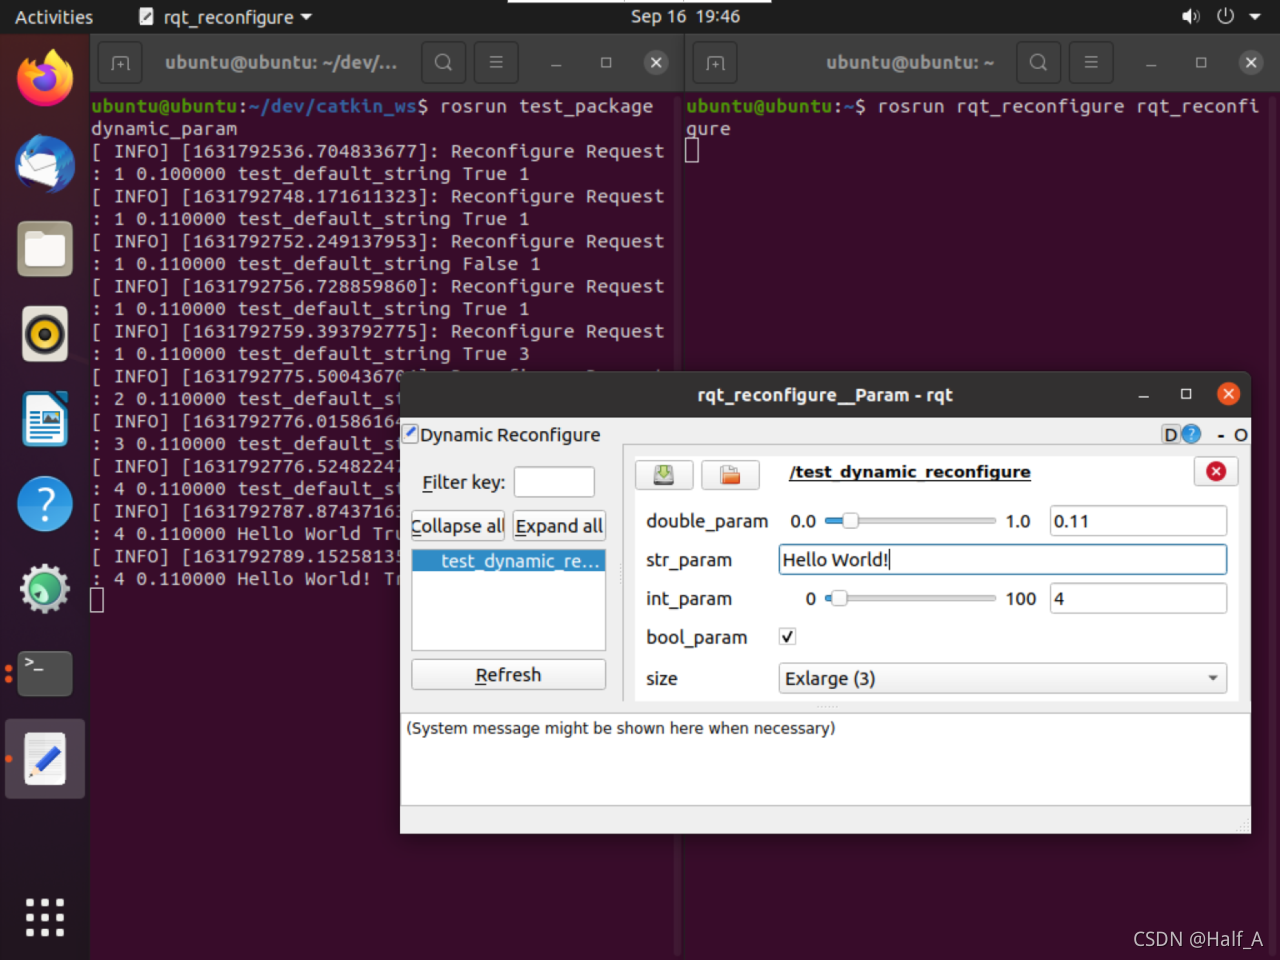
After the commands finish running, an rqt_reconfigure window appears. In this window, you can configure the node’s parameters dynamically, and when you adjust a parameter, you can see the parameter change printed on the command line.
Comments