![[6D Pose Estimation Algorithm] Introduction to LineMod and Code Testing](https://img.mahaofei.com/img/mesh%E7%BD%91%E6%A0%BC%E6%A8%A1%E5%9E%8B.png)
Contents
I. Introduction to the LineMod Algorithm
The LineMod algorithm was proposed by Hinterstoisser et al. in 2011. Using template matching, it addresses real-time detection and 6D pose estimation and localization for low-texture three-dimensional objects in cluttered scenes.
The algorithm takes RGB-D data from a 3D object as input and uses the PCL data processing library to analyze the target point cloud. With a short training process on pre-collected, noise-free or low-noise templates of the three-dimensional object, it obtains changes in the gradient direction and magnitude of every pixel for each object orientation. This allows template training to be completed in a short time. During recognition, the captured point cloud is compared with the templates to obtain the object’s information, pose, and confidence.
Because the LineMod algorithm uses the entire object as a single template for subsequent template matching, it cannot recognize multiple objects or handle occluded scenes.
II. Principles of the LineMod Algorithm
In general, the LineMod algorithm can be implemented in the following three stages.
- Template acquisition: Collect features of the target object from multiple viewpoints, distances, and orientations.
- Template training: Compute the target object’s feature points and feature vectors, obtain the coordinates of each feature point, and store them.
- Template matching: Process the features in the test image, spread them along the gradient directions to obtain a corresponding preprocessed image, construct a response table for linearized storage, and finally use sliding-window matching to calculate similarity with the template.
2.1 Template Acquisition
LineMod is based on template matching, so a complete, low-noise, high-precision model of the object must be obtained before recognizing a three-dimensional object. There are two ways to obtain this model.
- Use a depth camera to collect templates of the target from multiple viewpoints, distances, and orientations. However, this method tends to produce considerable noise, which interferes with subsequent object recognition, and it is time-consuming and labor-intensive.
- Manually render the model of the three-dimensional object to be recognized with OpenGL. Three-dimensional simulation software such as SolidWorks can be used to create and render a three-dimensional model of the object. This method provides good control over noise and helps improve the accuracy of subsequent object recognition.
Many template repositories for common three-dimensional objects are now available online. For example, websites such as Thingiverse, YouMagine, and Pinshape provide three-dimensional model files for common objects.
2.2 Template Training
The LineMod algorithm extracts, saves, and encodes gradient and normal-direction features from each viewpoint in the template images. The binary strings generated from these features are the key to subsequent template matching. During template training, the feature vectors and coordinates of feature points must be calculated, and the resulting information must be stored.
1. Calculate the feature vectors of feature points
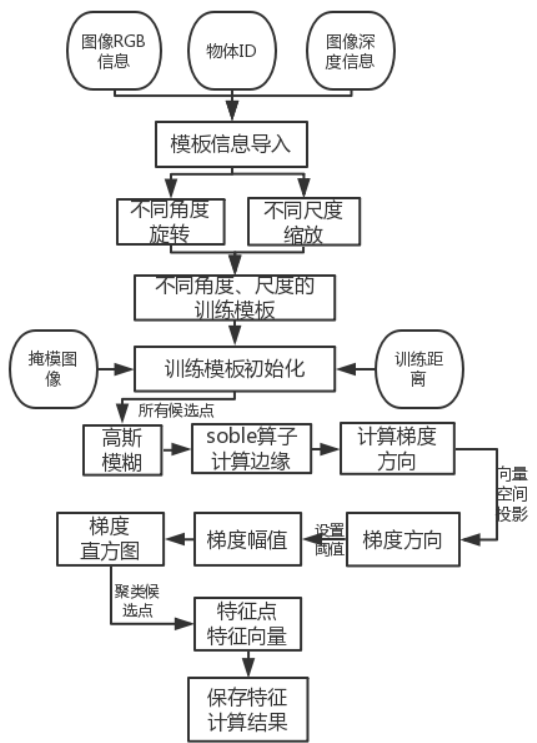
- Import the model’s RGB-D data and object ID information into the algorithm.
- The LineMod algorithm uses different angles and scaling factors in space to obtain the templates to be trained.
- The templates to be trained, training distance, and mask image are used as inputs for the feature points. Gaussian blur and low-pass filtering denoise and preprocess the candidate points.
- Use the Sobel operator to calculate the gradient magnitude of the candidate points and obtain the edges in the object image.
- Use the Phase function to calculate the gradient directions of the candidate points.
- Within the 360° range, project the gradient directions of the candidate points into 16 intervals comprising a total of ten directions, and quantize the gradient directions of the candidate points.
- Set a threshold and use a 3x3 gradient histogram to count the gradient directions of candidate points within a 3x3 region. Use the most frequent candidate-point gradient direction as the gradient direction of the entire region.
- Obtain the gradient directions and magnitudes of the feature points, and save the feature calculation results.
2. Calculate feature-point coordinates
The LineMod algorithm traverses the image pyramid of the input image and uses downsampling to extract the coordinate locations of feature points at each pyramid level. During training, it repeatedly calculates and corrects the feature-point coordinates, ultimately obtaining the coordinate locations corresponding to the feature points in each 3x3 region.
3. Store feature-point information
After obtaining the trained feature vectors (gradient magnitudes and gradient directions) and feature-point coordinates, save the training information with shapes.save_infos and write the preset feature-point information of the templates to be matched with detector.writerClasses.
2.3 Template Matching

The width and height of the input test image are adjusted to multiples of 16 to facilitate subsequent image processing. The feature vectors and coordinates of each feature point are calculated in the same way as during template training. After obtaining the feature vectors and coordinates of the feature points in the test image, perform the following operations.
1. Spread the gradient directions
Perform an OR operation on each pixel and its 3x3 neighborhood according to the discretized directions. Repeat this TxT times based on the neighborhood diameter T to traverse the gradient-direction values of the neighboring pixels, and store them in memory as contiguous feature-information data.
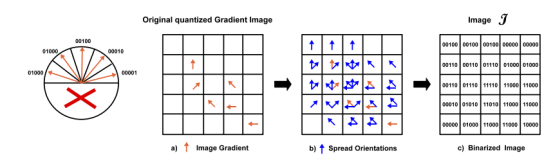
The gradient-direction spreading process is shown in the figure: a) the gradient direction of the pixel; b) spreading the gradient directions over a 3x3 neighborhood centered on the pixel; c) the quantized direction value corresponding to each neighborhood. After calculation, a gradient response table (Figure c) is created to store the quantized gradient-direction values.
2. Linearized storage
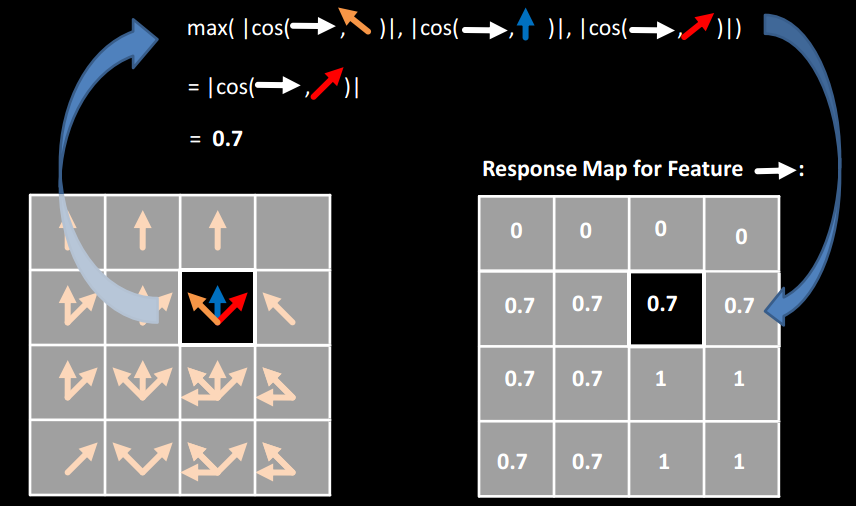
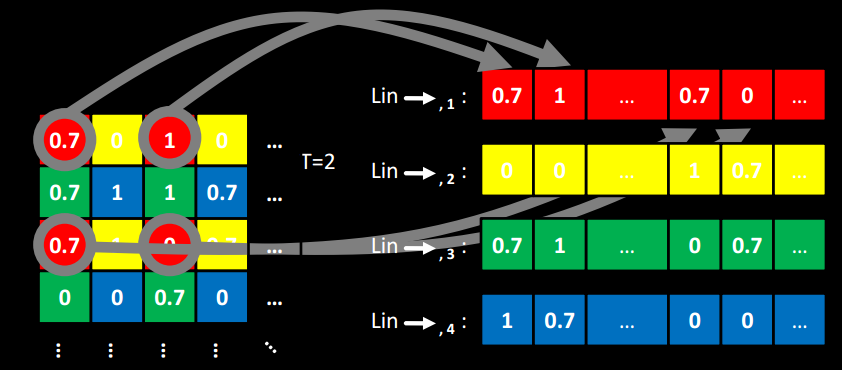
The LineMod algorithm preprocesses the response image and encodes multiple features at pixel x. The multiple features obtained through spreading are encoded as unique strings that are used during matching. The LineMod algorithm pre-creates n0 lookup tables for each discrete direction to search for matches with the binary strings. Each lookup-table index corresponds to a string, while the indexed value corresponds to the cosine value between the pixel’s location and the discrete feature direction. This completes pixel-feature processing for the test image, direction spreading, response-table construction, and linearized storage of the quantized gradient-direction values.
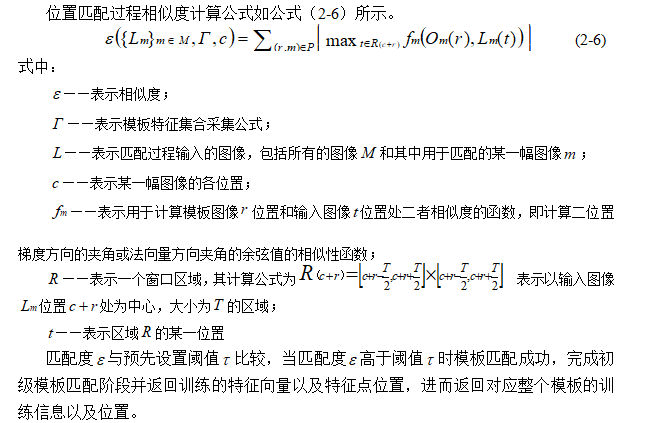
3. Calculate similarity
LineMod extracts the template feature-point information from the training stage. It slides the template horizontally and vertically over the test image and compares the differences between the gradient values of the training-template feature points and those of the corresponding pixels in the test image in the lookup table. This produces a two-dimensional similarity matrix and completes one sliding-window matching pass over the test image.
Sliding-window template matching is repeatedly performed on different pyramids of the test image to obtain different similarities (cosine values of the gradient directions). The similarities for the same template are added to obtain the overall similarity. In this way, templates at different positions, orientations, and angles produce different overall similarities for a test image, and these similarities can be used to determine whether matching succeeds.
III. Implementing the LineMod Algorithm
3.1 Set Up the Runtime Environment
System environment: ROS (this article uses Ubuntu20.04+ROS Noetic)
Hardware: 3D camera (this article uses RealSense D435i)
For RealSense installation, see the GitHub homepage
If the [camera/realsense2_camera_manager-2] process has died exit code 127 issue occurs, add LD_LIBRARY_PATH=/opt/ros/indigo/lib to .bashrc.
Here, the official RealSense example is used:
roslaunch realsense2_camera rs_rgbd.launchThe published RGBD information is:
| Information | Topic |
|---|---|
| rgb_frame_info | /camera/color/camera_info |
| rgb_image_topic | /camera/color/ |
| depth_frame_info | /camera/depth/camera_info |
| depth_image_topic | /camera/depth/image_rect_raw |
3.2 Install ORK
If ROS has been fully installed, run the following commands to install it:
export DISTRO=noetic
sudo apt-get install libopenni-dev ros-${DISTRO}-catkin ros-${DISTRO}-ecto* ros-${DISTRO}-opencv-candidate ros-${DISTRO}-moveit-msgs
sudo apt-get install ros-${DISTRO}-object-recognition-*
Enter the catkin_ws/src folder and run the following commands:
git clone https://github.com/wg-perception/object_recognition_msgs
git clone https://github.com/wg-perception/object_recognition_ros
git clone https://github.com/wg-perception/object_recognition_ros_visualization
git clone https://github.com/wg-perception/object_recognition_core
git clone https://github.com/wg-perception/linemod
git clone https://github.com/wg-perception/ork_renderer
cd ..
catkin_make3.3 Download ork_tutorials
Enter the catkin_ws/src folder and download the ork_tutorials package.
git clone https://github.com/wg-perception/ork_tutorialsEnter the ork_tutorials/data folder in the package you just downloaded and run the following command:
rosrun object_recognition_core object_add.py -n "coke " -d "A universal can of coke" --commitcd catkin_ws/src
git clone http://github.com/wg-perception/object_recognition_msgs
git clone http://github.com/wg-perception/object_recognition_ros
git clone http://github.com/wg-perception/object_recognition_ros_visualization
cd ../ && catkin_makecd catkin_ws/src
git clone http://github.com/wg-perception/object_recognition_core
git clone http://github.com/wg-perception/linemod
git clone http://github.com/wg-perception/ork_renderer
cd ../ && catkin_makeReferences Principles and Implementation of the LineMod Template Matching Algorithm (Part One: Principles and Formulas) # Principles and Implementation of the LineMod Template Matching Algorithm (Part Three: Principles and Implementation)
Comments